At the end of this article you will learn how to root Samsung Galaxy Y S5360. It was the most popular Android Smartphone under $200 when it was released. It had great hardware specifications for the price point, and was a very good performer too! But comparing to today’s Smartphones; like Samsung Galaxy S4, the performance of the Samsung Galaxy Y is too low. One of the best way to increase its performance is to root Samsung Galaxy Y and installing custom ROM in it.
So, if you have a Samsung Galaxy Y, and if you’re seeking for a tutorial to root Samsung Galaxy Y, then today here we are with a detailed tutorial on how to root the Samsung Galaxy Y and install CWM recovery.
Warnings:
There are some warning info’s that we would like you to read and understand before proceeding to root samsung galax y GT-S5360.
- Rooting your Smartphone will void the warranty of your Smartphone. Hence, once you root your galaxy y you’ll enjoy no warranty benefits on your mobile.
- Only use resources that we mention here in this article. We have provided download links for all rooting resources necessary to root Samsung Galaxy Y.
- Please read and follow the rooting tutorial carefully. A single mistake may damage your Smartphone.
- We are not responsible in case your Smartphone gets damaged or bricked.
- If you feel difficulty in understanding any of the rooting procedure, please rectify your confusions and then proceed with the rooting process.
Prerequisites to root Samsung Galaxy Y
Below are some prerequisite downloads and functions you need to do, before proceeding to root your Samsung Galaxy Y:
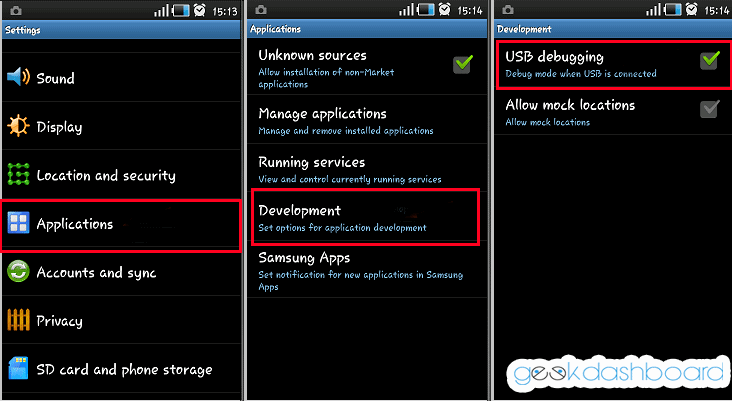
- Enable USB Debugging on your Samsung Galaxy Y. To enable USB Debugging; Go to Settings and then navigate to Applications. Here you can see Development option, Tap it and turn on the USB debugging.
- Download the root file
- Download CWM recovery for Samsung Galaxy Y.
- Make sure your Samsung Galaxy Y has at least 80% of battery backup.
How To Root Samsung Galaxy Y And Install CWM Recovery
Make sure you have gone through and followed the instructions on the above warnings and prerequisites section. If yes, below is the detailed tutorial on how to root your Samsung Galaxy Y and install CWM recovery
1. Copy and Paste both the downloaded files [root file and CWM recovery] on your external SD card.
2. Switch Off Your Samsung Galaxy Y.
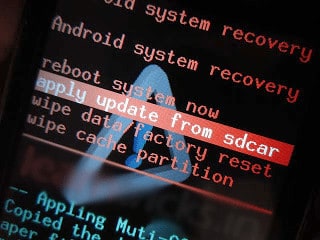
3. Boot into recovery mode by pressing Volume Down and Home key at the same time.
4. Once you have entered the recovery mode; Touch screen will loose it functionality so make use of volume keys to navigate and Home button to take the selection, Now select “Apply update from SD Card“.
5. After Selecting that option, choose the root file, that you copied in to your SD card earlier.
6. After selecting the root file, confirm by clicking “Yes“.
7. After confirming, the rooting process will begin and will take around 2-3 minutes.
8. After the rooting process gets over, select Wipe Data/Factory Reset and enable “Wipe Cache Partition”
7. Finally press ++++Go Back++++ and reboot the mobile
You have successfully learnt how to root Samsung galaxy y GT-S5360 in few easy steps.
Also Read: 5 Best Android Apps for Kids
Now lets install CWM Recovery on Galaxy Y
1. From the main menu, again choose “Install Zip From SD Card”.
2. From SD card, now choose the CWM Recovery file that you downloaded earlier.
3. Again confirm by clicking “Yes”.
4. After confirming, the device will now install the CWM Recovery. Which will take about 5 min.
After the process gets over, your Samsung Galaxy Y will automatically reboot. Congrats, you have now successfully rooted your Samsung Galaxy Y and installed CWM recovery !
Also Read: Check whether your Mobile is successfully rooted or not
This is the easiest and the most convenient method to root Samsung Galaxy Y. If you face any difficulty in the above listed process, please comment below !
There’s no download link anymore.
When i try to root,it says installation aborted
im used volume down button and home button both of pressing at a same time but i cannot anyy option y frnd say
some phone have to use volume up button and home button. try again 🙂
i dont know when i reboot phone from cwm it again comes to cwm….i have download custom rom and installed it and this started occuring
You should select “Reboot Now” option to boot manually
Error (429)
This account’s public links are generating too much traffic and have been temporarily disabled!
Pls. make mirror link :/
Error (429)
This account’s public links are generating too much traffic and have been temporarily disabled!
Pls. make mirror link :/
(Fixed) just traffic issues btw 🙂 tnx for the guide. much appreciated
unable to reboot in recovery mode
Actually its long press volume up+home+power button in order to proceed to recovery mode.
do this while cellphone is off
for your informatin ..rooting is not working
Thank you Amar for sharing the info on Galaxy Y. I will surely follow the steps.
I installed the custom ROM and it was working fine but then I tried changing the boot animation through ES File explorer and later by flashing the Zip file.My phone is now boot looping.Please help
You should unbrick your mobile by flashing it with stock ROM. Check this guide https://geekdashboard.com/how-to-unbrickflash-samsung-galaxy-y-s5360/