There are a number of settings available for various Windows systems which help the users to personalize their devices according to their will or their requirements. Some of the features are available for Windows 10 which makes the operating system ever more convenient, user-friendly and popular among the users across the globe.
Other than simply changing the wallpapers, screensavers or the like, now you can use some of the features and display settings effectively in order to make your Windows 10 computers more attractive and interesting. These better Windows 10 display settings improve the quality of the experience and ensure that the users can keep away from monotony to a maximum.
Even though a number of us have been using Windows 10 for quite some time now, we hardly know how to use and when to use some of these Windows 10 display settings effectively on our device in order to enjoy a quality experience.

Thus, some of those Windows 10 display settings, which we should be using for a better experience on Windows devices are:
1. Do Color Calibration
With the color calibration tool, adding some colors to your desktop or laptop might be a good option to keep things simple yet attractive. Color, contrast, and brightness are the 3 parameters which aid in the overall outlook of your screen.
So now the question arises as to where you will find the option of calibrating the colors, brighten up your screen or bring about a contract to the screen? The answer is simple, follow below instructions to find the best Windows 10 color calibration settings.
All you need to do is Search for Color Calibration option in the Control Panel or you can simply search for it in the Search Box at the Menu bar and Calibrate Colour Display will pop up.
As soon as you click on the option you will be directed to a wide range of display types and combinations, basically 4 combinations of brightness, color, and contrast. This helps to balance the color. You can click on each one of the combinations and change it according to your preference and get a preview of the look as well.

2. Fine Tune Text with Better Resolution
The best thing about the fine-tuning of the text feature for Windows 10 users is that they can use the text and arrange the resolution as per the perception of the viewer. There are about 5 options of resolution to choose from. The lower the resolution the more blurred the text is going to be. You can get a clear preview of the text in each of the resolutions and on the basis of that, you can decide which one suits best with your requirements.
This feature also involves the opportunity of scaling up the texts and adjusts the visibility. Increasing or decreasing the sharpness of the text is what this feature of Windows 10 is capable of providing. To know how to fine-tune text in Windows 10, Search for “ClearType Tuner” in Start Menu.

Click on Next and you will find 5 different text variants that are different in terms of style, sharpness, etc. Find the best one that suits your need and make it easy to read the text easily.

3. Use DPI Scaling on Old Apps
When you upgrade your apps to a higher quality of the display, sometimes the app looks very blurry and it becomes really difficult to use those apps. Instead of discarding the app you can simply use the DPI scaling.
Also Read: How to fix “Restoring your previous version of Windows” error after automatic updates
For this, you need to go to the Properties of your App. There you will find an option that says Compatibility click on that, followed by the tick on Override High DPI Scaling Behavior box. After this, choose the System you want to use and click on Apply and Ok to complete the task.

4. Use Night Light for Night Vision
When you use the computer or your system for a long duration of time your eyes become sore, the light of the systems seems to give you a fuzzy vision which might hinder in your work. Thus, it is advisable that you control the brightness of the screen and the screen light on the basis of the environmental availability of light.
At night use a dimmer version to gain a better experience and make sure that the eyes are fit and fine at the end of the experience. To enable this feature, follow this path:
Go to Settings > System > Display > Night light Settings. There a slider is provided to make a versatile choice between different warm colors and their shades according to requirement. You can also set the timings in which you want Night Light settings to be enabled and it will be turned off automatically.

After making these changes, a Night Light button will appear at the Action Center making it easier to choose the night light options.
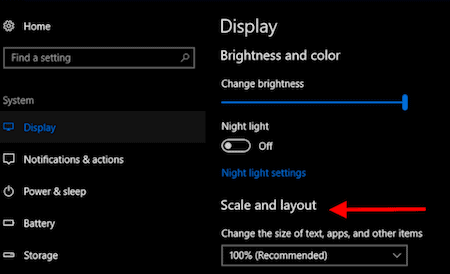
5. Text Size, Apps and Icons Sizes can be Changed
With some of the simple features of Windows 10 comes the feature of changing the Text size, app and icon size. This can be done by going to the Settings option after which the Display option needs to be selected.
Also Read: How to fix missing volume icon in Windows 10 taskbar
There you would find an option that says Scale and Layout there the text size and the size of the rest is denoted in the form of percentages. You can simply slide to change the size of icons and apps along with simple texts in order to make it more clearly visible even with a bad resolution.
6. Choose the Original Resolution
You can choose the Windows recommended resolution to be absolutely sure about the quality of the presentation you are providing. The recommended setting for resolution in Windows 10 is the best of the lot and ensures blur-free images or visuals. Thus, if you are not sure how to go about the arrangement of the resolution and the overall outlook of the Windows 10 device, it is best and safest to stick to the Windows recommended options.
Conclusion for Windows 10 display settings
These are some of the things you need to do to customize Windows 10 display settings and make it easier for your eyes. All these display settings options are available for Windows 10 but not all of us know how to use it effectively. If we understand the usefulness of these settings, then we can have an altogether elevated experience being a Windows 10 user.
I went through your posts and what I found in your posts was truly amazing and keep up the good work. you share a such of wonderful information, it’s very helpful to us.