As we all know, Android has changed the era of mobile communications (smartphones). In this article here, I would not tell you again and again on Android or any other common things. I mean, are you not bored of hearing the same story on Android? Yes, it is an Open source, has its advantages blah blah. Enough of all that. Let me not get into it again today. Coming straight into the topic, here is the complete guide on “How to manually Install Android 5.0 Lollipop on Moto G.”  Moto E, Moto G are two products of Motorola, sold in numbers that are huge in just few months. As the users of these smart phones are large in number, I had a feeling that it is essential to help them install Android 5.0 Lollipop on Moto G. If you’re one among the users of Moto G, then consider yourselves lucky. You are about to have the complete step-by-step guide to install Android 5.0 lollipop on Moto G. There is a series of process you should follow to install Android 5.0 on Moto G. The below steps will guide you in installing Android Lollipop. Make sure you do it the right way. Do not start if you’re not sure. Read the guide more than once to understand it better. This guide here has:
- Unlocking BootLoader For Moto G
- The process of Rooting your Moto G
- How to Flash Android 5.0 OTA Manually.
So, let’s get started. Follow the below process to root your device and install Android 5.0 Lollipop on Moto G. You must Unlock your BootLoader and Root your device to Flash any Stock ROM’s or Custom ROM’s. Note: Unlocking BootLoader will erase all data on your device. So better have a backup of your Android mobile.
Unlocking BootLoader for Moto G:
Unlocking the Boot Loader has been now made official. Visit the official Motorola site for more info. Now all you need to do is to follow 4 simple steps mentioned in the site. Finally you get an unlock key that is used in future steps of the installation. Below are the clear steps to be followed to install Android 5.0 on Moto G. Step 1: You will have to download and install Android-SDK to perform this operation. Step 2: Make sure that you have ADB drivers for your phone on your PC. Step 3: Switch Off your device and open it in FastBoot mode by Prss and holding Power and Volume Down button for 3 seconds and Connect your Moto G to the PC using USB cable. Make sure you enabled USB Debugging on your Moto G. Step 4: Open the directory where you have placed Android-SDK on your computer/laptop and go to SDK, then go to platform-tools and then open Command Prompt by Holding Shift and Right Click. Step 5: Type fastboot oem get_unlock_data and hit Enter. You can then see something similar to this. 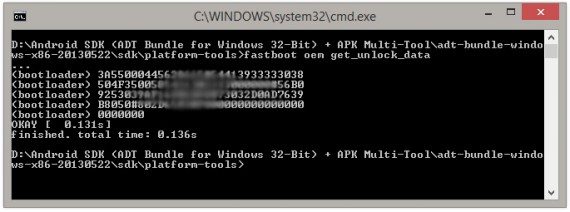 Step 6: Copy that in a text file and delete the words ‘bootloader‘. The remaining code is your unlock key. Make sure no empty spaces and new lines are present and it should looks like shown below.
Step 6: Paste that code in Motorola Unlock My Device page and click on “Can my device be unlocked?” to just notify the Moto officials. Once your get a popup with success message, scroll down a bit and click “Request Unlock Key”.
Step 7: You will get an Email to the registered email with your unique Unlock Code.
Step 8: Switch off your device and boot your device to FastBoot mode by Pres and Holding Power and Volume Down buttons for couple of seconds and again re-open the command prompt like in above steps.
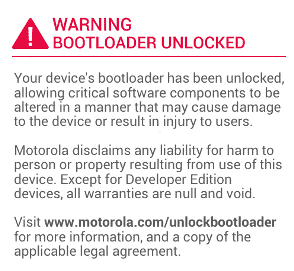
Step 9: Type fastboot oem unlock <Insert your code here without braces> in CMD and hit Enter.  Step 10: You should see a pop-up on the device giving a confirmation about the unlock process. Baaam..! Your device is now unlocked and you will get a screen as shown below.
Video Tutorial
How to Root your Moto G?
To root your Moto G, follow the steps below.
Step 1: Make sure that your device is BootLoader unlocked.
Step 2: Enable “USB Debugging” and “Unknown Sources” in Developers Options in the device settings.
Step 3: Enter into BootLoader mode by pressing Volume-Down and Power buttons simultaneously.
Step 4: Download Superboot file.
Step 5: Extract it in a folder and open command prompt there.
Step 6:
- Windows users, double click on the superboot-windows.bat file.
- MAC users, open a terminal window in the folder containing the rooting tool file and run the command chmod+x superboot-mac.sh and then type ./superboot-mac.sh
- LINUX users, open a terminal window in the folder containing the rooting tool file and run the command chmod+x superboot-linux.sh and then type ./superboot-linux.s
Step 7: When you reboot your phone, you should see “SuperUser” application in the App drawer.
How To Flash/Install ANDROID 5.0 LOLLIPOP [OTA] On Moto G Manually
Own a Moto G? Cool, then here’s is a tutorial on how to update your phone to Android Lollipop 5.0. As Google promised to give an update for Moto series, we can expect an OTA update from it. Few Globally unlocked phones got the update already but many didn’t. Here is an “How to guide” to experience Android Lollipop 5.0 on your Moto G (Falcon) without getting an official OTA update. All you need is a PC, files given in links and a little courage. Caution: Before you update to Lollipop 5.0, you need to Flash the Stock ROM (Kitkat 4.4) of GPE (Google play edition)_Brazilian version. And make sure that you have enough battery and a back-up of your data (not mandatory) before putting leg into this.
Note: The Following steps are to be applicable for only Moto G XT-1033/32.
Step 1: Make sure that yourBootLoader Unlocked. Else it is impossible to flash Lollipop stock ROM.
Step 2: Now connect your mobile to your PC in BootLoader mode using a USB cable.
Step 3: Extract the Brazilian 4.4.4 Firmware.zip you downloaded earlier.
Step 4: Now open Command prompt in that folder and run the commands in the sequence given below.
mfastboot flash partition gpt.bin

mfastboot flash motoboot motoboot.img

mfastboot flash logo logo.bin

mfastboot flash boot boot.img

mfastboot flash recovery recovery.img

mfastboot flash system system.img_sparsechunk.0

mfastboot flash system system.img_sparsechunk.1

mfastboot flash system system.img_sparsechunk.2

mfastboot flash modem NON-HLOS.bin

mfastboot erase modemst1

mfastboot erase modemst2

mfastboot flash fsg fsg.mbn

mfastboot erase cache

mfastboot erase userdata

mfastboot reboot
Now your phone will boot with Brazilian Firmware and your device is all set to install android lollipop in it.
Step 5: Copy Lollipop 5.0 For Moto G.zip to the root folder of your device. Switch off Moto G and go to Stock Recovery and “select zip from SD card” and select the “Lollipop 5.0 For Moto G” and flash it.
Step 6: This may take around 10-15 minutes. Be patient. Reboot the device and it is ready
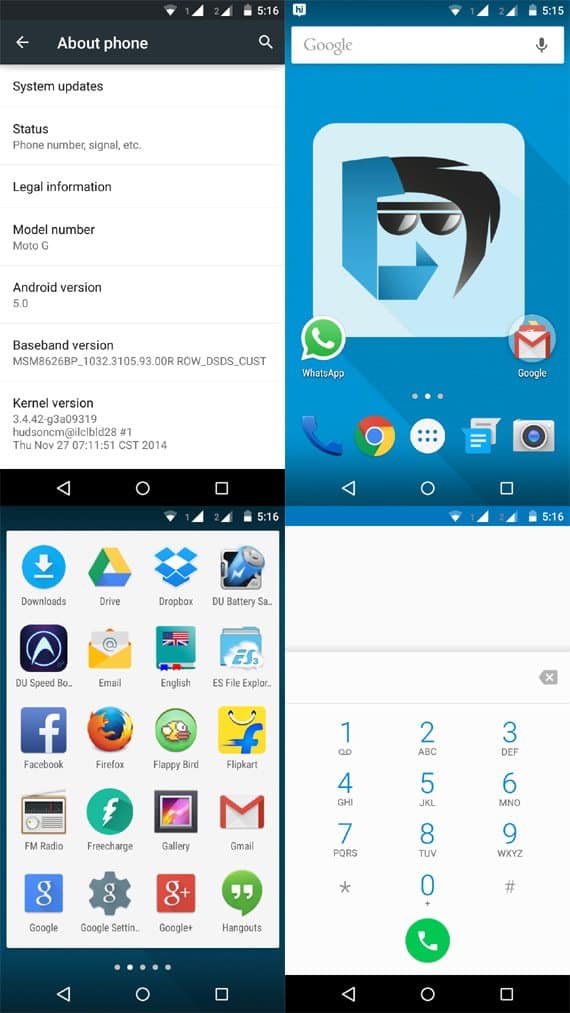
Screenshots from my mobile
Round Up
This makes your phone convert to Google play edition and cannot be degradable. You will receive further updates like GPE’s if any. Few Indian variants are facing some issues with network problems after flashing this. However it can be fixed by simply Google-ing about it. After your completed installing Android Lollipop Android 5.0 on Moto G, you should again root it. However this is optional.
this is a great tutorial very easy to follow
i have just started the process and i will give an update when im through with the entire procedure
thank you
thanks. nice tut