Being a developer and blogger, I know how important is to take website backups to avoid data loss. If you are on shared hosting, your hosting company will maintain backups internally and you can contact them straight away and they will immediately help you and restore your site with available backup.
Though this is not a perfect solution, you will have a chance to save your business and to avoid data loss. But things are not the same with cloud servers and especially with DigitalOcean.
DigitalOcean being a cloud infrastructure provider, we need to manage everything from scratch. If you’re a WordPress user and using DigitalOcean, you might have already encountered with the process of installing PHP, MySQL, Apache/Nginx while setting up your droplet. Unlike shared hosting, you will not find any options for the mail server, backups, file manager, etc. Everything should be handled manually. Since setting up the mail server is a real headache, I decided to go with G Suite and for file manager, I’m using Filezilla.
The actual problem starts with backups. When Geek Dashboard is running on shared hosting, I make use of the backup wizard in cPanel and take the regular backups which are not possible with DigitalOcean. To be on safer side I enabled backups option for my droplet which cost me extra $2/month. The downside is DigitalOcean will take a backup for every 7 days and in the worst case, I’ll lose my 7 days data. Still, it is better to lose 7 days of data instead of losing my entire site.
Everything is going normally until I see a lot of updates on Facebook where people complain about DigitalOcean’s strange behavior. For some reasons, DigitalOcean guys are taking down the production sites and locking access to droplets without any warning or notice. Support of DigitalOcean is poor as everyone knows and we need to wait for hours just to get a reply for our ticket.
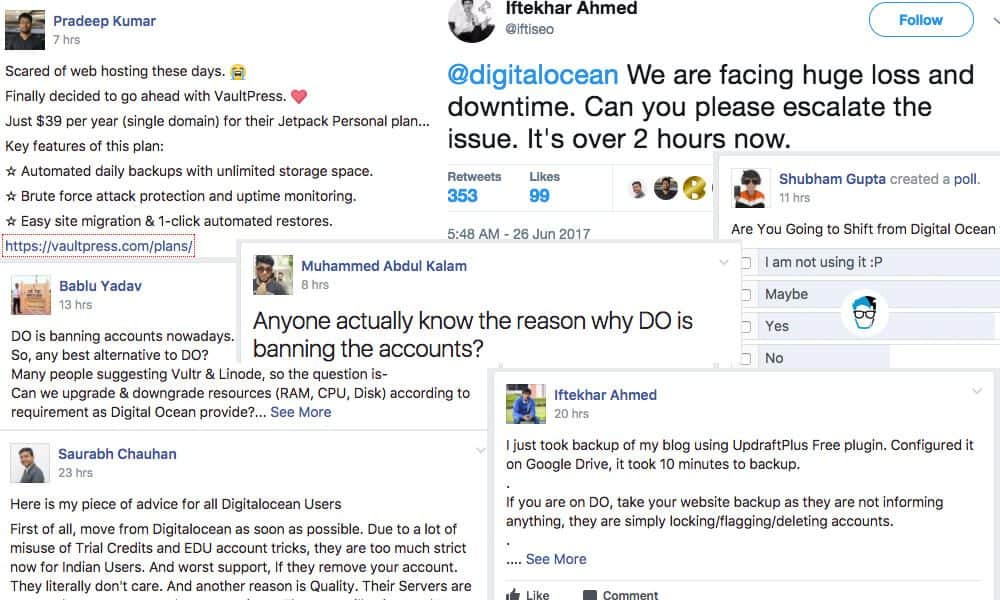
If my site is taken down and locked access to the droplet, then what is the use of backups in my droplet? What if they permanently disable the account and refuses to provide backup? Our entire business will go down in split second and irony is we’ll never know why our droplet is taken down and how our business died.
So, I decided to look for a few other backup options which will save me even in such a situation with zero or less damage. I quickly searched for WordPress backup plugins and satisfied with the features and reviews of UpdraftPlus. I installed it immediately on my live site and Bhoom!
For strange reasons, after installing UpdraftPlus, my site went down with 502 Bad Gateway and
504 Gateway Time-out errors. Later I found my CPU usage is over 100% and something wrong is happening. I logged in using FileZilla and deleted UpdraftPlus plugin and everything comes to normal again.
This time I ditched plugins for backup and decided to go with manual backups. Since I had basic knowledge of Linux commands (Thanks to my computer science degree), I created the backup of my entire site in less than 15 minutes without any plugins. All I have to do is running a few lines of Linux commands carefully.
I will show you the simplest method to manually backup database and all website files in DigitalOcean and save them locally on your machine.
Manually create files and database backup in DigitalOcean
We’ll connect to the droplet using the terminal and zip entire HTML directory and save it to the same directory. We’ll download the zip file using the browser and then delete it from the server. In the same way, we’ll dump the database as SQL file, download it from the browser and finally delete it from the server.
Here is how I manually backup my files and database in DigitalOcean and saved to local machine using Terminal.
Step 1:
Open Terminal (Mac) or Putty (Windows) and connect to your terminal by running the following command and enter the password when prompted.
ssh yourUsername@yourIPAddress
Your command will look like ssh amar@138.197.84.94
Step 2:
Navigate to /var/www/html directory using the command cd /var/www/html
Step 3:
You need to follow this step only when you’re taking backup for the first time. In this step, we’re installing a utility to zip the files. Ignore this step if zip utility is already installed and proceed to step 4.
Run the following commands to install zip utility. Press Y when prompted.
sudo apt install yum
sudo yum install zip
Step 4:
It’s time to take the actual backup by running the following command. It would take 2-10 minutes to zip your entire site depending on the size of files. Don’t panic and stay calm until it does its work
sudo zip -r /var/www/html/files-backup.zip /var/www/html/
Your backup will be saved with name files-backup.zip and you can download the backup file by opening www.domain-name.com/files-backup.zip
Step 5:
For security reasons, you should delete the zip file immediately after downloading the zip file. Run the below command to delete the backup file from the server.
sudo rm files-backup.zip
We have successfully downloaded your entire website files and saved it on the local machine. Still, we need to back up the database to complete the process.
Step 6:
We’ll back up the entire database as an SQL file which can be used to restore again if needed. To back up your database, run the below command with required changes.
sudo mysqldump -u mysql_username -p database_name > database-backup.sql
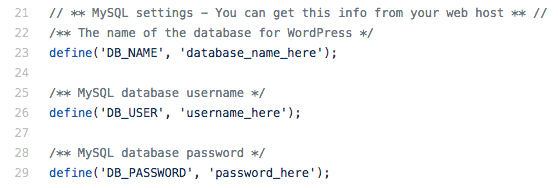
Before running this command, make sure you change mysql_username and database_name you need to back up. Along with them you also need to enter the MySQL password (if any) when prompted.
You can get all these 3 details from your wp-config.php file. To open it, run sudo nano wp-config.php command
Step 7:
Download the database backup by opening www.domain-name.com/database-backup.sql from your browser.
Step 8:
Again for security reasons, you need to delete the database-backup.sql file by running the following command
sudo rm database-backup.sql
That’s it you’re done manually taking backup of files and database from DigitaOcean droplet. Log out and close the terminal.
What’s next?
Make sure you deleted both files from the server by opening www.domain-name.com/files-backup.zip and www.domain-name.com/database-backup.sql where both URL’s will land you in 404 page.
Repeat all steps except Step 3 every day for regular backups.
You can also upload those two files to Dropbox or Google Drive for better safety.
Conclusion
Hope this guide will help you to manually backup files and database from DigitalOcean server without any plugin. If you find any problems while running above commands, drop a comment below and I’ll help you in fixing the problem.
Thanks for your article!
Maybe an addition to this would be to create a little bash script and create a Cron task to get it scheduled.
To move the needle a little bit further, automate the backup to be sent to DigitalOcean Spaces!
Keep up to good work!
Thanks for the suggestions. I’ll create the bash script and update the article when I got time.
Hello,
For Ubuntu 20.04 doesn`t work this command sudo apt install yum
Tell please How to fix this issue?
What error message are you receiving when you run
sudo apt install yumon Ubuntu 20.04?Hello,
Here is what I got: http://prntscr.com/vrhv57 – Unable to locate package yum
Hope for your help.
Thanks
Try running the command
sudo apt-get updateFor more solutions, check https://askubuntu.com/questions/378558/unable-to-locate-package-while-trying-to-install-packages-with-apt
Hello,
It seems that yum package doesn`t exist on Ubuntu 20.04
focal version
I try everything and still can`t use your manual. On previuos 18.04 everything was fine. Could you please help?
I like this manual backup approach and I am definitely using it because I am not ready to lose my data whatsoever to DO, the only caveat I have with it is: I could write a non-DOS, browser-like script to check “https://geekdashboard.com/database-backup.sql” and “https://geekdashboard.com/files-backup.zip” every now and then, and this will keep running until it catches a copy of your website—because I figure that the entire process take 10 – 15 mins which then means I have a recurring 5 min window to do file check on your website.
I wouldn’t suggest timestamp either because I could simply do a “grep” using the first 5 digits of the current timestamp; my advice would be storing the data where it won’t be accessible via the web and using “scp” to pull the data to your local system or anywhere else. What do you think?
scp root@yourwebsite.com:/var/www/database-backup080519.sql /Users/you/backups/websites/yourwebsite/
Hi Adebayo Akinlaja,
I agree, storing the backup on a publicly accessible root folder is not an ideal solution. I did this just to make things easier to novice users.
My recommended solution is storing in tmp folder and downloading them using FTP.
Thanks for sharing your experience with us. I just wanted to know how to restore this files if the my site is went down?
To restore the backup. You need to follow this sequence.
1. Import the database-backup.sql file.
2. Upload files-backup.zip file to root directory.
3. Extract the ZIP file
4. Update the wp-config.php file with your new database details.
Hi, can you please give the complete steps for restoring from putty?
Hi,
what will be the procedure to transfer whole vps server to new vps server?
could you make a image of the server into other. I want to transfer my site from digital ocean to vultr.
Kindly guide me.
thanks.
If you are good at managing servers, try this guide to clone a Linux server https://www.digitalocean.com/community/tutorial_series/how-to-migrate-to-a-new-linux-server
My suggestion is, configure the new server manually by taking the existing server as the reference. After configuring the servers, backup the files and database using our tutorial and move them to the newly configured server.
If budget is not a problem, use Vultr with Cloudways. At Cloudways you will get a user-friendly interface to manage the server.
Try Cloudways here https://www.cloudways.com/en/?id=157799 (aff. link)
Thanks for the information…
Could you please let me know that how to download files direct to local machine without making backup file on to server?
You can create the backup inside /tmp folder which is not accessible to the public. Later you can download the files using FTP clients like FileZilla.
If you don’t want to create the backup file, then you need to download entire wp-content folder without zipping/compressing it. But it would take a lot of time when compared to above method.
FileZilla is very slow when we have thousands of files to download/upload. So we are zipping it to single file to make the process faster.
The recommended way is, create the backup in the /tmp folder.
Thanks a lot for sharing. This post makes so happy and very great relief for me. My database now working properly and this fixing is really working