I were forced to enable Wi-Fi at our house to surf internet on Tablets and laptops easily without any cables. Then i immediately bought and replaced my old BSNL modem with D-Link DSL 2730U Wireless N 150 ADSL Modem Router. I went straight to service provider office to configure it but my bad i can’t get good support as it’s not a working day. I can imagine who would be my life without an Internet Connection, So i tried configuring it my self and ended with huge success.
Configuring D-Link DSL DSL 2730U N150 Wireless Router with BSNL Broadband is not a geeky task. Well, you might got a setup CD along with the box, but we’re not using the CD anymore here. You can configure D-Link DSL 2730U N150 Wireless Router with BSNL Broadband without using the CD provided by the vendor. All you need is a browser installed on your PC , whatever it may be, Either Google Chrome or Firefox etc.
Also Read: 5 Reasons to Buy Windows 7 Today
D-Link DSL 2730U Router Specifications
Let’s know about the router. I must appreciate you for selecting D-Link DSL 2730U router for your BSNL connection, since it works petty well and an awesome router at low cost.
- Supports 802.11n/g/b
- 24 MBPS downstream
- 1 MBPS upstream
- N150 Technology
- Wi-Fi On/Off button
- Reset button
- WPS button
Here is a step by step tutorial to configure D-Link DSL 2730U N150 Wireless Router with BSNL Broadband
let us configure D-Link DSL 2730U N150 Wireless Router with BSNL broadband connection. Always keep in mind, this tutorial works only on BSNL connections and it won’t work on other vendors.
Pre-requirements before entering into Tutorial
- Unbox the new modem and keep the Adapter, Telephone cables ready.
- Make sure power is supplied and modem in switched on.
- Make all necessary connections between modem, Telephone and the system. (Green light should glow over internet and LAN symbol)
D-Link DSL 2730U N150 Wireless Router Configuration
1. Open one of your browser and type in address bar and hit enter.
2. You’re now forced to enter login details of your D-Link router. Enter the details mentioned below
- User Name: admin
- Password: admin
Now all details of your modem in shown at the landing page and i will look somewhat like this as shown in the figure.

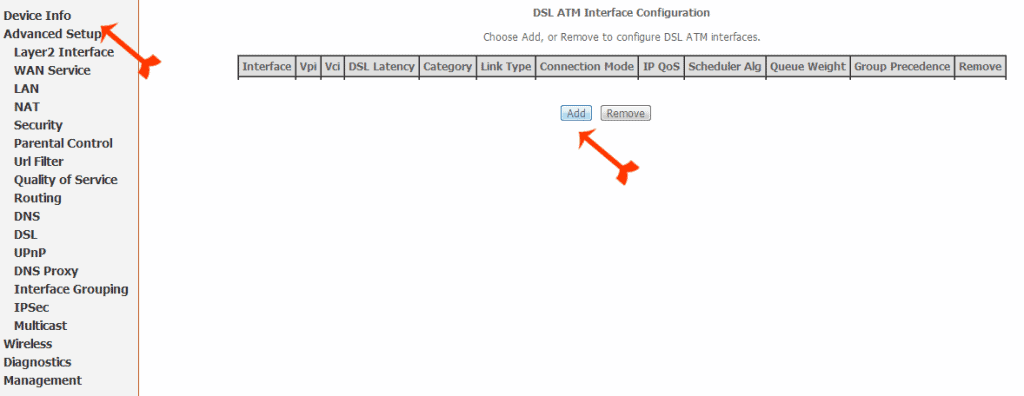
3. Click Advanced setup from left sidebar menu and hit Add and make the changes as mentioned below (Check screenshot for reference)
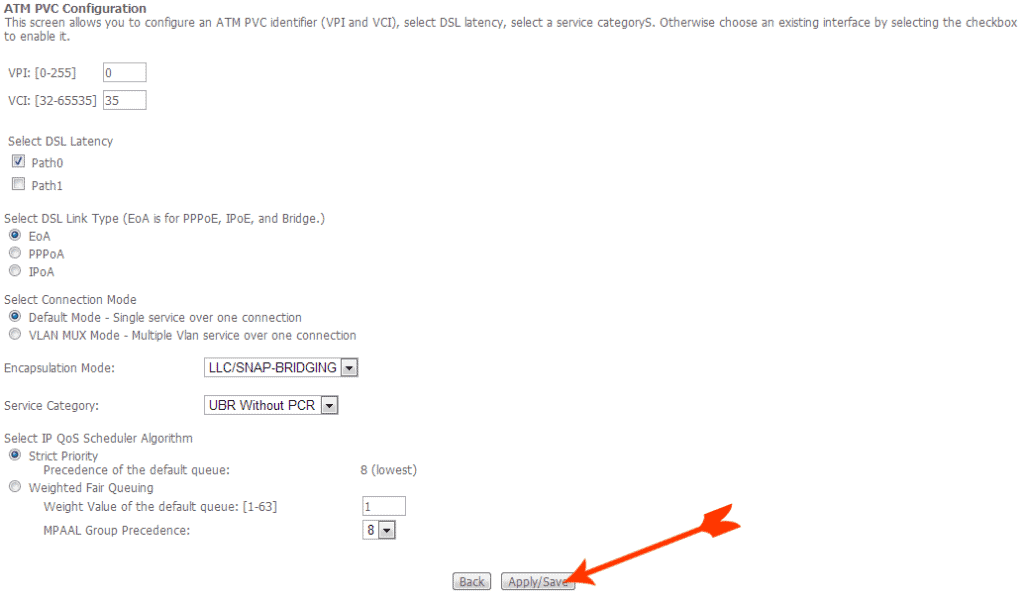
- VPI: [0-255] : 0 (zero)
- VCI: [32-65535] : 35
- Select DSL Latency: Path0
- Select DSL Link Type (EoA is for PPPoE, IPoE, and Bridge.) : EoA
- Encapsulation Mode: LLC/SNAP –BRIDGING
- Service category : UBR Without PCR
- Select the IP QoS Scheduler Algorithm : Strict Priority
Immediately after making changes as mentioned above, click Apply and change and you will see the page as shown below.

4. Click WAN Service under Advance setup and hit on Add to get a new page and blindly hit next to go for next page.
 5. Select PPP over Ethernet (PPPoE) and leave the remaining options as default. Finally hit Next

As you’re selecting PPPoE, Internet connection will establish automatically whenever both system and Modem gets powered with electricity. So, no need for any dailup modem.
6. Again make the final following changes in the opened page to establish the Internet connection.
- PPP Username: (Your Telephone username, usually you will get this username from the service provider)
- PPP Password: (Generally it will be “password” Ignore if you had changed it)
- PPPoE Service Name: (Type anything according to your convenience, In our case we used Geek Dashboard)
- Authentication Method: Auto
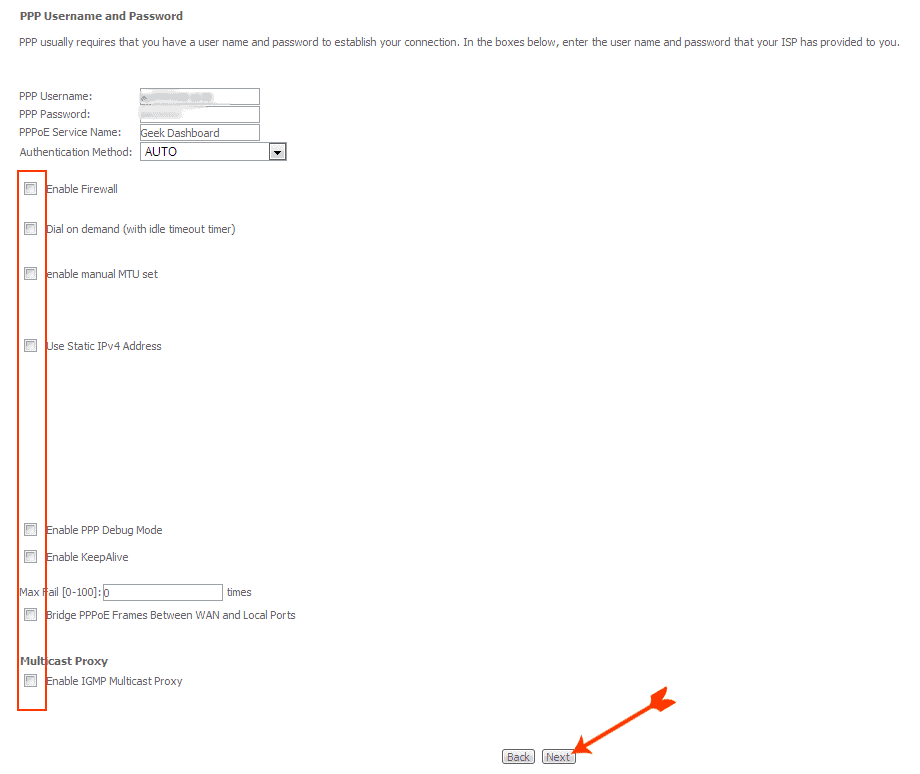
Leave the remaining settings as default and click Next to enter the next page.
7. Now check the Select DNS Server Interface from available WAN Interfaces button and hit Next.

8. Last but not least click Apply/Save button to complete the configuration. You will see a screen something like this as shown in the screenshot.

That’s it you have successfully configured D-Link DSL 2730U N150 Wireless Router with BSNL Broadband. All you need to do lastly is Rebooting the modem to apply changes. To reboot the router, Click Management from left menu and click Reboot
You’re done everything now. Enjoy Surfing Internet. Before leaving, please feel free to comment or Subscribing to feeds.
It was really helpful. I always used to suffer because of these technical issues. Really need to share this.
Gah of course the password is “admin”. I was trying every default password I could think of… never occurred to me that they would just make it the same as the username -_-
Hi, when I type in the address you gave for configuring the modem, it says the site can’t be reached. I am trying for D Link N 150 DIR 600L model. Could you please help
Admin URL may be different for some models. Check user manual provided in the box for correct URL.
Hi, impressive article! I recently bought D-Link DIR-816 Wireless AC750 Dual Band Router for BSNL broadband connection. BSNL engg told he requires a ADSL modem along with router but read online that you can configure just the router(non-adsl) for BSNL wifi connection. Is there a way? If yes pls help me with both hardware(is there a diff kind of splitter) and software config
But i get a red light after configuring the router
Thank you for describing in details …
HI
I have wifi modem but my connection airwire is given by static ip address in computer i need to add wifi router to that thanks. it is really diffecult to me help me thx.
Dear Amar, first….thanks a lot…ur blog helped me configure my D link modem. The interesting part was…only half an hour ago…bsnl rep visiting my premise had declared it impossible without a firmware update….and suggested i buy a new one from bsnl!!
Truly spking…there’s nothing better than Gyan…when u r desperately looking for one…that was what it was today…heartfelt gratitude.
Hi,
I am trying to configure a wireless router connected to a BSNL modem(without wireless). The router config is done as per the instructions given by the D-Link , but the internet connection status says disconnected.
I do have the bsnl username and password, and provided the same through. Is there something I should modify in the modem itself to send data through the router?
PS: I can connect to internet via modem, and i am using the same to type this.
Just to make sure, You are connecting a wireless modem to non-wireless modem right? You should use master/slave concept here. For more detailed information, I suggest you to follow the steps mentioned here
http://www.labnol.org/software/add-router-to-wireless-network/19716/
hello sir, how can i Configure /setup d-link -2730u wireless N 150 adsl2 +router of version IN_1.11 for bsnl broadband?
Do you have BSNL username and password with you?
I believe what you typed was very reasonable. However, what about this?
suppose you typed a catchier title? I ain’t suggesting your information is not solid.,
but suppose you added something that makes people want more?
I mean How to Configure D-Link N150 DSL Wireless Router with BSNL Broadband is a little boring.
You should peek at Yahoo’s front page and note how they
create article headlines to get people interested.
You might add a related video or a related picture or two to get people interested about what
you’ve written. In my opinion, it might bring your website a
little bit more interesting.
Thanks for the tip 🙂
Was very very very helpful thank you…
Hello sir i have broadband connection at my home but i want to install wireless router. is it possible without any change??
yeah, just configure the wireless router and configure it as shown above (Dlink router)
My Name is Livingston. My Router Firmware is 1.1.All the Settings are Different .Plz Hell me.!
Can you please send us a screenshot of the same?
I have the same modem but my admin page is different from your screenshots, is this an old firmware?
Sir
we purchased dlink n150 2730u for my two computers. one computer is running smoothly and another computer is not showing any function. why? if any setting is required you may please be advice me
Thank u
V Maharajan
Can I know which operating systems you are using
Thank You
hey i have a broadband connection of bsnl at my office. So i will install the wireless router but should i need to modify my telephone settings also ? or it should remain untouched?
Hello Sir,
I have a D-link router, when I’m configure he say please enter username and password, but I have only A class ip address, this ip address provide by bsln.
so please help step by step…..
You can get your username and password from nearby BSNL office
Hai,
I read your note thank you 1st of all but tell me one thing why not we use that cd when company is providing it? If I install this cd is it creat any problem?
2nd thing is about wan security…
mean to say under the range of my router any body can access internet in wairless ? Because u not mention any password for security.
Thanking you
Abhijit Mukherjee
Hai Abhijit
Installing that CD won’t create any problems.
and if you’re in a plan to secure your wi-fi with a password, then do this
Open 192.168.1.1
Click WireLess from the left menu and then click Security.
Enter your desired password in the field provided after “WPA/WAPI passphrase:” and hit “Apply/Save”
That’s it, one can’t access your wifi unless they know your password
hi; it’s useful.
Hi,
I am using Bsnl broadband with Dlink wifi modem, modem is recieving DSl but the Internet light is not glowing ….need help
It might be the problem with your connection. Better configure all above mentioned settings carefully once again
hi..
i bought a D-link dsl-2730u n configured it… bt cn’t acces the the internet.. i contacted the isp n they said that the configuration is ok… n that i was connected 2 thou i cudn’t access the net :/ the worst part is that i had 1hr of internet connection via my android until i disconnected :(( the cd says that the router cn’t b detected 🙁
Hello Sadique Muhamed,
I am Kumaran working as BSNL JTO in Tamilnadu.It seems to be that the problem is not with your DSL modem. DSL link should be stable before proceeding further.(The problem may be due to the faulty DSLAM server port/telephone copper line cable ( from telephone exchange to your end).Contact the nearest BSNL customer service center for further help/Visit my blogging page subtlespot.hubpages.com to get the complete procedures on rectifying your DSL broadband problems.
Using Windows 7 Professional in my PC.
Yes all the lights of the modem that should be on for indicating internet access are glowing.
Which operating system are you using currently ?
I configured as per your advice above.
I start the modem at first and after the links glow and boot my computer. Many times internet cannot be connected as multiple networks try to access the system
Are you sure, Internet light is still glowing on your modem?
hi,
i took new bsnl broadband connection and also bought a d link modem after configuration dsl indicator didn’t work. when i reported this problem they said i should replace the modem because due to distance problem the signal will not get. so they advice me to take an bsnl modem but that too didnt work pls help
This is very strange answer from ISP i have heard ever. It should work, Distance is not an issue in case of BSNL as it uses a land line telephone. Cross check that you have configured the modem properly and make sure all wires are connected and working properly and Telephone and modem are at same place.
Sir, how do I assign static IP on that modem (DSL-2730U)? For the purpose of network communication, I want a static IP; model router IP often changed itself (ISP provides DHCP IP). Please reply me; I would be very grateful to you.
Open your D-Link routers Web configuration screen and then open Setup tab.
Now. click Network Settings.
navigate and Add DHCP Reservation section, Tick Enable box and add your device’s name.
Now add device’s IP Address and MAC Address as well.
IP Address you entered should be within your’s router DHCP UP Address Range.
and ultimately Click Save.
it’s not work out at D-Link 2730 U Router, it still showing the red color ! what to do?
Red Color indicates, either there is a problem in your settings or in your landline wiring. Better contact your ISP
Sir
I am having same model and i configured modem in the same way
it works well for 20-30 minutes and then internet stops working . Then it does not work by any methods.
I can use only next day. On same day it does not connect after first use though DSL is ok
Strange problem! have you configured your modem properly? Follow our steps exactly and perform any additional steps. Before proceeding, reset your modem.
If problem exits, login in to your modem and under management menu, select reboot. Hope it works well.
thnk u buddy …
Hi ,
is it possible to connect the Dlink Model Number :DSL-2730 U for a lan cable with static IP ,
If Yes how .
I Tried many sites they are not helpful.
Have you configured your modem manually ?
Hey, I used the method for configuring my D link 2750
And it worked!
Yay!
Thankyou
#BSNL Broadband
i dont have option wireless.
thanks
Can i know the model number of your modem ?
Hi,
I used this wi-fi config for my D-Link box with my bsnl broadband. It worked fine. Thanks mate!
I tried it a 100 no. of times and in vain..
the world map led icon remaining in red always 🙁
pls help me..
Can i know your Operating system? Windows XP or Windows 7 or Windows 8 or Linux or any other ?
its windows 7 64 bit
It was working fine til i inserted the cd given in the pack and tried to configure.
I dont know why the hell I inserted the cd!!! 🙁
Can u see any new program installed in “Add or remove programs” ? (Control Panel)
Hi Amar,
Great Post. What a coincidence I am also using this model and also faced a lot of problems to configure it,Hope it is useful to all