Time Machine backups are a powerful and useful feature every Apple users prefer to secure their personal and professional data. Being a developer, I regularly commit my code to BitBucket for backups and to safeguard personal files and memories; I use Time Machine backup every week. I will connect my 1 TB WD passport external hard drive to Mac, and it creates the latest backup every time. Everything looks good from the outside, but the real problem starts when you want to access Time Machine backups on Windows PC or laptop. Recently my MacBook Pro denied to power on even after PRAM, NVRAM, and SMC reset, and I switched to a Windows laptop till it gets repaired.
When I tried to connect my external hard drive, Windows failed to detect it since Mac formats the hard drive in HFS+ format while creating the first Time Machine backup. Unfortunately, Windows only supports NTFS and FAT32 file systems, and it can not detect Mac formatted hard disks and disk images. The one way to connect your Time Machine backup drive to Windows is by formatting it in any of the Windows supported file system. But formatting will delete all Time Machine backups permanently, and we don’t want to do this.
The other way to restore Time Machine backups on Windows is using any third party tools which can read HFS, HFS+, and HFSX file systems. Luckily there are few such tools available in the market while some of them come with a price tag. Windows and OS X are two different platforms, technically we can only view all the Time Machine backups and its files using these tools, but we can not restore settings or applications. However, you can export all your files from Time Machine backups to Windows manually with the software programs which can read drives formatted in HFS+ files system.
Also Read: How to Fix Keyboard Typing Wrong Characters in Windows 10
Copying Time Machine Backups to Windows
HFS Explorer from Cotacombae (Open Souce. Find the source code here) and HFS+ for Windows by Paragon are two popular softwares for Windows to read HFS, HFS+ and HFSX files systems. The former is a free tool with basic user interface but requires Java whereas the latter is a more advanced HFS+ reader with the rich interface but comes with a price tag. However, HFS+ for Windows offers a 7-day free trial which is quite enough to test and understand the software. Both tools have its pros and cons – you need to pick one of your choices.
If you want to restore Time Machines backups to Windows frequently and don’t want to install Java on your device, then HFS+ for Windows is the best option for you. But paying for something which comes for free doesn’t make sense. So, we’ll go with the free solution using HFS Explorer with the only downside of installing Java.
This solution to view Time Machine backups on Windows works on all popular versions including Windows 10, Windows 8, Windows 7 and even on Windows XP.
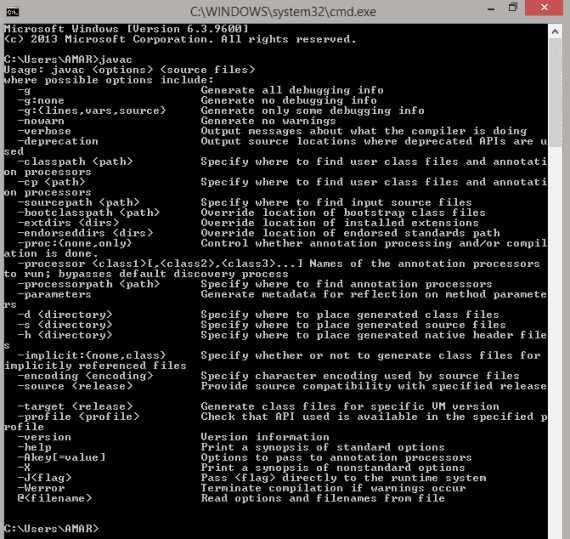
1. Download Java and set the PATH variable
To use HFS Explorer, you must first download Java and install it on your device. After installing JAVA, you also need to set the Java path properly to let your Windows know where Java is currently installed. To set the path, you need to open Environment Variables under the Advanced Settings of My Computer and create a path variable under User variables.
Read this article to know how to set the Java path.
To confirm whether you have installed and configured Java correctly, type javac in command prompt, and it prints the output as shown in below image.
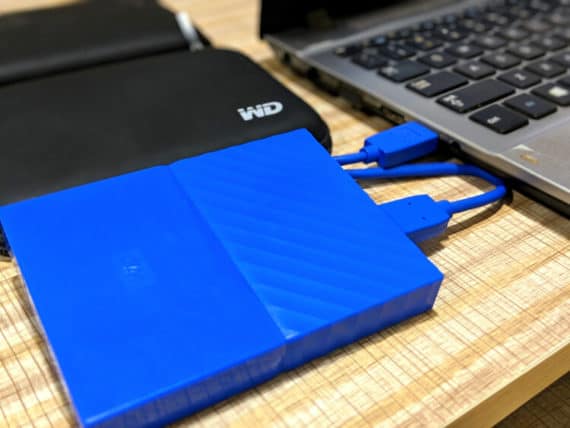
2. Connect Hard Drive to Your Windows PC/Laptop
The first step to access Time Machine backup files on Windows is connecting your Mac formatted hard drive to your Windows machine using the USB cable. You might need to use adapters in case your hard drives come with a Thunderbolt cable, which is very rear.
As we already know, Windows will fail to recognise the hard drive as it is an HFS+ formatted device. If you don’t know, your Mac can read file systems of Windows (NTFS/FAT32), but your Windows machine cannot read the file systems of OS X (HFS/HFS+HFSX).


3. Install HFS Explorer
After installing and configuring Java successfully, you need to download and install HFS Explorer to view Time Machine backups on Windows. After installing HFS Explorer, you might see a dialog box on your screen asking you to format the connected external hard drive. You should cancel it carefully and never format the device.
Being said that, open HFS Explorer (as Administrator) by double-clicking the shortcut icon on Desktop. After opening it, select File menu and choose “Load file system from drive“. HFS Explorer is smart enough to detect your connected external drive which is in HFS+ format automatically. If it fails to pick the device, you have to manually choose it from the “Detected Devices” drop-down box.
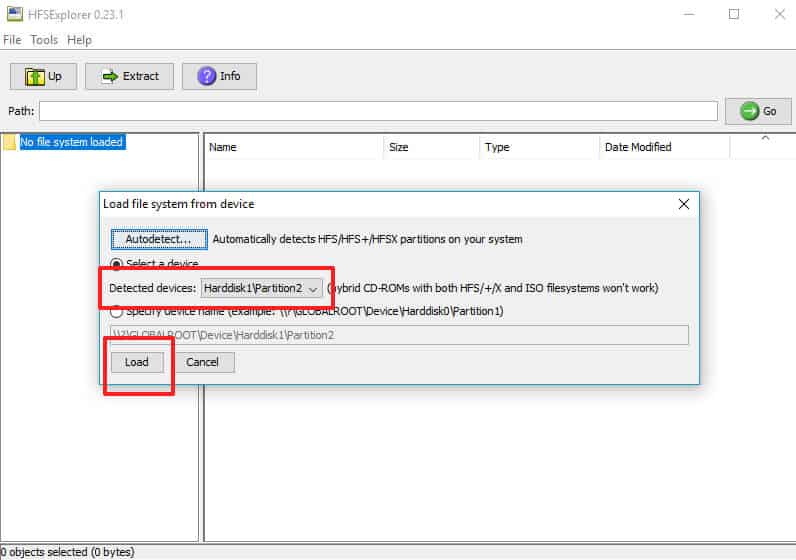
Once you choose the correct drive, click Load and it will list all the file contents of a hard drive containing Time Machine backups.
4. Restore Time Machine Backup Files to Windows
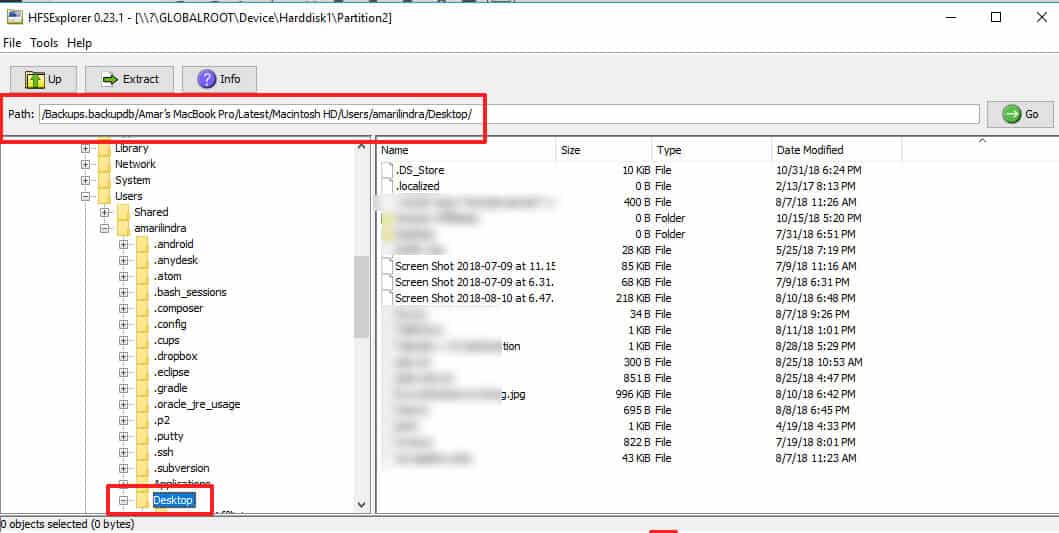
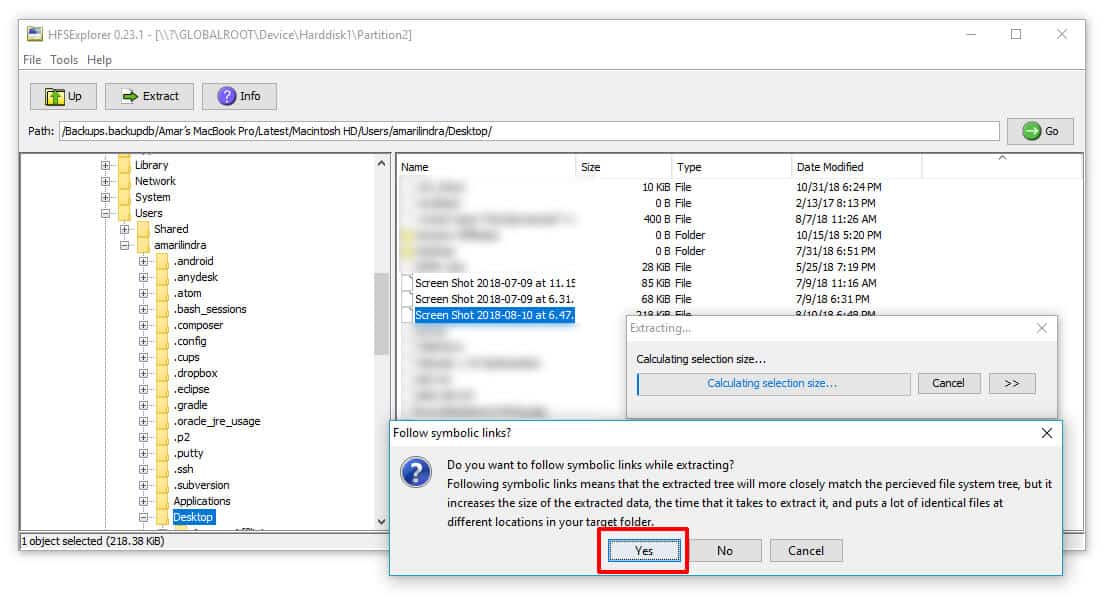
You need to first understand the file hierarchy of Time Machine backup files to navigate through the desired folder. After listing the files of the hard drive, you will find a folder named “Backups.backupdb” in the root folder.
Inside Backups.backupdb folder, you will see another folder with the name of your MacBook. In my case, it is “Amar’s MacBook Pro”. Open it to see all your recent Time Machine Backups created at different dates. The recent Time Machine backup will be named as “Latest“. However, you can also choose older backups if you wanted to see the older files.
To view your files, open the folder named Latest and navigate to Macintosh HD – Users and open amarilindra (your username) folder. Here is where you can see all your Downloads, Desktop files, Music, Pictures, Documents and more.
To restore entire Time Machine backup to your Windows, navigate to the backup folder and click on the Export button. Choose the destination folder in your Windows device and HFS Explorer will export and copy Time Machine backup to Windows automatically.
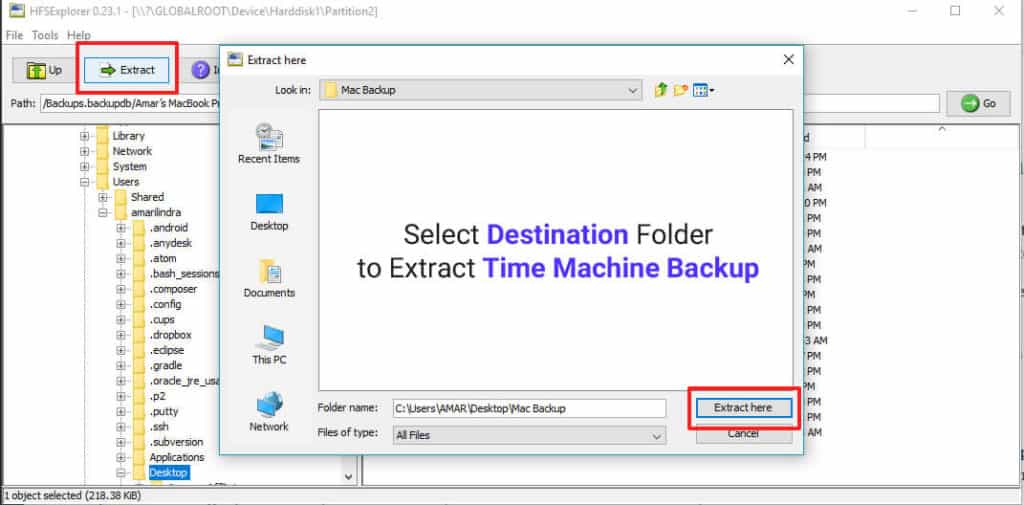
If you want to export only a few folders or files from Time Machine backup, navigate to the required folder and choose the file(s) and hit the Export button. You selected files and folders might have symbolic links, and HFS Explorer follows the same. Don’t worry, allow HFS Explorer to follow symbolic links and it will take care of copying Time Machine files to Windows. You might see the duplicate files being copied due to symbolic links and you have to delete them later manually.
Use Mac Formatted HFS+ Files System External Drives on Windows
This is how you can copy Time Machine backups to Windows PC or laptop without formatting or any data loss. The drawback of this method is, you have to install Java on your device. If for some reasons HFS Explorer didn’t work on your device or if you don’t like installing Java, then HFS+ for Windows by Paragon will be the best choice for you.
Usually, OS X uses the FAT32 file system for regular usage devices like pen drives, memory cards etc. which is supported by Windows but in some individual cases like Time Machine backups it uses HFS+ file system. This is when you need Windows tools which can open HFS+ file systems. Though you can connect, access, view, and export Time Machine backups to Windows using HFS Explorer, you can not still edit and write the files. You have just read-only access.
Another workaround to access Time Machine backup files in Windows is by connecting your hard drive to other MacBook or iMac and copying the data to a portable device with the FAT32 file system which is accessible in Windows. But this is not preferable for everyday tasks as it kills a lot of your time. So the ideal solution to view Time Machine backups on Windows is either using HFS Explorer along with Java runtime or buying HFS+ for Windows by Paragon. If you choose the free solution and install Java on your machine, then you must also consider disabling Java on web browsers for various security benefits.
Thank you! This was very helpful and easy to follow 🙂
Hi,
Does it support encrypted Time Machine backup ?
Never tried it. Please update me if you tried it yourself.
Thank you for this article! It allowed me to rescue years worth of photos that I thought were gone forever.
Hello Amar. Well written article.
I tried the HFS+ for Windows by Paragon. Twice. Free trial but it did not allow me to see my Time Machine FILES on my external drive. Showed directories but when I try to open one, it asked me which app I wanted to use. I’m viewing them in my regular old File Explorer. There is no option for extract. And it clearly says in the FAQ it will NOT work with TM.
“Can I open my Time Machine backup using HFS+ for Windows?
No, Time Machine volumes are not supported. They can be opened only using the corresponding application on macOS.”
So that’s out.
And I’m afraid to use HFS Explorer as it looks VERY sketchy. The only info I can find regarding it is your page and one other similar write-up. So not good.
My 2009 iMac power supply gave out and I want to transfer my personal files from my TM external drive to my Windows 10 PC. Why isn’t this simple?
I did find this which says plug the external drive into another mac and them pull them off with a flash drive. I guess that makes sense. Now I have to find another mac. None available without intruding on someone. And my drive has a USB port.
https://discussions.apple.com/thread/6748802
Your thoughts? Thanks!
If you are not comfortable using HFS Explorer, the best option is restoring the backup in another Mac. From there, you can copy the data easily.
Same here. My virus software went crazy with HFS explorer, and the time machine structure is there, but the files are not readable with HFS+. Your and the copied article both say the same, too bad this article seems written for SEO and not real useability. Did you actually try it yourself? Doesn’t look that way.
Dear Dr Walker,
I have personally tried HFS Explorer in 2018 while writing this tutorial. The screenshots in the article prove it. However, I can see the software is recently updated in Feb 2021 (which is after writing this article). You can find it from changelogs here http://www.catacombae.org/hfsexplorer/changelog.txt
I’ll re-download the latest version and see how it goes. I’ll keep you updated.
Can you please let us know the Antivirus you are using?
Btw, do you install Java on your Windows machine before using HFS Explorer?
I am having the same problem right now. Downloaded free trial for HFS+ for windows thinking all my problems were sorted, since many websites mention them when talking about how to recover time machine back up on windows. Was very disapointed and thinking i was doing something wrong, even after reading on their product page that it wont support time machine back up, i still had hope because so many websites/blogs/foruns mention it as a solution. Guess now after reading you had same problem i will finally give up and also try to find someone with a mac for me to recover as i am not confortable with installing java on my computer, specially because i am new to windows…This is so frustrating