Even though WhatsApp and Telegram are currently one of the most popular messaging applications, Apple iMessage is still my go-to messaging service for a variety of reasons. Well, for starters, iMessage works exceptionally well across multiple Apple products, offering a seamless experience.
The other good things about the app are its small but nifty features, such as the ability to link popular external links without leaving the app itself.
I recently started using the Windows PC besides my MacBook for my workflow. Sadly, there is no iMessage support for Windows, which is a bummer for me.
So I decided to look for some workaround to get the iMessage work on my Windows PC. After spending a couple of hours, I have found two different ways to use iMessage on Windows machine. If this sounds interesting to you, then you should read further in this article.
2 Ways to Use Apple iMessage on Windows Desktop or Laptop
As mentioned earlier, there are two different approaches use iMessage on Windows, and both have various benefits. You may want to check out both of them and choose the better one according to your convenience.
It is worth mentioning that there is no stand-alone application from the company for non-Apple products. This means that you still need a working Apple product with iMessage (iPhone or Mac) for both of the tricks to work.
With that cleared out of the way, let’s get right into the first method.
Method 1: Use iMessage on Windows with Chrome Remote Desktop (No Jailbreak Required)
Well, the heading of this trick says it all – Here is how you will use Chrome Remote Desktop app to mirror and use iMessage on Windows PC:
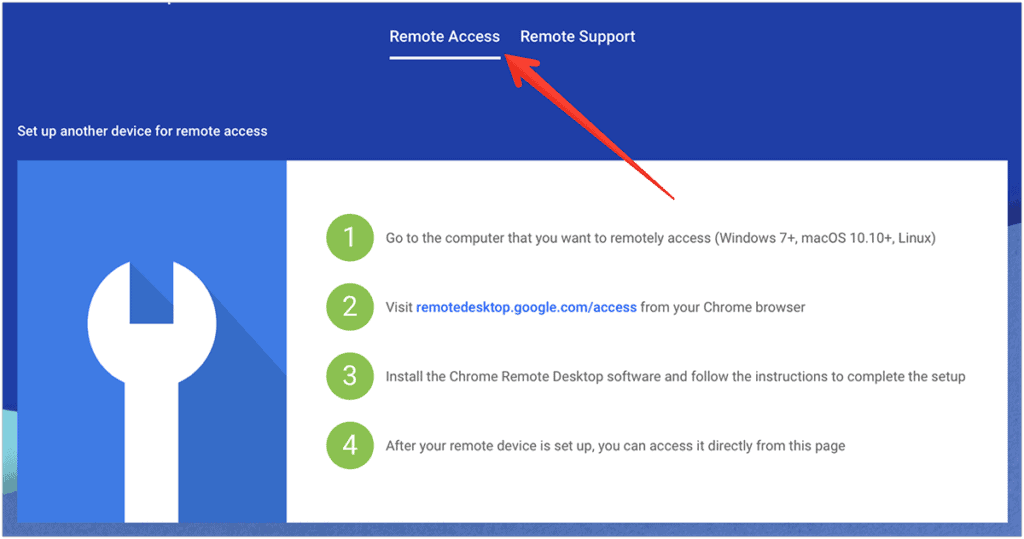
- Open up your Mac and install the Chrome browser if you haven’t already. Once it is installed, open remotedesktop.google.com to access the Chrome Remote Desktop app.
Chrome Remote Desktop service has now shifted from the extension to a dedicated web app that you can access from the above link.
- Once you’re inside the website, you will see two options Remote Access and Remote Support. You have to select the Remote Access option.
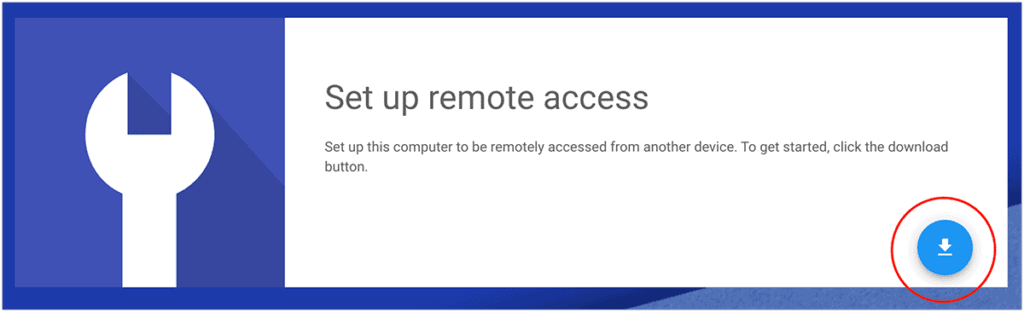
- You need to now set up your Mac to make it ready for remote access and to use iMessage on Windows. To do that, tap on the Download button. This will download the Chrome Remote Desktop host server on your Mac.
 Chrome may ask you to install Chrome Remote Desktop browser extension for more shortcuts. But installing the extension is optional.
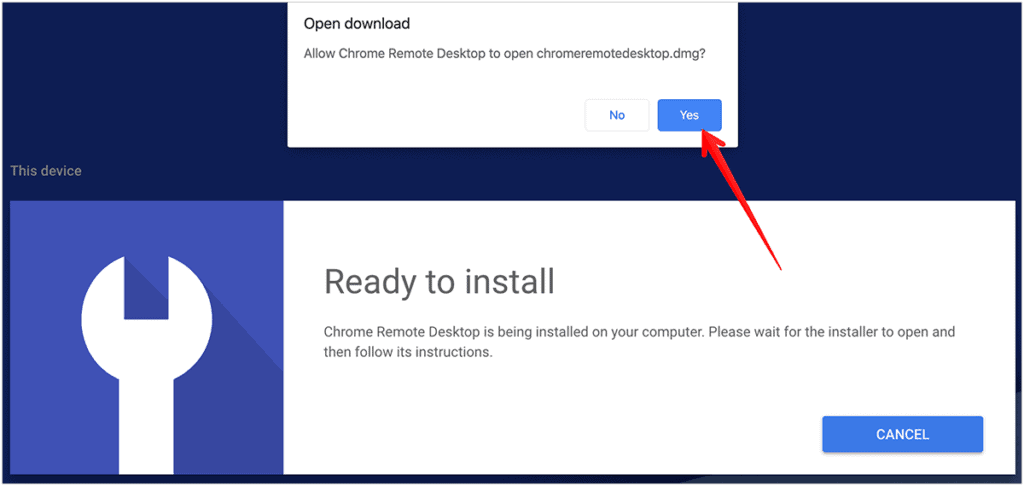
- After downloading the file, open “chromeremotedesktop.app” and complete the installation setup.
During the installation of the app, you will probably be asked a few times to enter your Mac’s admin credentials. - You will be asked to name your computer and set a pin with at least 6 numbers. This pin will be required to create a connection between Mac and Windows.

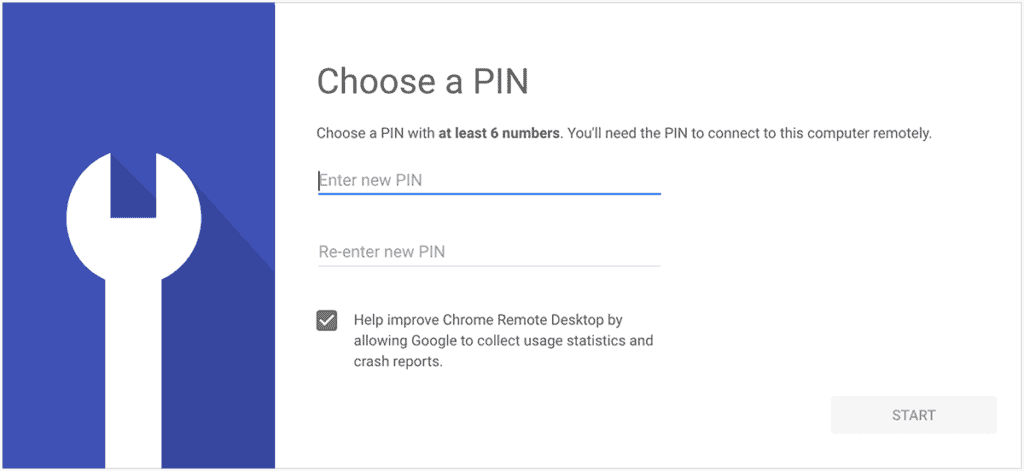
- After setting the pin code, you will be able to see your Mac under the This Device section inside the Remote Access.

- After installing the host server, you will be able to generate access code on the Chrome Remote Desktop website under the Remote Support tab.
- To do that, head over to Remote Support and click the Generate Code button inside the Get Support. This will generate a 12 digit access code that will get expire in 5 minutes.

- Now, let’s move to your Windows PC and open the Chrome browser. Make sure you’re using the same Google Account on both the devices.

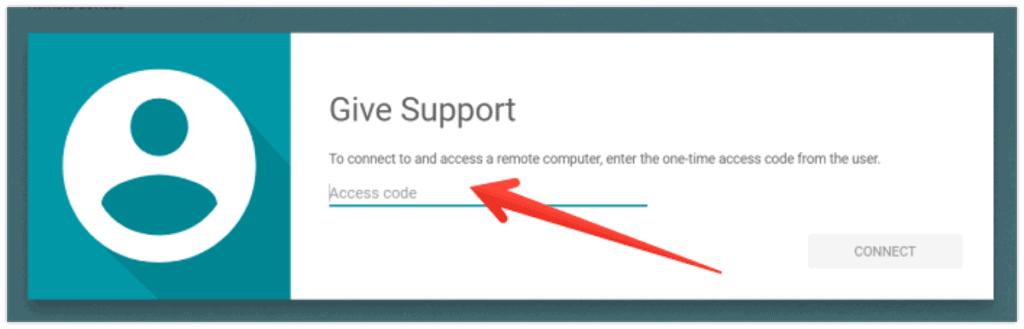
Starting Remote Access Set up on Windows - Instead of Remote Access, this time you have to click on the Remote Support option in your Windows device. You will find a section that reads Give Support.
- You have to enter the access code generated from Mac earlier at the “Give Support” section. Once done, this will send a request to Mac for the remote connection. You will be asked to enter the pin code to authenticate.
- After entering the valid pin code, both the devices will remotely connect. You can now control your Mac from the Windows PC.
- Now, all you need to Launchpad on your remote connected Mac screen and fire up that Messages app.
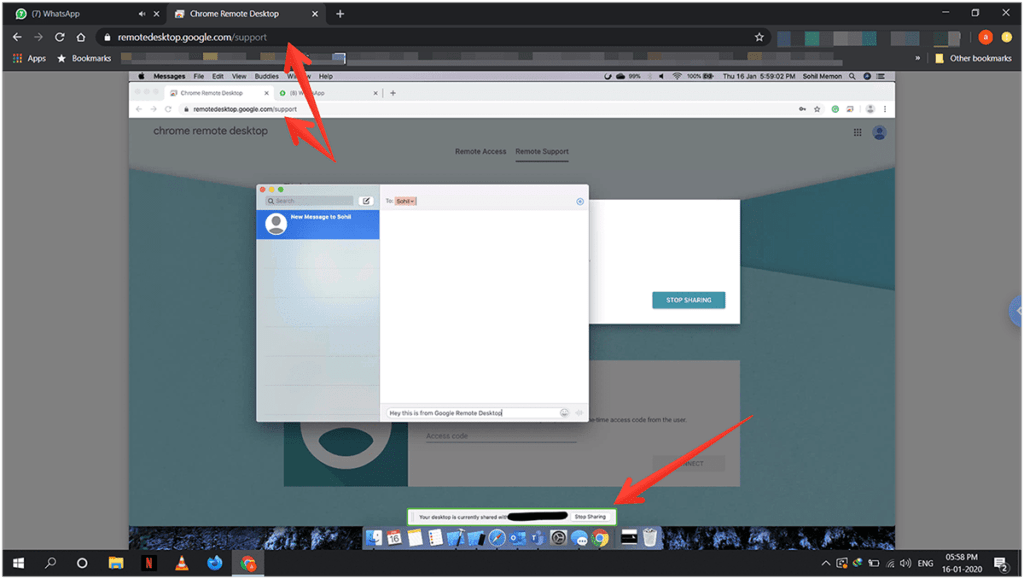
You can now access the iMessage on your Windows PC by simply going to the app drawer. You can view and send iMessages from Windows via Chrome Remote Desktop app on Mac. As mentioned earlier, this is the non-jailbreak version of the workaround. Sadly, this method will only work for those who have a Mac with them.
Method 2: Get iMessage on Windows using Cydia iOS App (Jailbreak Required)
Coming to the second method, you will need a jailbroken iOS device to use iMessage on Windows. This method is basically for those who don’t have access to the MacBook and still want to get iMessage on their Windows platform. For those who’re unaware, jailbreaking is pretty much similar to the rooting an Android smartphone.
Talking about the Cydia, it’s an application that we will use to create communication between the iOS and Windows platforms. With that said, follow the below steps to get iMessage on Windows.
- Download and install the Cydia app from this link.
- After installing Cydia on your iPhone, open it up and tap on the Sources tab located at the bottom menu.
- Now, tap on the Edit button on the top right corner. Now, hit Add button on the top left corner and enter the source URL as http://repo.hackyouriphone.org
- Once it is added to the list, search Remote Messages repo using the search option. From the search results, select the Remote Messages repo depending on your iOS version.
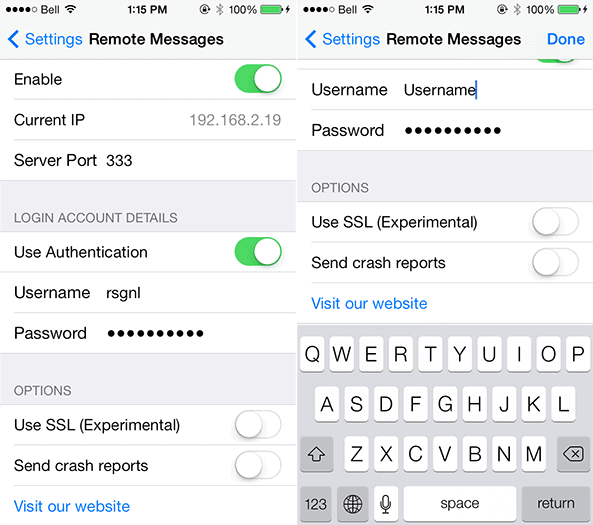
- Now, head over to iPhone Settings and scroll down until you find the Remote Messages option.
- Tap on it to access the app settings and now enable it to fire up the Remote Messages app.
- Once you do that, you will be able to see the Current IP and Port number. We will be using them to make a connection link between the iPhone and Windows machines. If you wish, you can also enable the user authentication to make the connection more secure by adding up a username and password.
- Now, head over to the Windows PC and open your favorite web browser. Type the current IP and port number separated with a colon (:) in the address bar and hit Enter to open the URL.
If your current IP is 193.134.245.273 and the port number is 73, then your URL will be
193.134.245.273:73Also, make sure both your iPhone and Windows devices are connected to the same WiFi network.
- You may be asked for a username and password if you have enabled the user authentication as mentioned in Step 7.
- After entering the necessary information, a connection will initiate between your Windows PC and iPhone.
You can now access all your iMessages on your Windows PC with the help of Cydia and its Remote Messaging repo.
Also Read: How to View Saved WiFi Passwords in iPhone
Conclusion
We have shown you two different workarounds to use iMessage app on your Windows PC. Before trying the second method, we recommend you to learn more about the jailbreak process and its pros and cons before proceeding further.
If you’re facing any issue while following this guide to get iMessage on Windows computer, you can let us know in the comment section below. We’ll be happy to help.