Android is truly an awe-inspiring Operating System. So why do you think the developers made it open source? It was for as users could tweak settings and do incredible customization’s on their tablets and phones. The part of customization we see when our phones open-Boot animation. Today, in this article I’m cover few tips on tweaking and make it to your liking. Hey, what are you waiting for? Just wheel over.

Introduction
The boot animation is the first thing that you see when switching on your device, after the manufacturer logo. Though its doesn’t have any purpose or we can say its useless but, an jaw-dropping boot animation can undeniably make your device quirky from others while booting.
HOW TO CREATE BOOT ANIMATIONS
So you want to unleash the Picasso inside you at work and create your personal boot animation? It’s so easy that even a kid can handle, and we are going to explain you how.
What you need:
- A compression application like 7-Zip/WinZip
- Image editor of your liking like PhotoShop, GIMP even the basic MS Paint will do.
- A text editor of your choice. I recommended software like Notepad++ instead of Notepad.
- As much time and creativity and will as you are willing to put into the task.
- You must know the screen resolution of your device if you don’t know it already. You can find the resolution by googling (searching for “[your device model name] screen size) it.
How to Change Boot Animation
- FIRST, learn what’s inside the entire Inside the
bootanimation.zipFile if you haven’t already done so. - Decide how your boot animation will play. How many different components or in simple words parts it will have, what will be the duration of each part and what will be the sequence of those parts.
- Create a new folder at any suitable place on your computer/laptop, and name it bootanimation.
- In this folder, create new folders for each component of your boot animation, named part0, part1 and continued.
- Edit images to make all the image files for each part of your boot animation with the proper dimensions/sizes equal to your device’s resolution, and save them in the respective folder for every part, in PNG format.
- Ensure the images are named in numerical format and in proper concatenation, that means, the images in the first part should start with, for example 00000.png and go on till 00065.png, and the images in the second part should then start with 00066.png and go on to – for just an example – 00123.png.
- Once you have the images for all the parts done and saved with proper names in each folder, make a text file named
desc.txtin the main bootanimation folder. - Open the text file in a text editor and edit it in the format. Note that a frame rate larger than 30 frames per minute can give problems on many devices.
470 420 24p 1 0 part0p 0 10 part1Where 470 = Width | 420 = Height | 24 = No.of Frames per second | Part0, Part1 are folder names - Select all the things of bootanimation folder and put them into a new uncompressed archive(zip) using any compression application.
Here is the walkthrough using 7-zip:
- Select everything inside the bootanimation folder.
- Right-click on any of the selected files/folders an.d from the 7-zip menu, select ‘Add to archive’.
- Use ‘zip’ as the archive format and ‘Store’ as the compression level, and click OK. This creates a file called bootanimation.zip in that identical folder.
That’s it – you have created your very awesome(maybe) Android boot animation! The only thing remaining is loading onto your device. Hey, let’s proceed.
HOW TO CHANGE THE BOOT ANIMATIONS?
Also Read: Advantages and Disadvantages of Android Rooting
Step 1:
You’ll need a proper root browser. Root Explorer is a good selection, but you can use ES File Explorer with ‘Root Explorer’ turned on.
Root Explorer | Root Explorer (Play Store)
Step 2:
Got installed, go to the root folder and navigate through system > media. Once there, locate your current bootanimation.zip file.
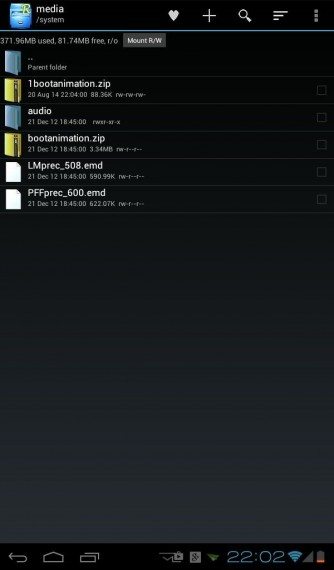
Step 3:
Long-press your current bootanimation.zip file, and click copy, as to keep your boot animation safe and sound by keeping a backup. Install it wherever appropriate/convenient for you.
Step 4:
We’re assuming that you already have a bootanimation.zip file that you want to change your current animation with. Load it onto your phone ( locate it, and again long-press it. Click move…)
Step 5:
Once your new bootanimation.zip has been selected for moving, navigate back to system > media and paste it there. You will have to overwrite your current animation zip, but that’s okay as you have a backup or you may change the name of old bootanimation.zip as something like bootanimation_old.zip.
Voila! You have successfully changed the boot animation. Now its time for learning how to change GIFS into bootable boot animations. Lets proceed.
How to Convert GIF to Boot Animation
There are many GIF animations around the internet you like to set as your Android booting screen, but unfortunately, you don’t know how to do that. In this section you’ll be able to set GIFS as your boot animations; very easily.
Step 1:
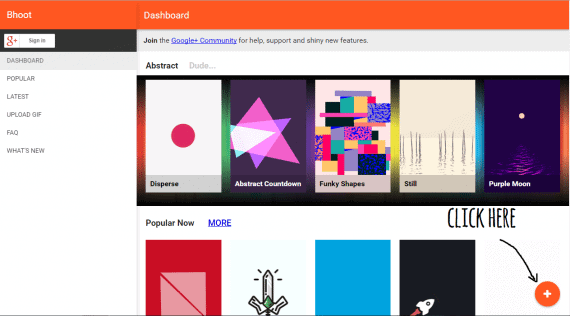
Go to this bhoot.co.uk
Step 2:
Click on the ‘+’ sign near the bottom right of your screen with caption ‘Upload GIF’
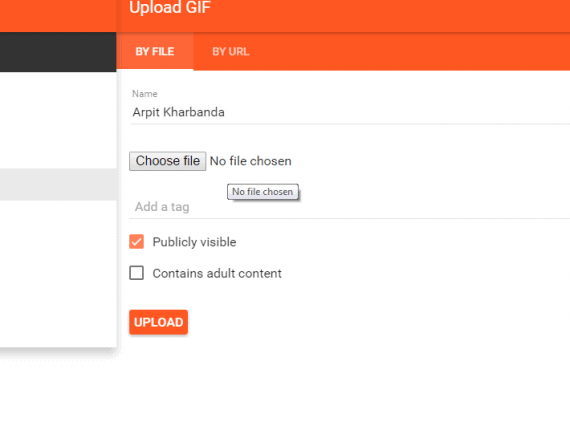
Fill in the name of your Boot Animation.
Step 4:
Click on choose file and upload the .GIF file from your computer or you might upload it by providing the URL of the GIF file.
Step 5:
You can add few tags to describe the boot animation.
Step 6:
There are few checkboxs, which you can tick to your liking.(If you want to display it publicly check the first one, and if it has NSFW media check the next box too.)
Step 7:
Ready! Now press the button upload.
Step 8:
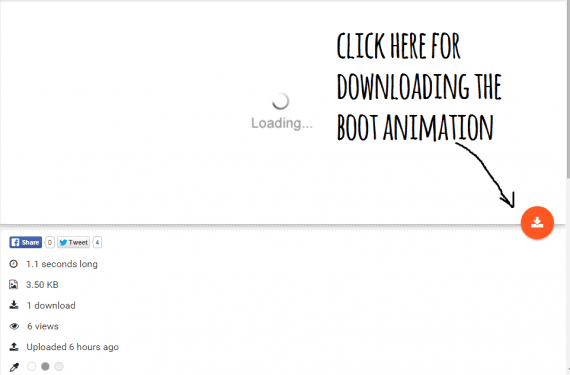
Now click the download icon just right on your screen.
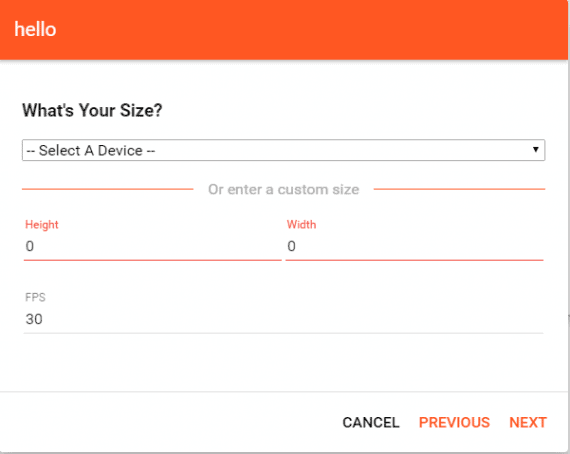
Step 9:
Click next and find out your device from the drop-down list or specify its height and width. Also, you can change the FPS (Frames Per Second) for the animation to be played.
Step 10:
Then select the scale type convenient for you and click next.
Step 11:
Now verify the overview and if something you want to change, click on previous button and edit it.
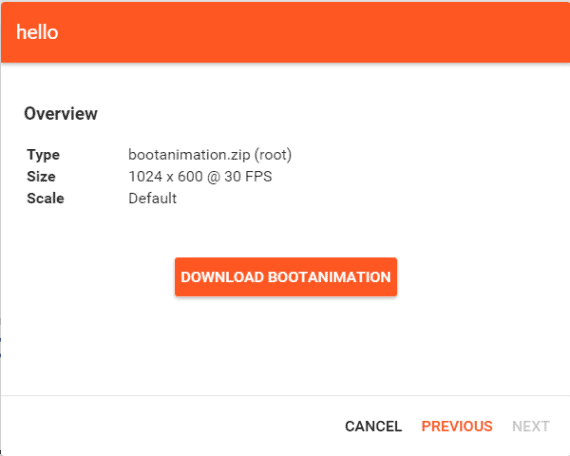
Step 12:
Finally, click on the download button and boot the animation on your device
(Note: You can browse other boot animation uploaded by different people in the Popular Tab.)
Awesome! Now your device is personalized and you can boast in front of your friends! Don’t forget showing your boot screens in the comments below.
Final Thoughts
What are your thoughts regarding Boot Animation? Were you successful changing the animation? What were the hurdles you faced? And surely showcase your extraordinary boot animations. You could upload your animation on Imgur.
SOME OTHER NOTABLE RESOURCE(S)
[Boot Animation][Collection] 81 AWESOME Boot Animations @xda-developers
[Android App] [root] LiveBoot by Chainfire