Is your iPhone suddenly running out of storage space? While you are busy searching the probable reasons, you might want to take a look at the Messages app. iPhone and iPad saves text message and iMessage locally. That means your device might have conversations that might date back several years or months ago. So, it is always a best practice to auto-delete old text messages on iPhone and iPad to save plenty of storage space.
In order to save storage space on your Apple device, deleting old text messages is a must. However, manually deleting individual messages is time-consuming, tedious, and boring.
Fortunately, Apple offers a much-needed and easy solution. There is, in fact, a simple way to get rid of old text messages. Yes, you can actually auto-delete old SMS easily with just a few simple clicks. You should make a minor change in the Settings to automatically delete text messages. Moreover, there is also an option to let you decide the time period to delete older messages.
However, you must understand that once these messages are deleted, it is not possible to recover them. That is why you must think clearly before making the necessary changes to your iPhone or iPad.
Being said that, follow the steps below to know how you can automatically delete old messages to save space on iPhone and iPad.
How to Enable Auto-Delete Text Messages Feature on iPhone and iPad

Do you want to get rid of unwanted text messages and auto-delete old conversations on your iPhone and iPad? If you are a regular iMessage user, messages are most likely to take up space on your iOS device.
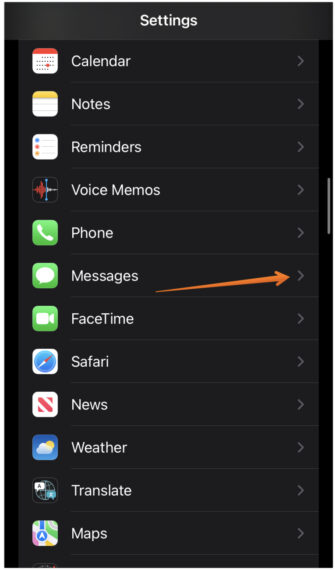
So, here is how you can automatically delete old messages from iPhone and iPad:
- Open the Settings app on your Apple device.
- Now tap on the Messages option.
- In the Messages section, under the Message History sub-heading, click on Keep Messages.
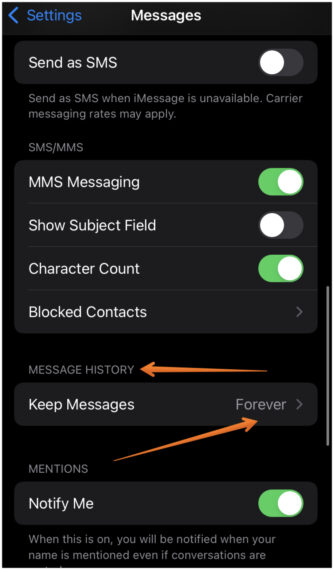
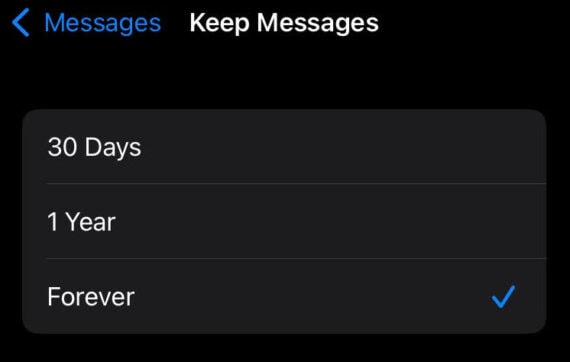
- Here, you can pick the time period you like. You have 3 options to choose from – 30 Days, 1 Year, and Forever.
- Tap on the preferred time period. For example, I chose 1 Year, which means messages older than 1 year are deleted automatically.
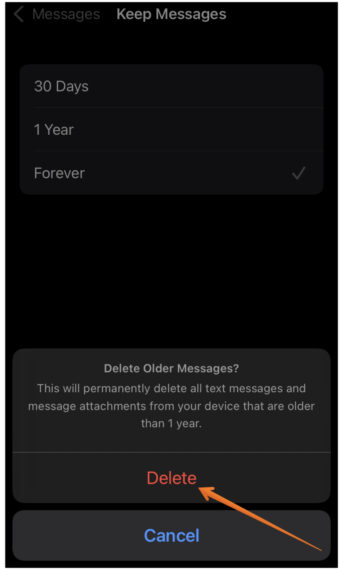
- You will see a pop-up box stating that “it will permanently delete all text messages and text attachments from your device that are older than 1 Year/30 Days”. Click on Delete to confirm your selection.
This is how you can enable the auto-delete text messages option on your iPhone or iPad. Depending on your preference, the device will automatically delete old conversations. For instance, if you choose 30 days, messages that are older than 30 days will be deleted automatically. Moreover, you don’t have to worry about freeing the storage space due to text messages again.
You can also check out how much storage space the messages are taking up in your phone.
- Go to the Settings app on your iPhone.
- Then, tap on the General.
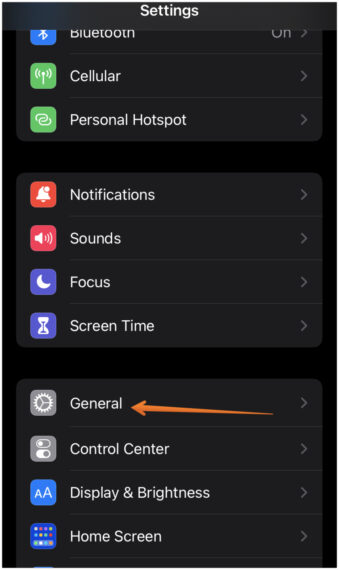
- Now, head over to the iPhone Storage.

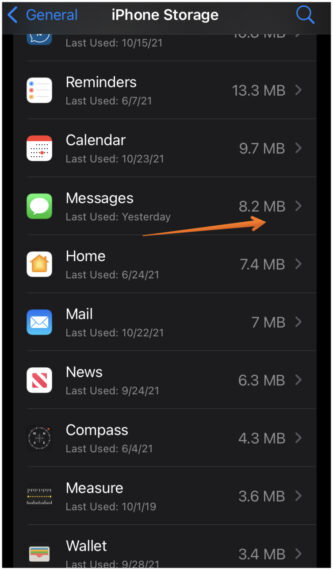
- In this section, you will see a small infographic on top of the screen helping you to understand how much space is occupied and how much storage is still left in the device. Here, you will observe different options like Photos, Messages, Apps, Media, and Others.
- Scroll down below and click on Messages.
- This will give you an idea about the storage used by the Messages app on your iPhone and iPad.
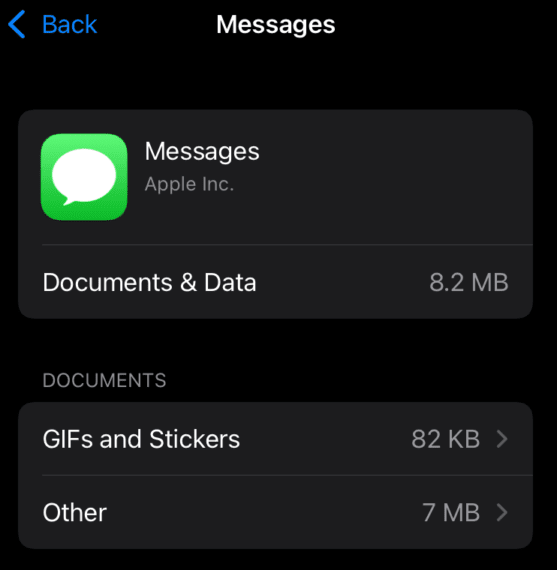
Thankfully, it is just 8.2 MB in my case as I’ve set up auto-delete SMS after every 30 days. If not, it would have easily gone up to 1 GB of storage. Setting-up auto-delete for old text messages also helps you in getting rid of those OTP messages which are of no use once they are expired.
Transfer Messages to iCloud
While it is good to automatically delete old conversations on iPad and iPhone periodically but what if you want to go through some really old text? Unfortunately, Apple doesn’t provide an option to set a time frame for individual conversations. If you change the time period to 30 days, it applies to all conversations including the loved ones.
In that case, it is best to transfer messages to iCloud. This way you can save the storage space on your iPhone without enabling the Auto delete SMS feature. To do this, you should turn on the messages option in iCloud. When you turn on this function, you let iCloud keep all your messages. It is an excellent way to recover your device space.
Take a look at the steps to move your text messages to iCloud:
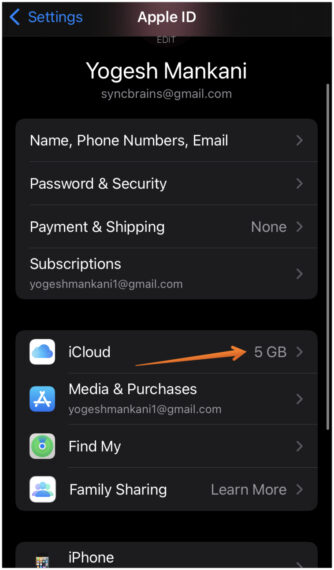
- Go to the Settings on your iPhone.
- Tap on your name to open Account information.
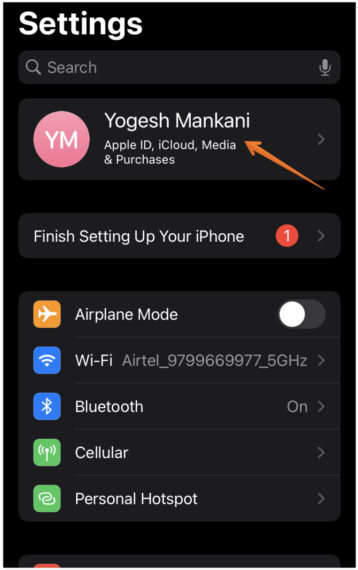
- Now click on iCloud.
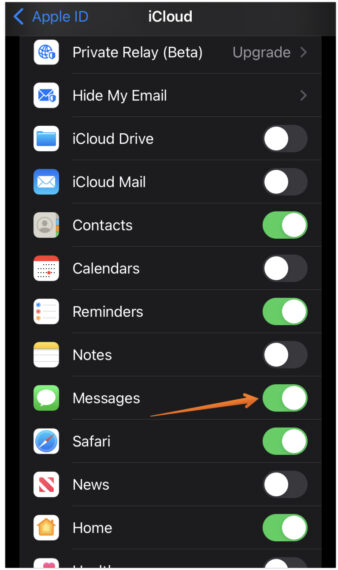
- Once you open the iCloud, you will see all the apps using iCloud. Scroll down and find Messages. Toggle on the Messages if it is turned off.
If you are enabling the Messages in iCloud for the very first time, keep in mind that transferring all your text messages to iCloud will take time depending on your internet connectivity. For safer side, give it at least one full night before you delete messages locally.
Also Read: How to Use iMessage on Windows PC [2 Ways]
How to Disable Auto-Delete Messages on iPhone and iPad
Did you change your mind and no longer wanted to enjoy the auto-delete old messages feature? In that case, you can always disable the automatically delete SMS feature and go back to the default settings.
Well, it is pretty easy. Here is how you can disable the auto-delete old conversations feature on your iPad and iPhone.
- Go to the Settings app on your iPhone.
- Open the Messages section inside the Settings.
- Scroll down a bit and tap on Keep Messages under Message History.
- Set the time period to Forever.
Here is how you can disable the auto-delete feature of text messages on your iPhone and iPad.
By selecting forever, you are choosing to keep the old text messages on your Apple device. You can now only delete them when you do it manually. In case you don’t delete them, they will remain forever on your device and increase the storage space. Changing it to Forever will stop deleting the older messages automatically.
Auto-Delete Messages to Save Storage Space
If you are facing storage problems on your iOS devices from time to time and old messages are taking too much storage, then it is better to enable the auto-delete text messages option on your iPhone or iPad.
I’m sure this article will help you to enable and disable it easily. If you are stuck anywhere while following the above steps, do let us in the comments below and I will try to solve it as soon as possible.