Are you having trouble with your Windows 11 screensaver? Nowadays, screensavers add visual elegance to the screen when you are not working. Apart from that, it also protects on-screen information when you are not present. But, sometimes, you might come up with an issue that Windows 11 screensaver not working.
Usually, the Windows screensaver comes when a pre-set time passes. However, if you don’t see it even after that period of time, there may be some issues. Moreover, you need to fix them if the screensaver in Windows 11 stops working.
There are various reasons that can lead to the Windows 11 Screensaver not working. Luckily, there are numerous ways that you can handle this problem. This article is about featuring the various ways to fix if screensaver in Windows 11 not working. Let’s check them one by one.
Note: The solutions mentioned below work for both Windows 10 and Windows 11. If your device is running on Windows 11, you can still try the troubleshooting steps below and it should work.
How to Fix the Windows 11 Screensaver Not Working Problem
There are several solutions that you can adopt to handle if the screensaver in Windows 11 Screensaver is Not Working. Take a look at the solutions below:
1. Remove External Devices You Longer Using
One of the most common causes of the problem with the screensaver is the usage of external devices. For this, you can try to disconnect these devices that you don’t need anymore.
These include cameras, joysticks, headphones, etc. These might trigger the screensaver and interfere with its functioning. To remove devices in Windows 11 that you are not using, follow the below methods:
- Find the devices that you want to remove in the Taskbar Notifications area. If you can’t find devices, must be hidden under the Up-arrow icon. Click on the Up-arrow icon to find the hidden devices.
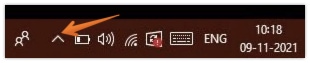
- Click on it and remove the devices by right-clicking on them. Choose Eject.
- You can repeat the same process for each device you are not using and wish to disconnect.
However, if this solution doesn’t work, you can take a look at the other methods.
2. Go to Settings to Turn on the Screensaver
You can fix the Windows 11 screensaver not working issue by verifying the system settings. It is imperative to understand that the screensaver in Windows is disabled by default.
That is why users need to configure the settings. If you forget, chances are that is the reason why the screensaver is not working in Windows 11.
Follow these steps on how to turn on the screensaver in Windows 11:
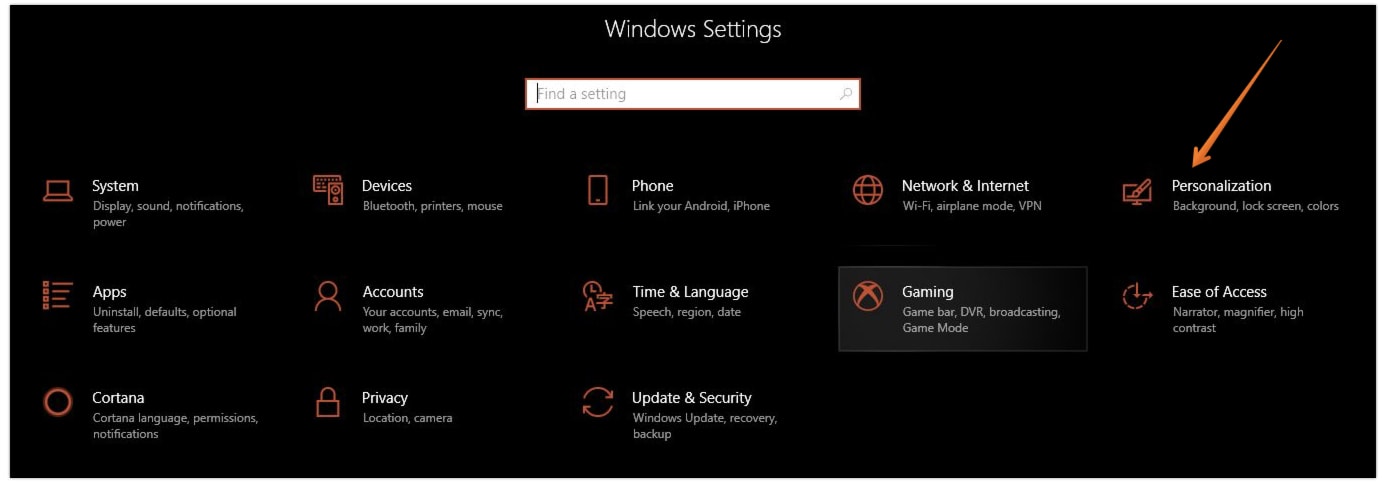
- Go to the Settings app or use the keyboard shortcut Windows + I.
- Once the Settings app is opened, click on Personalization.
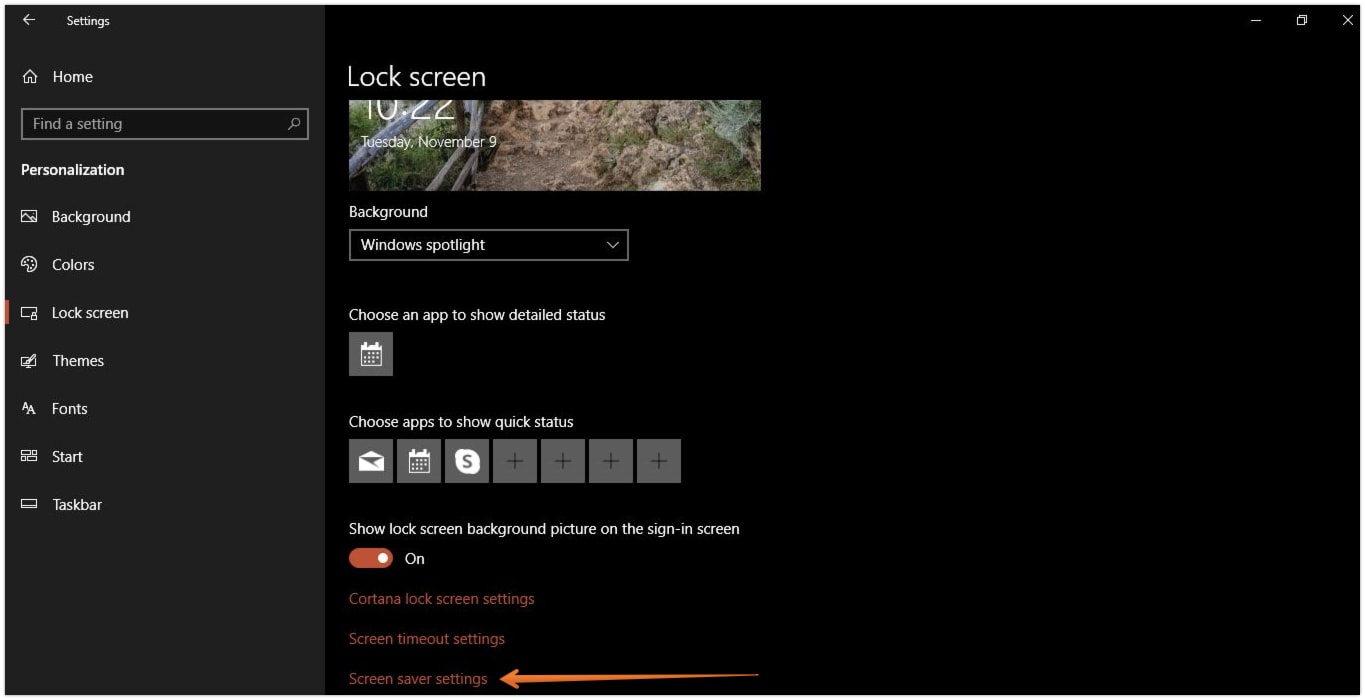
- In the left pane, Select Lock Screen.
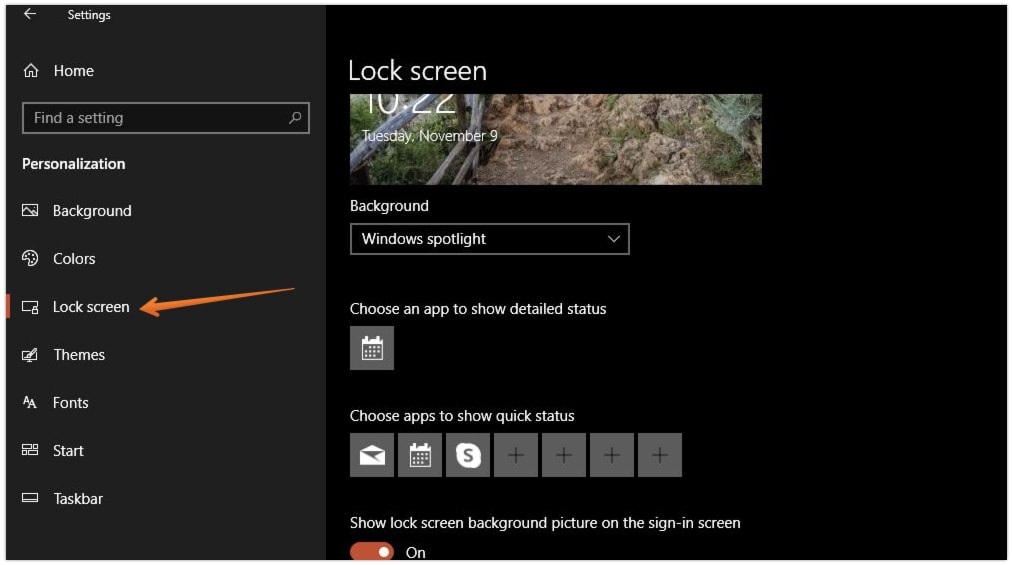
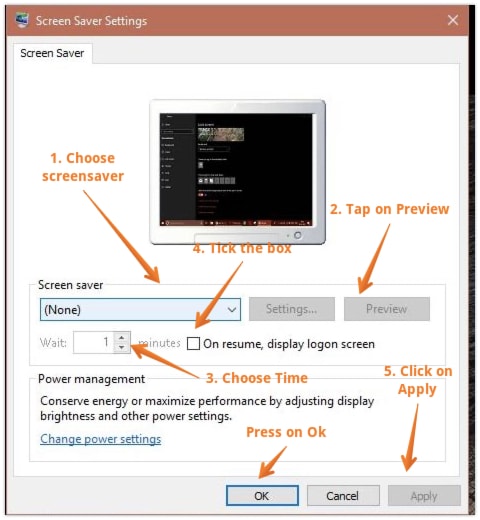
- Inside Lock Screen, scroll down a little and click on Screen Saver Settings.
- Use the drop-down menu to choose the screensaver you want if it is set to None. Check how the screensaver looks by tapping on the Preview.
- Now, you need to set the time after which the screen saver will appear. For that, change the minutes next to the Wait option. Just to check whether the screensaver is working or not, you can choose the waiting time as a minimum of 1 minute for the first time.
- Click on Apply and press OK once you are done with the changes. This will turn on the screensaver in Windows 11.
- For security and privacy reason, enable the “On resume, display logon screen” option. This will automatically lock your computer once the screensavers start displaying.
Keep in mind that if Windows is not activated, you cannot make any changes to the screensaver’s settings.
3. Make Changes to the Sleep Time
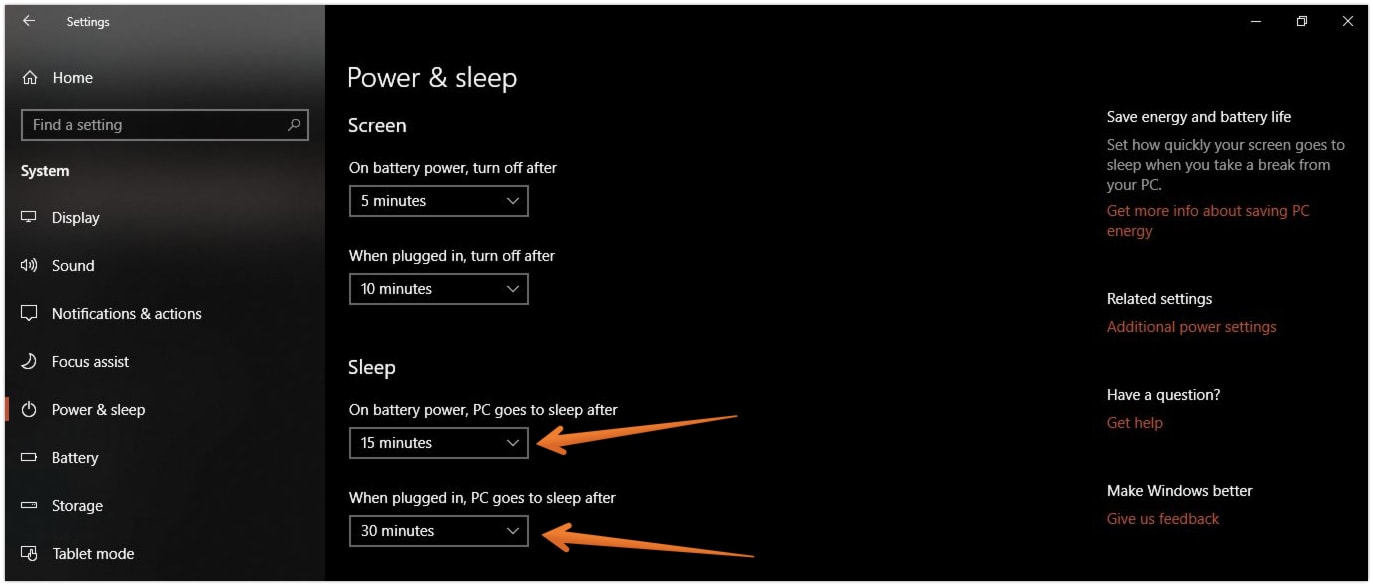
Does your PC take only a few seconds to enter sleep mode? If that is the case, then you will never come across the screensaver. That is because if the screensaver doesn’t have enough time to emerge, it will not appear. If the computer enters sleep mode before the screensaver, then that could be the reason for the problem.
You can try changing the sleep time in order to deal with this issue. For this, you can take a look at the steps outlined here:
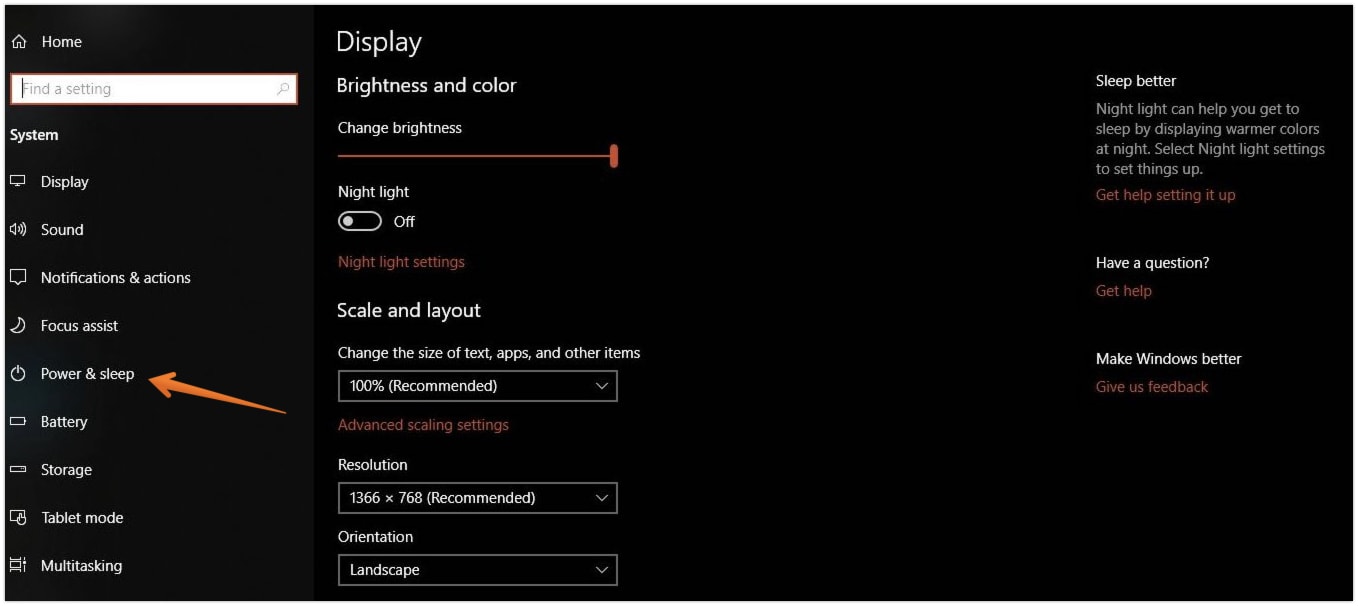
- Type Settings in the search bar or press Windows + I keys.
- Click on System once you are in the Settings app.

- Choose Power & Sleep from the left-pane settings.
- Here, you need to set the time under the Sleep option. It is advisable that you also set a new time for the next option – When plugged in, PC goes to sleep after.
4. Use the Power Troubleshooter
Another way that you can deal with the Windows 11 screensaver not working is by running the Power troubleshooter. Trying the Windows troubleshooting tools is an excellent way to handle this problem. Here are the steps that you can follow:
- Go to the Settings app.
- Here, you need to click on Update & Security.
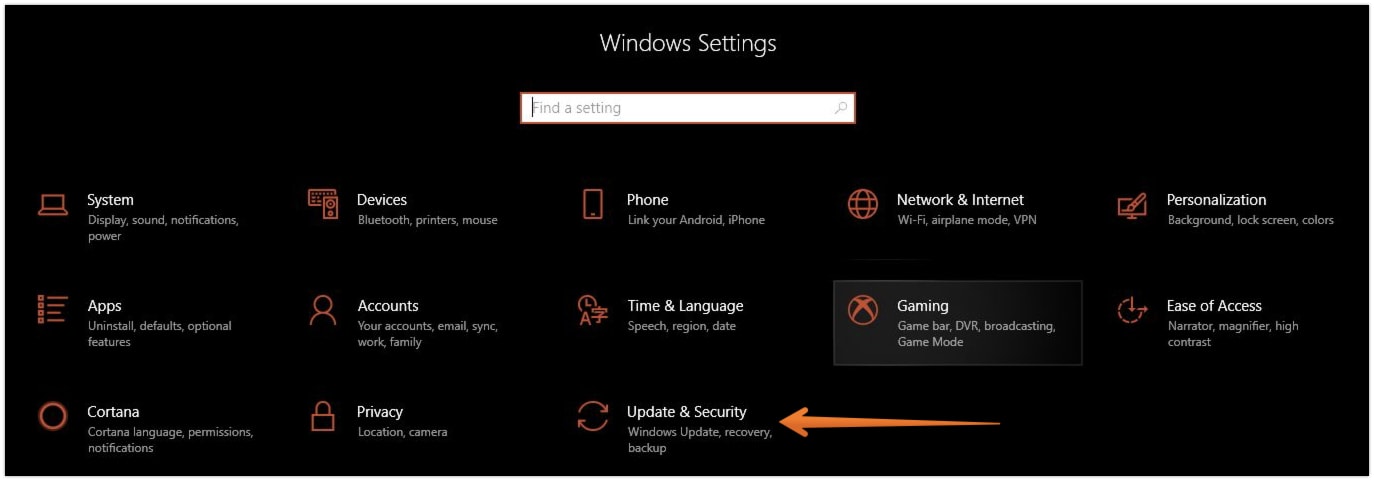
- Choose Troubleshoot from the left pane.

- You will find lots of troubleshooting options here, find Power under “Find and fix other problems”. Click on Power.
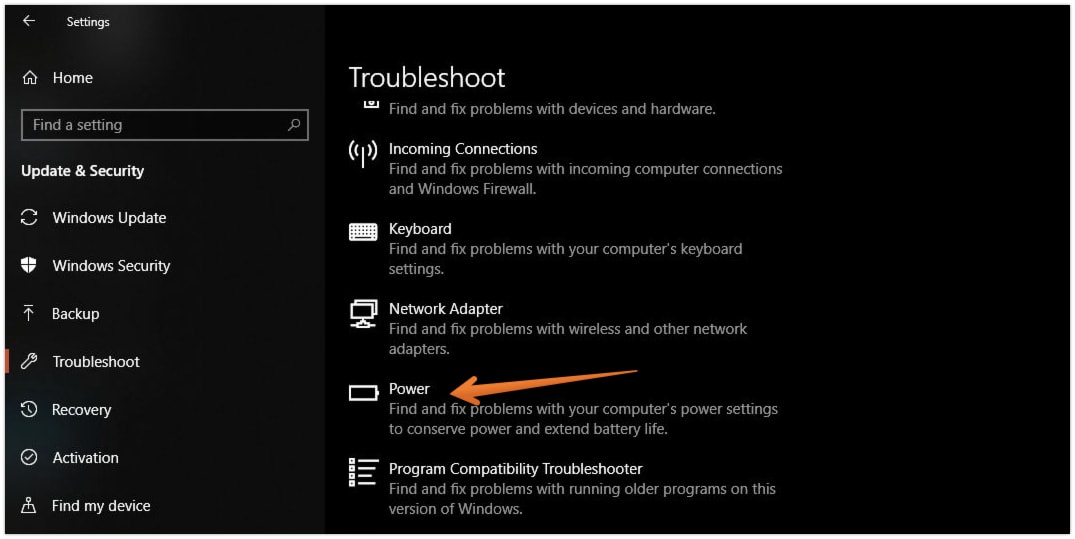
- Once you click on it, you will get an option just underneath it stating Run the troubleshooter.
Here, the troubleshooter will detect potential issues. Now, you can check if the screensaver in Windows 11 not working problem is fixed or not.
5. Note the Presentation Settings
There are numerous tools in Windows that can help you deal with one problem. You can opt for the presentation settings to handle the screensaver not working issue.
Did you know that the presentation mode can turn off the screensaver? Though it is an excellent tool for conducting business meetings, it can interfere with the screensaver.
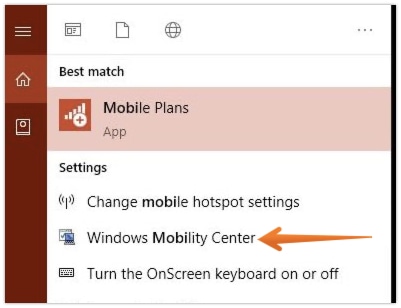
- Type Mobility Center in the Search bar and from the search results select Windows Mobility Center.
- Lookout for the Presenting option. Here, click on “Turn off” under Presenting section.
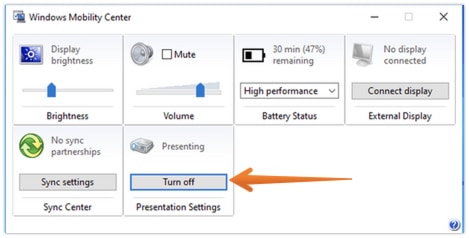
- Below the Turn off button, click the Presentation settings and see if the screensaver is turned off.
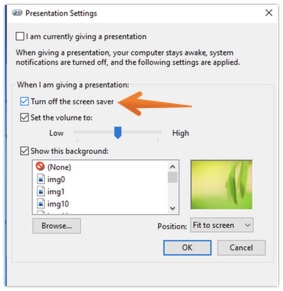
- Make sure it is unchecked, and then press Ok.
6. Launch the System File Checker Scan
Sometimes, corrupt or damaged system files can cause issues with the screensaver. Due to this, the screensaver might not work properly. Here, you can opt for the System File Checker to deal with this problem. Let’s see how you can do this:
- Open the Command Prompt and then run the SFC scan with the command
SFC /scannow - Make sure you run the CMD with administrative rights otherwise, the command won’t run and will give you an error. To do so, right-click on Command Prompt and choose Run as Administrator option.

It is vital to understand that the scanning will take several minutes. Be careful that you close the Command Prompt window. The best part is that the scan will replace the corrupt files automatically.
7. Take a Look at the Display Drivers
Did your screensaver freeze even if it’s working? For that, you can take a look at the display driver and see if it’s up-to-date.
Usually, graphic card drivers get automatic updates from Windows. But, if you are using the one that doesn’t fit this criterion, then there could be an issue. Take a look at the steps that you can follow to update display drivers in Windows 11:
- Type Device Manager in the Start Menu search bar.
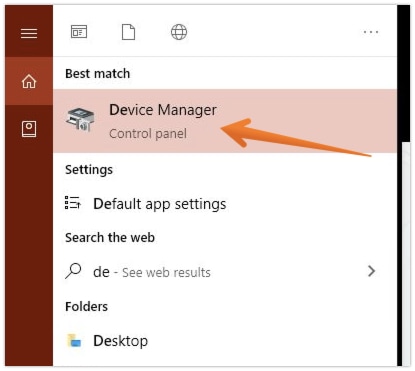
- Once you find it, click on Device Manager. A new window will open, click on Display Adapters to expand the options.
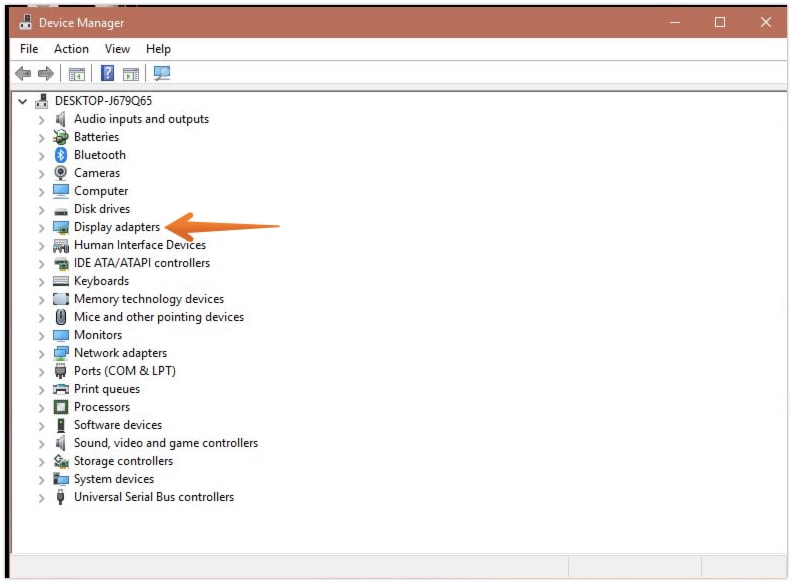
- Here, you will find the graphic driver’s name. Right-click on the graphics driver and choose Update driver.
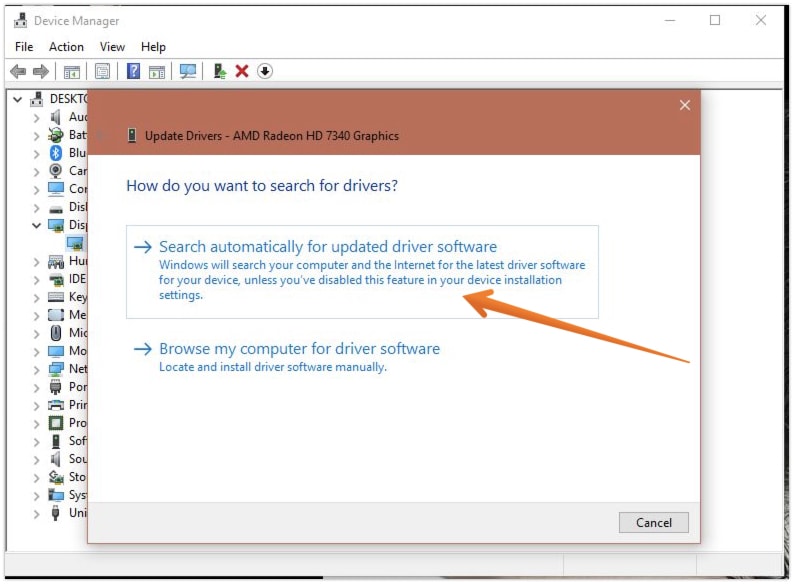
- Now, select the “Search Automatically for Update Device Software” option. In this option, Windows will search your computer and the Internet for the latest device software and update it automatically.
8. Reset Plan Settings from Power
In some cases, power settings can lead to the screensaver not working in Windows 11. To deal with this problem, you can directly head to the power settings and have a look. Here, you must change the settings to default to resolve the issue.
Take a look at how you can achieve this –
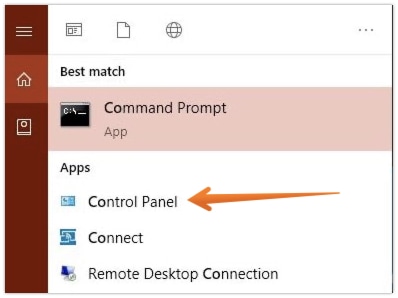
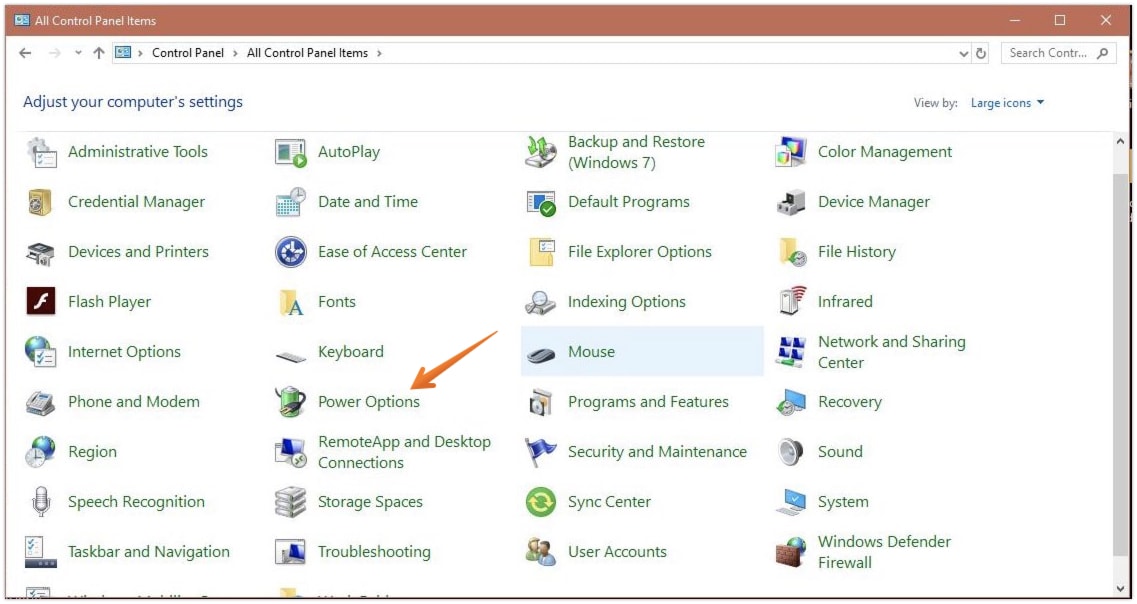
- In the Start Menu search bar, find and open the Control Panel.
- Find and tap on Power options in the Control Panel options.
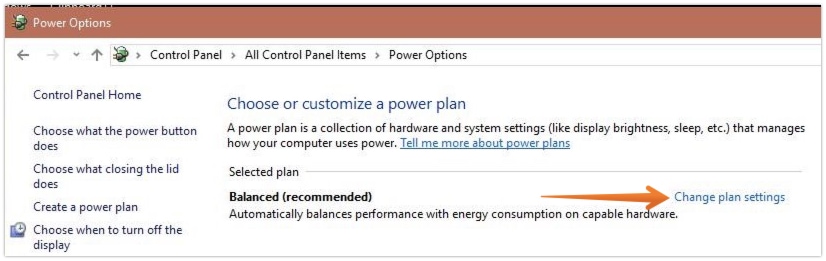
- Select Change Plan Settings under the Selected Plan section.
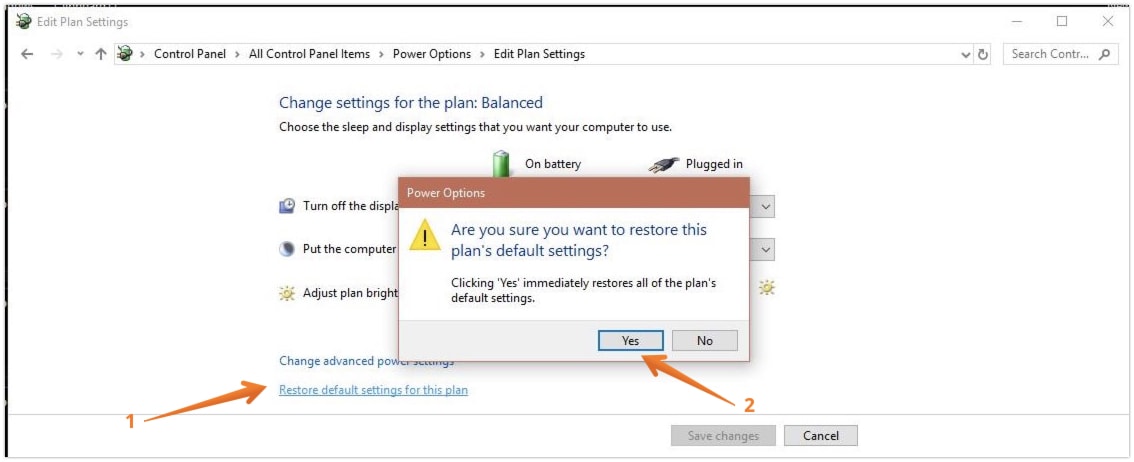
- Scroll down, and you will see the option – click on Restore default settings for this plan.
- A confirmation pop-up will appear, click on Yes to restore the plan’s default settings.
9. Clean the Optical Mouse and Pad
Nowadays, the mouse uses optical sensors for the detection of movement. But, if there is an accumulation of dust and dirt, then there might be issues. It might get false input and refrain the screensaver from appearing.
To deal with this issue, you need to clean the mouse and mouse pad immediately. For that, you can use a cotton swab or soft towel. Be gentle while cleaning the mouse.
10. Run DISM
Another troubleshooting tool that you can use is DISM or Deployment Image & Servicing Management. It is definitely more powerful when compared to the SFC scan. If running the SFC scan doesn’t work, you can try this. Here is what you need to do to run the tool:
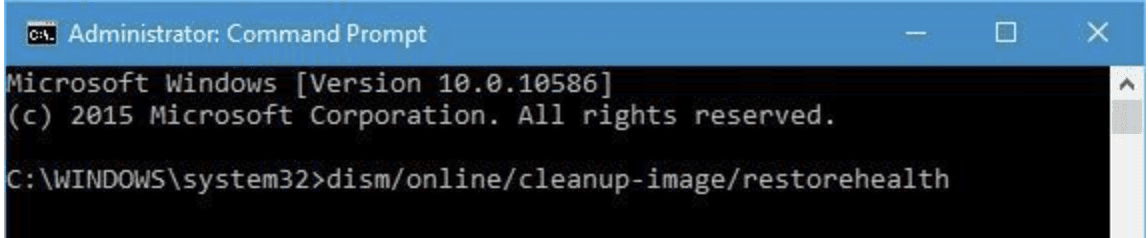
- Launch the Command Prompt
- Run the below commands one by one and then press Enter key after every command.
Dism /Online /Cleanup-Image /CheckHealth
Dism /Online /Cleanup-Image /ScanHealth
Dism /Online /Cleanup-Image /RestoreHealth
- Close the Command Prompt once it is done.
- Reboot the PC and see if the screensaver is working now.
11. Update Windows 11
Lastly, you can try updating Windows 11 in order to fix Windows 11 screensaver not working problem. If the issue is due to a technical glitch, then the update may resolve it automatically. Here is how you can update Windows 11 to the latest release:
- Go to the Settings app.
- Click on Update & Security.
- From the left pane menu, click on the Windows Update option.
- After that, click Check for updates button.
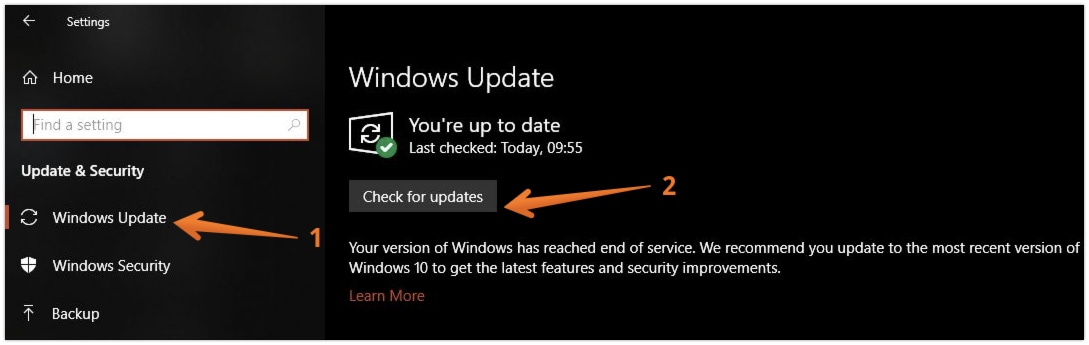
- If you see any updates, you must download and install it.
- Reboot the computer and see if the problem is resolved.
Solve Windows 11 Screensaver Not Working Problem
These are some of the ways you can try to fix the screensaver in Windows 11 not working problem. However, if the issues still don’t resolve while following the solutions we have mentioned above., please let us know in the comments section below and we definitely try to solve if the screensaver in Windows 11 not working problem still persists.