Windows 11 receives many updates with security enhancements, new features, improved performance, and more frequently. This approach works best to keep the Windows devices up-to-date and secure, and you still can’t rely on them. The first thing that comes to your mind is to disable Windows updates.
Not only because you’ll have to restart your PC to install the update, but some updates might contain bugs simultaneously. These bugs can cause possible driver failures, application crashes, or Blue Screen of Death. While that’s one side of the coin, you still have to download those updates, which consume your internet data; it gets worse if you’re on a metered connection.
The best possible solution to this problem is to disable updates on Windows 11 permanently. This guide will walk you through different ways to disable updates on Windows 11 permanently.
In this Page
- How to Disable Windows Updates Through Settings
- How to Disable Automatic Windows 11 Updates Using Group Policy
- How to Disable Automatic Windows 11 Updates With Registry
- Permanently Disable Windows Updates using the Windows Update Block Utility Application
- Disabling Windows Updates using Metered Connection
How to Disable Windows Updates Through Settings
If trying to avoid a specific Windows update, you don’t need to disable the Windows updates permanently. You can instead choose to pause the updates for up to five weeks. However, the option is only available on Windows 11 Home and Windows 11 Pro.
Follow these steps to disable the Windows 11 updates temporarily:
- Open Settings from the Start menu. You can also press Win + I on your keyboard.
- Select Windows Update from the side pane.
- Next to the Pause Updates setting, choose the number of weeks (maximum of five) you want to disable automatic updates from the dropdown menu.
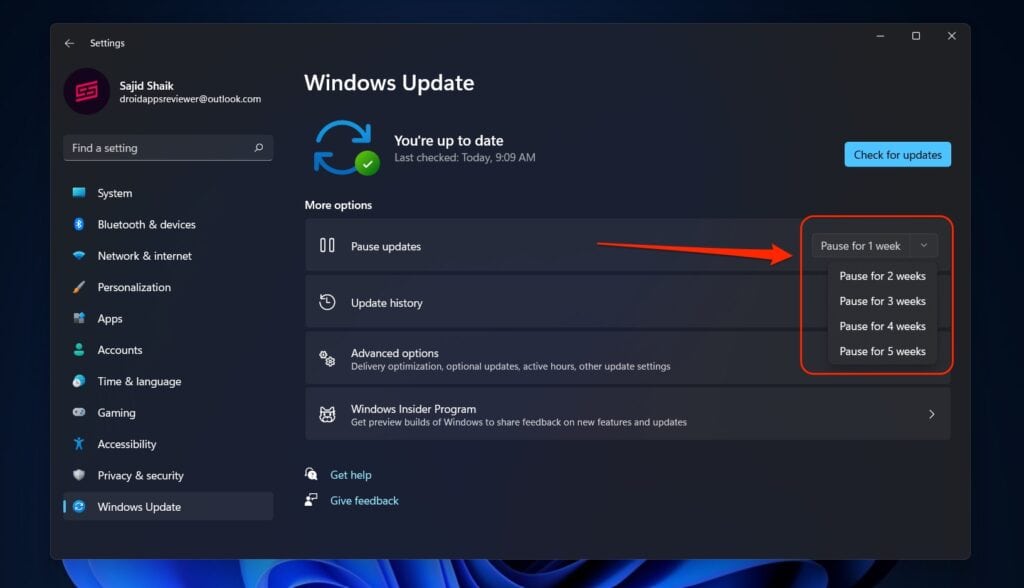
Once done, Windows 11 will pause automatic updates on your Windows PC for the specified time. If you wish to resume the updates again, you can follow the exact instructions; click on the Resume updates button in step 3.
How to Disable Automatic Windows 11 Updates Using Group Policy
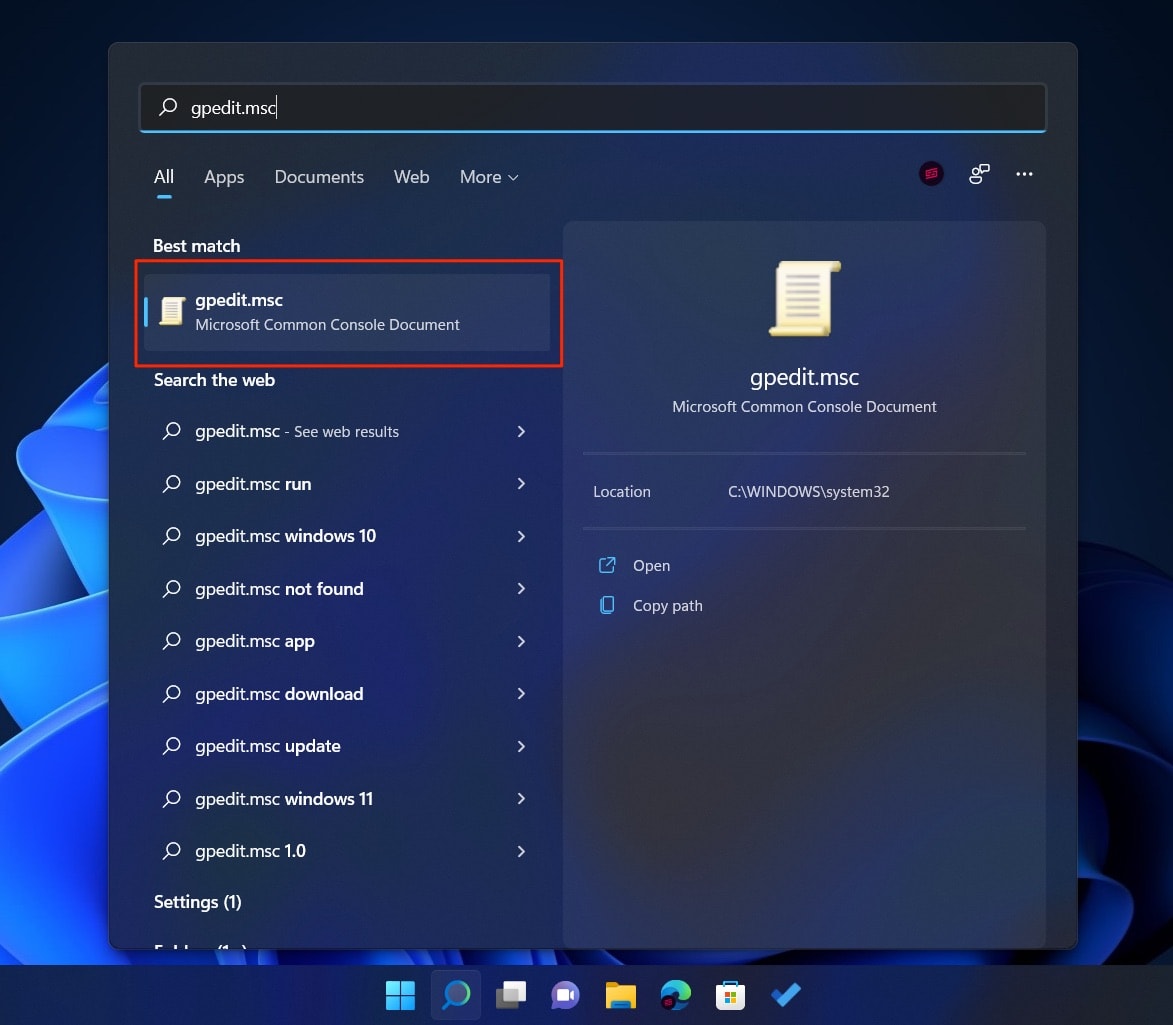
If you’re on Windows 11 Pro or higher, you can permanently use the Group Policy Editor to disable automatic updates. If you’re on Windows 11 Home, you will see “gpedit.msc not found” error when you open Group Policy Editor.
Here’s how you can permanently disable automatic updates on Windows 11 using the Group Policy Editor:
- Open the Start menu on your Windows PC.
- Search for gpedit.msc and click on the first result to launch the Local Group Policy Editor.
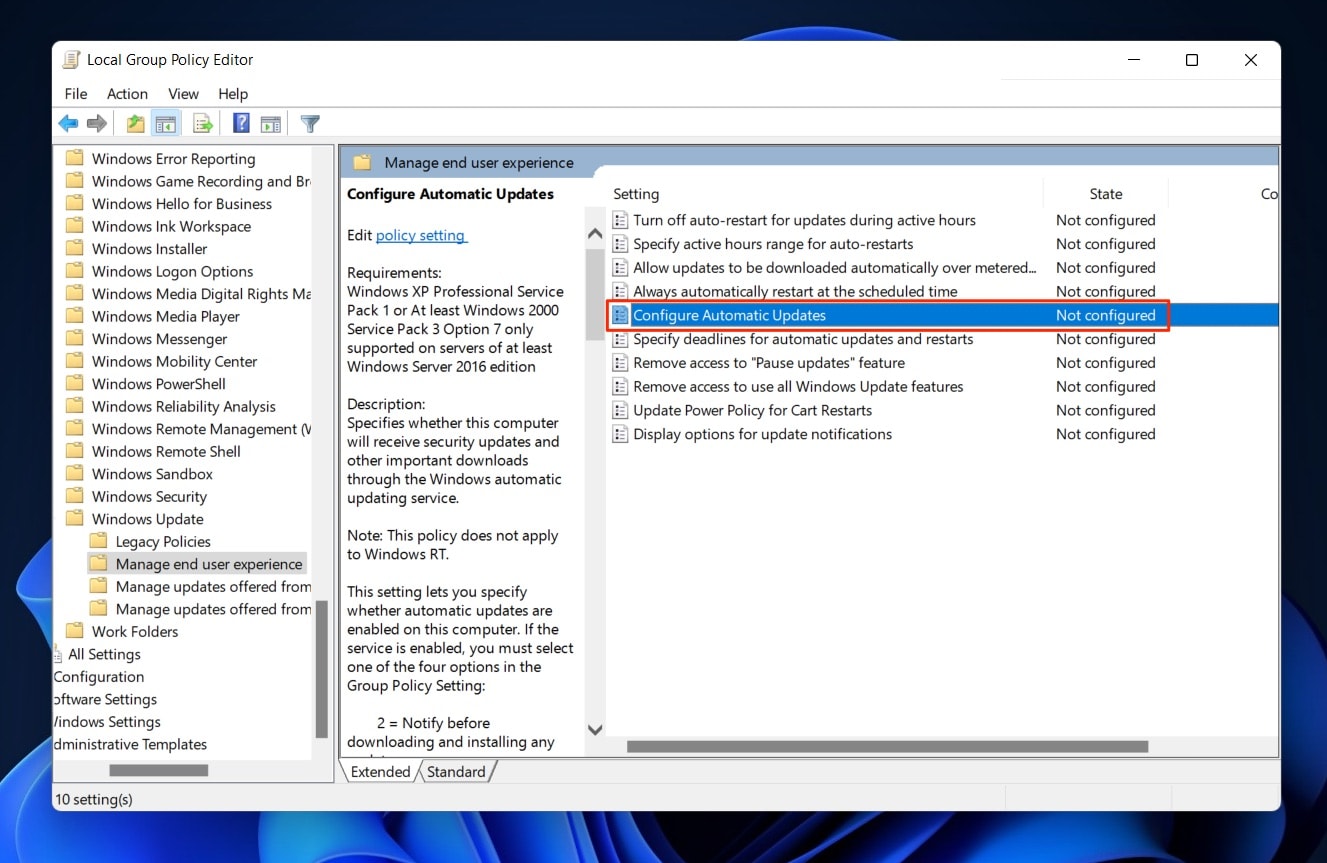
- Navigate to the following path in the Group Policy Editor
Computer Configuration → Administrative Templates → Windows Components → Windows Update → Manage end user experience - Double-click the Configure Automatic Updates policy from the options listed on the right side.
- Select the Disabled option and click the Apply and OK button.
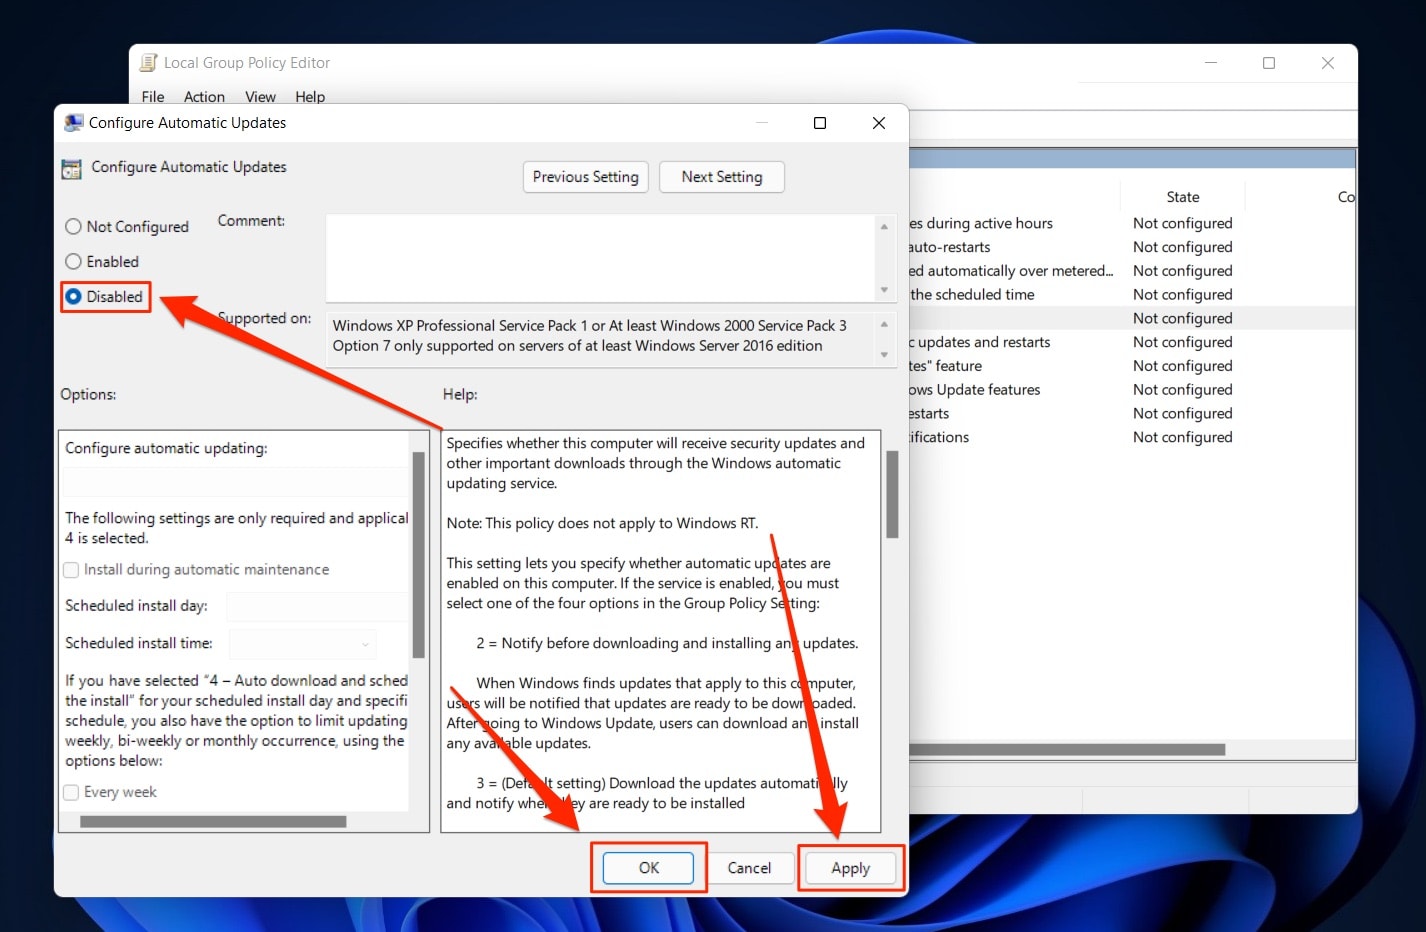
- Restart your computer.
Once your computer restarts, Windows 11 won’t download and install updates automatically on your PC. If you wish to install updates at any time, you’ll need to go to Settings → Windows Update and click the Check for updates button.
Also, you can re-enable the automatic updates by going through the above process but selecting the Not Configured option.
How to Disable Automatic Windows 11 Updates With Registry
You can also permanently disable Windows updates using the Registry Editor on Windows. However, editing the Registry is risky and can lead to irreversible damage if not done correctly.
It’s best to take a complete backup of your PC before proceeding with Registry edits.
Follow these steps to disable Windows 11 updates using Registry Editor permanently.
- Open the Start menu on your PC.
- Search for “regedit” and click on the first result to launch the Registry Editor.
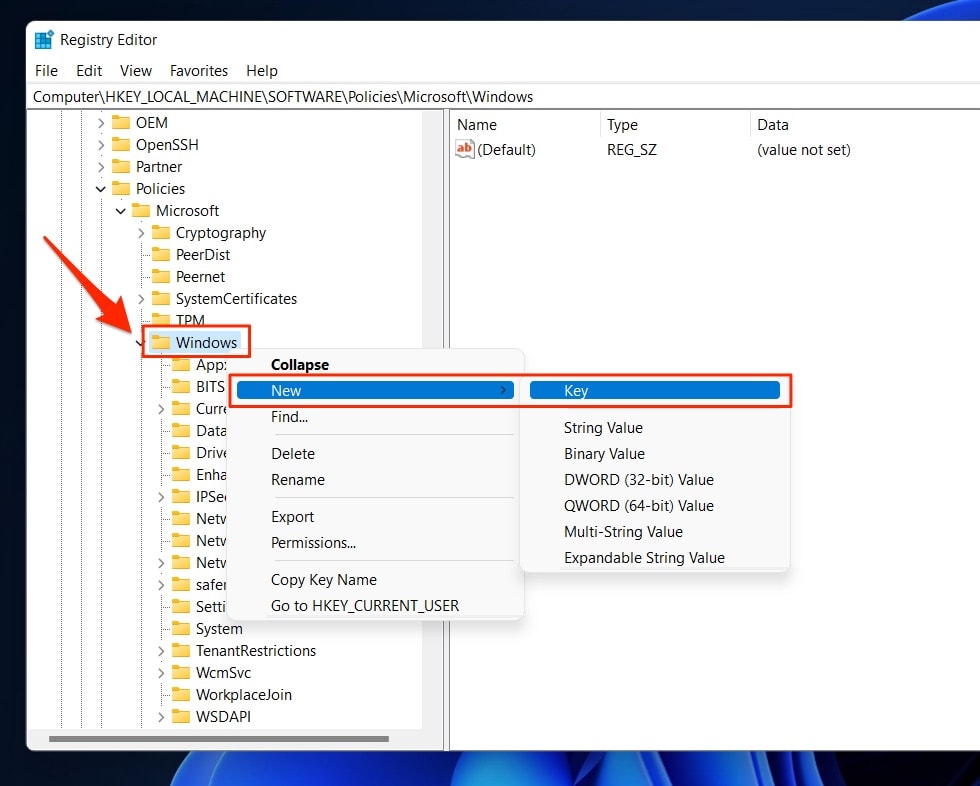
- Navigate to the following path in the Registry Editor
HKEY_LOCAL_MACHINE → SOFTWARE → Policies → Microsoft → Windows - Right-click on the Windows folder and select New and then the Key option.
- Name the new key to WindowsUpdate and press Enter key.
- Right-click on the newly WindowsUpdate created key, select New, and then the Key option.
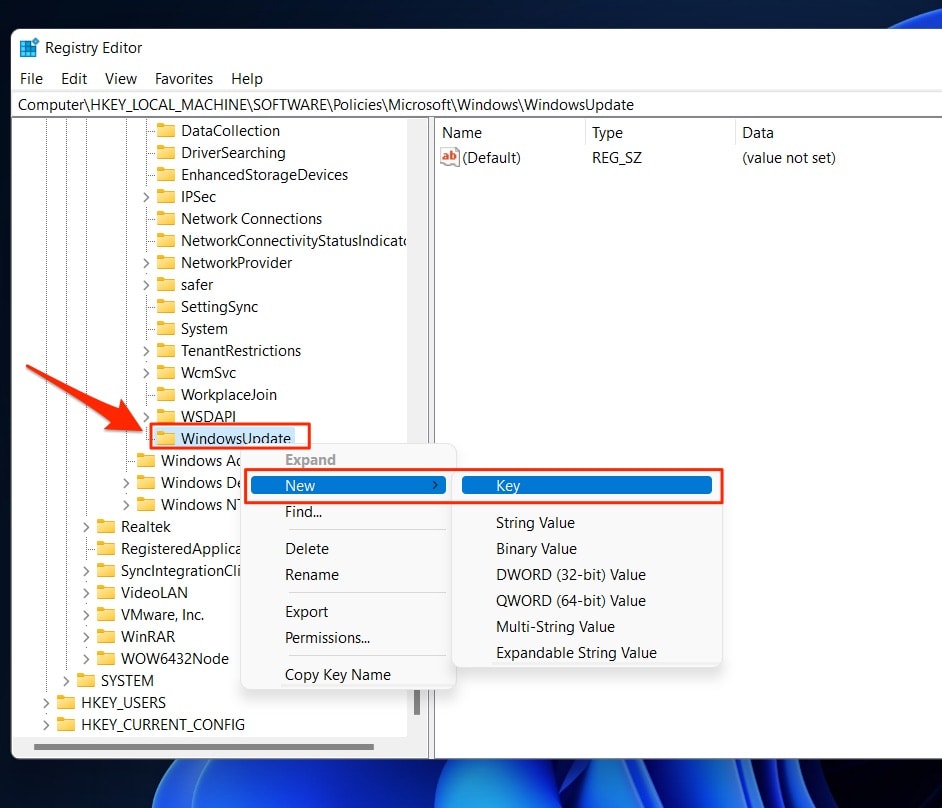
- Name the new key to AU and press the Enter key.
- Right-click the AU key, select New, and then the DWORD (32-bit) Value option.
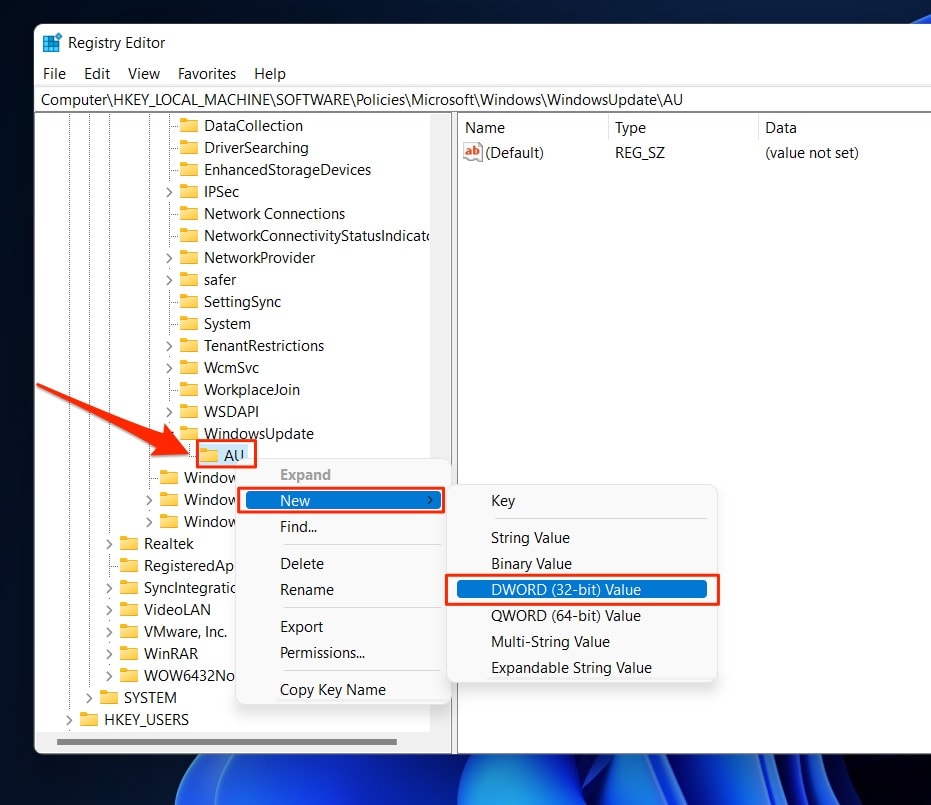
- Name the new key to NoAutoUpdate and press the Enter key.
- Double-click the newly created key and replace its value from 0 to 1.
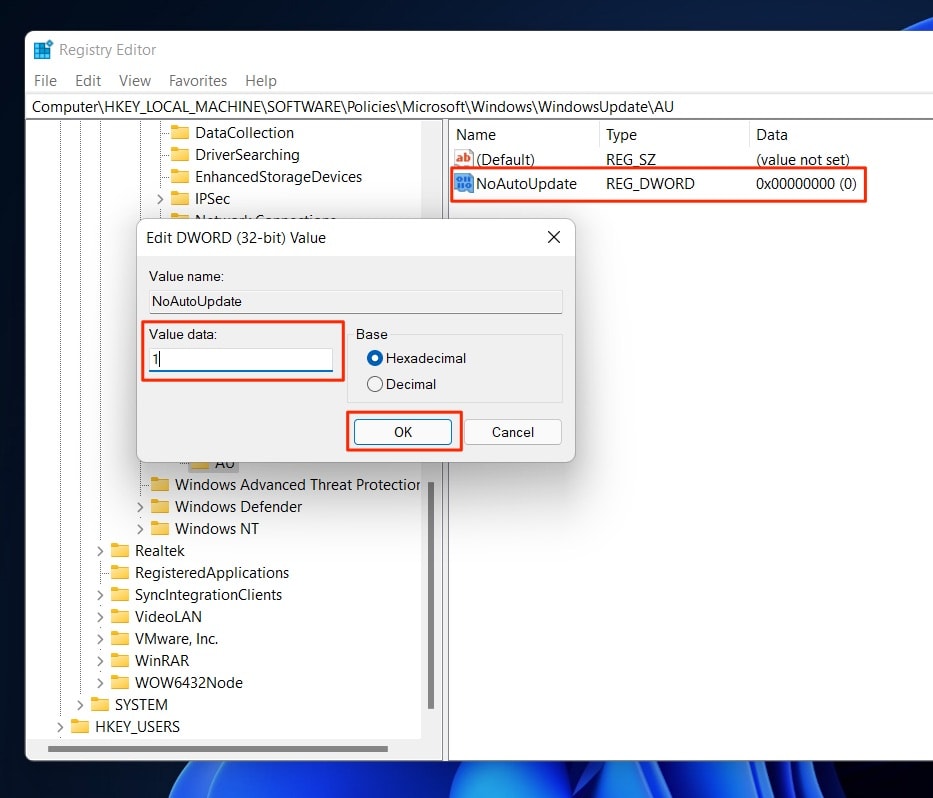
- Click the OK button.
- Restart your PC once done.
Once your computer restarts, the automatic updates on Windows 11 will disable permanently. However, you’ll be able to install updates from the Windows Updates page in Settings.
Permanently Disable Windows Updates using the Windows Update Block Utility Application
If you don’t want to involve yourself with the trouble of editing the Local Group Policy or Registry Editor, you can install Windows Update Blocker Utility. It turns off automatic updates in a few simple steps. Here’s how to do it.
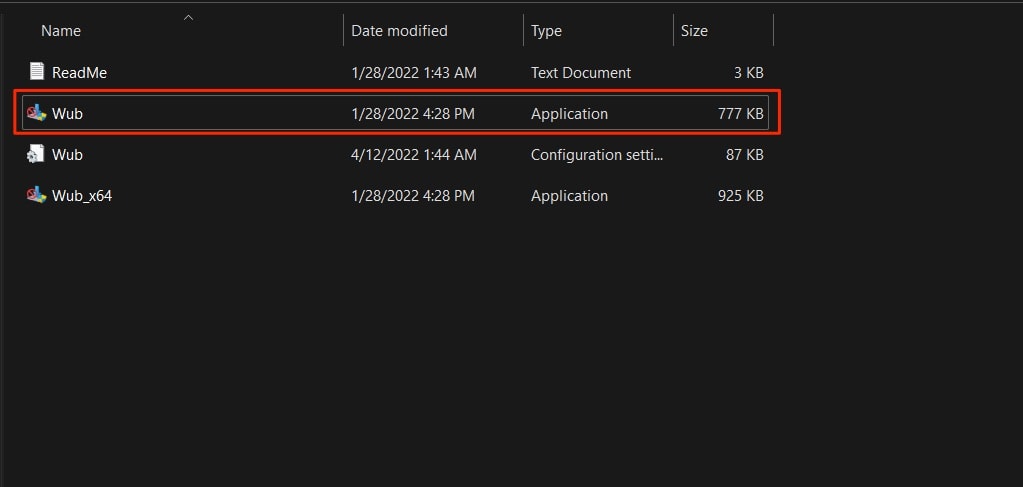
- Download the Windows Update Blocker.
- Extract the downloaded zip file.

- Open the wub.exe file and select the Disable Updates option.
- Check the Protect Service Settings checkbox and hit Apply Now.
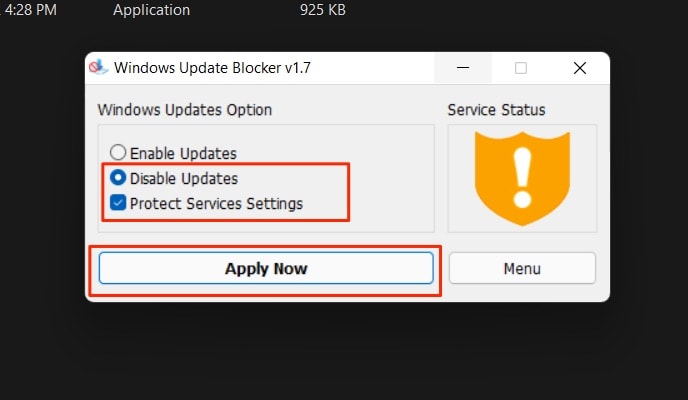
If the shield icon under Service Status turns red, Windows 11 updates have successfully disabled on your PC.
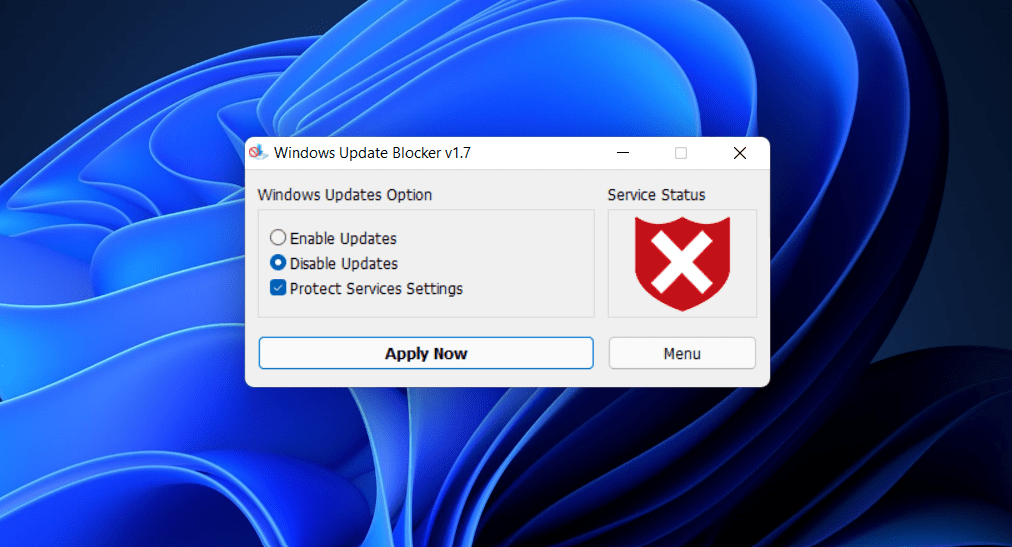
To enable the updates again, select the Enable Updates option, and hit Apply Now.
Disabling Windows Updates using Metered Connection
Another way to permanently disable Windows Updates is to set up your WiFi/Ethernet connection as a metered connection. It disables automatic updates on Windows 11 until you switch off the metered connection setting. Here’s how you can set up a metered connection on Windows 11.
- Open Settings from the Start menu or press the Windows + I key on your keyboard.
- Select “Network & Internet” from the side pane.
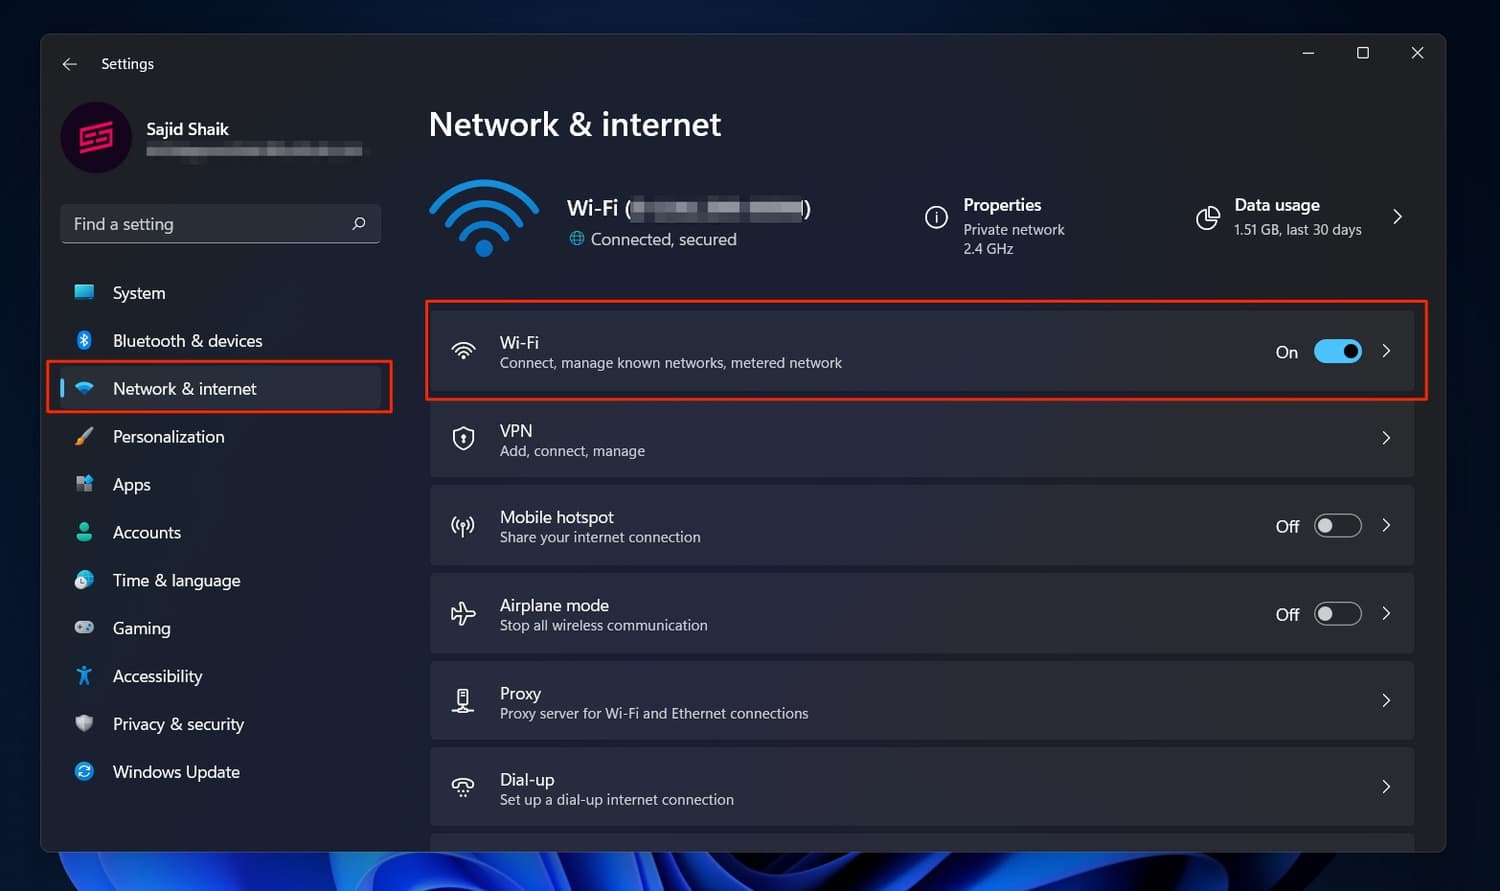
- Choose the WiFi/Ethernet connection to which you’re connected and select its properties.
- Enable the Metered connection option.
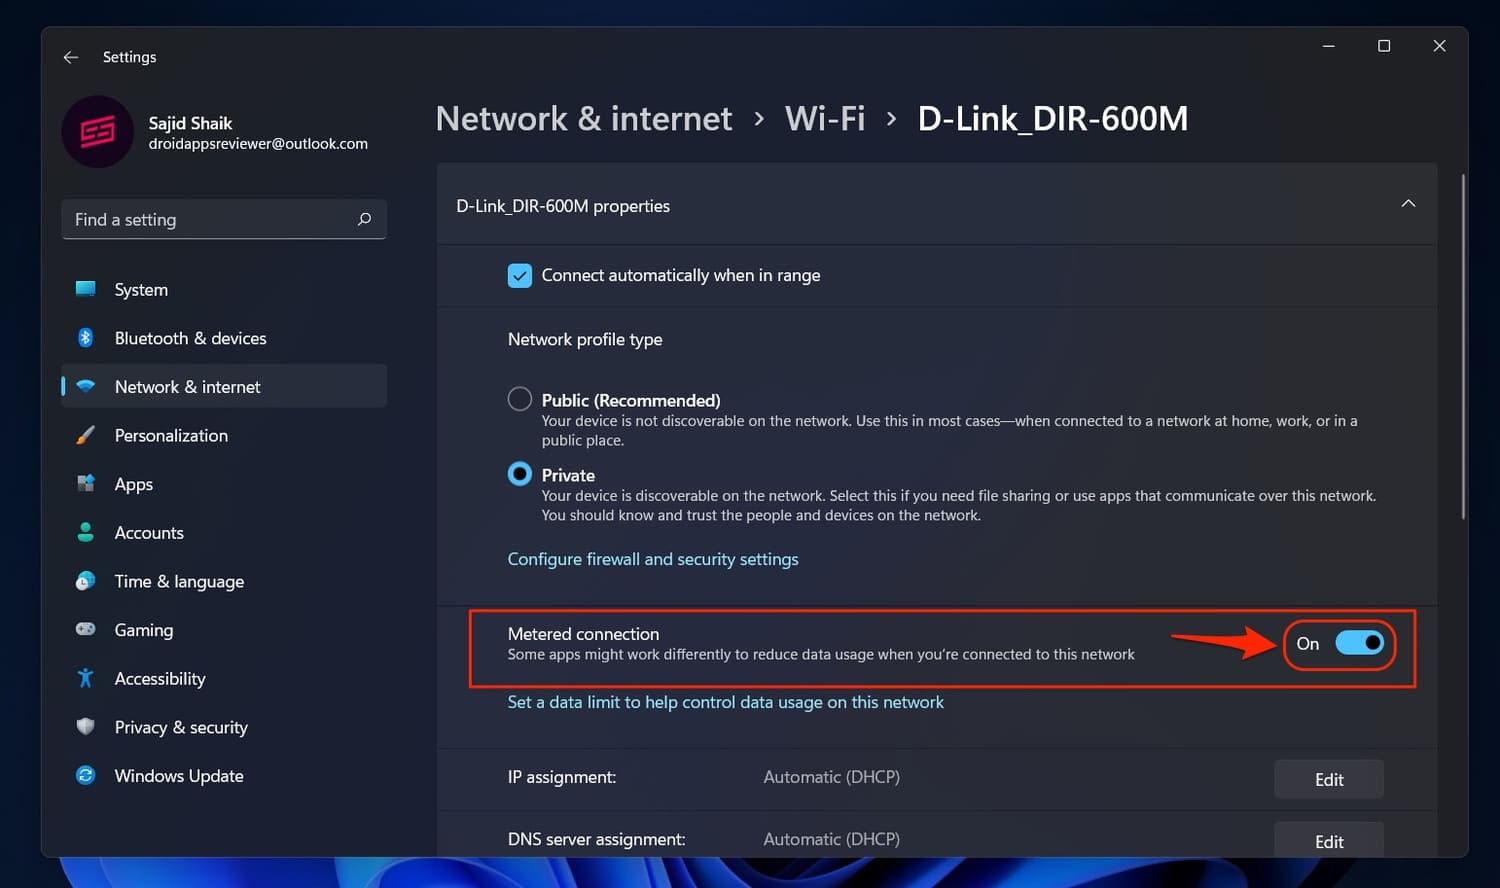
Once done, Windows Updates won’t download updates automatically without notifying you first. You can still download and install the updates from the Windows Update settings page. Once you turn off the metered connection setting, automatic updates will resume.
Also Read: How to Connect AirPods Without Case? Is it Really Possible?
Conclusion
Windows updates don’t ensure that your PC will run fine with every update. It’s best to turn them off when there are bugs that haven’t been fixed. These were the ways to turn off automatic Windows updates on Windows 11 PC.
You can use any of these methods to turn off Windows updates. Make sure to backup your PC when using the Registry Editor method.
If you’ve any suggestions or queries regarding these methods, you can mention them in the comments.
While I understand people are upset with the way Windows 11 updates break things, this disable approach is not a good idea from a security posture. The better way to handle this is like with any Agile software development. That process is adopted in Enterprise…”N-1.” With N-1 you have time to see if there are issues and corrections that need to be implemented before N-1 occurs. If there are still issues, push out to N-1.5 or even N-2. Your article is an N-∞ solution and never recommended for security reasons.