What is Action Center?
Action Center is a centralized notification panel to view the status of a computer running on Windows 8. It allows a user to view system alerts and take necessary actions for managing system administrative tasks. The main objective of Windows Action Center is to keep your system running smoothly and prevent it from being impacted by security and maintenance issues.
This feature was first introduced with Windows XP Service Pack 2. Since then, it has gone through continuous improvements in all subsequent Windows releases. Windows 8 comes integrated with a powerful Action Center dashboard. In this tutorial, we will be introducing you to the nitty-gritty of configuring and working with Action Center on a computer powered by Windows 8 operating system.

Accessing Action Center
As is the case with any core Windows feature, there are more than just a single way to access Action Center.
Method 1:
First go to your ‘Control Panel’. Then browse to ‘System and Security’ section and subsequently click on the ‘Action Center’ link.
Method 2:
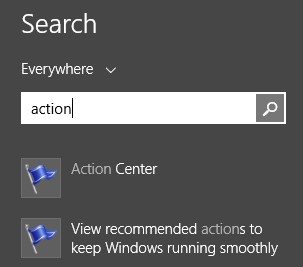
From the ‘Start’ screen, type ‘Action’ in the search box and then click on ‘Settings’. ‘Action Center’ link will now be displayed in the search results. Click on the same.
Method 3:
You can also access ‘Action Center’ from your desktop using the ‘Notification Area’ icon on the bottom right corner of your screen. Simply click on the ‘Notification’ icon and it would display a floating menu. ‘Open Action Center’ link will be available as the last entry on this menu. Click on that link to go to ‘Action Center’.
Action Center Dashboard
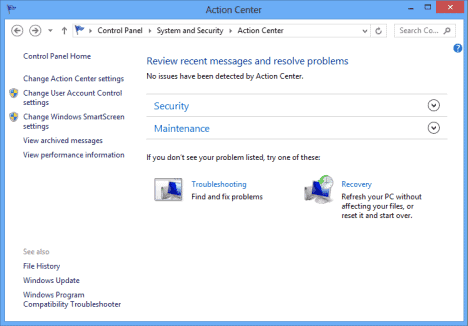
Action Center in Windows 8 has two different sections. While the right sided section lists down system issues for your review and action, the other one on the left contains the navigation link to change the configuration options.

Action Center Color Codes
Action Center displays notifications about security and maintenance settings which require your attention. Important action items are highlighted in ‘Red’ to indicate significant system issues that need your immediate attention. Lesser important items are marked in ‘Yellow’ and these are the recommended suggestions for your system to operate smoothly.
Configuration Options
As mentioned previously, the left column contains link to Action Center configuration options. Provided below is a detailed overview of available options that you are allowed to modify.
Change Action Center Settings
This link allows you to configure and modify the Action Center settings. It allows you to customize the displayed notification items as per your requirement. You can enable or disable the display of notification messages from here.
Once you click on the link ‘Change Action Center Settings’, you will be taken to a new interface. On top of the new window, you have a link to ‘Turn Messages On or Off’. The messages are categorized in to 3 groups –
1. Security Messages
2. Maintenance Messages and
3. Related Settings.
Both security and maintenance section contain a list of messages with adjacent check-boxes which can be enabled or disabled as per your requirements.
- Security Section
Windows Update – Allows you to view latest available updates for enhancing your computer’s security and performance.
Internet Security Settings – Lists down notifications related to Internet Security. Enabling this option will display security information for the Internet as well as the Local Intranet. You can also set up custom level protection by mentioning the Trusted Sites and Restricted Sites.
Network Firewall – This option is used to show security messages with respect to Firewall protection.
Microsoft Account – If you have a Microsoft account linked to your computer, enabling this option will help you keep track of important security updates released by Microsoft immediately.
Windows Activation – Displays messages related to activation of your Windows operating system.
Spyware and Unwanted Software Protection – Allows you to detect and remove spyware and other malicious installable programs.
User Account Control (UAC) – Helps to prevent unauthorized changes to your computer. It notifies you when changes are being made to your computer that require administrator level privilege.
Virus Protection – Notifies you of any virus related threats.
SmartScreen – Microsoft SmartScreen is an in-built phishing and malware filter implemented in Windows 8. When enabled, it runs system checks to show notifications about potential security risks on the Action Center interface.
- Maintenance Section
Windows Backup – Allows you to view notifications about the stored system recovery images.
Automatic Maintenance – If you have configured any periodic system administration activity, you will be able to view the schedules and updates regarding that.
Drive Status – Keeps you aware of the system disk status and prompts for drive scanning if needed.
Devices Software – Information on device driver software installation, update, rollback etc are available here.
Startup Apps – By enabling this you can keep track of changes made to Startup Applications.
Windows Troubleshooting – If you encounter any system related issues, this section will keep you notified on the troubleshooting procedure.
Homegroup – Displays information about changes made to local, intranet or internet network groups.
File History – Periodically scans the file system for changes and notifies you accordingly.
Storage Spaces – Windows 8 allows you to combine multiple Hard Disk Drives or Solid State Drives into one single storage pool. If enabled, information related to this storage pool gets displayed in the action center.
- Related Settings
Customer Experience Improvement – By enabling this option, you can let your system participate in Microsoft’s Customer Experience Improvement Program.
Problem Reporting – It allows you to configure whether or not system related problems are automatically reported to Microsoft.
Windows Update – If enabled, this option offers you the convenience of automatically updating your Windows 8 operating system whenever a new update is made available by Microsoft.
How to Enable/Disable Action Center Configuration Options
To enable a particular notification, simply tick the appropriate check-box. Once you are done, click on the ‘OK’ button available on the bottom of the page to save the configuration changes.
Similarly, to disable a notification item, just uncheck the respective check-box and click on the ‘OK’ button for the changes to take effect.
Conclusion:
Action Center usage is not just restricted to a standalone Windows desktop, but it is equally effective for carrying out sysadmin activities on a Windows server system as well. For example, if you want to start a blog (or website) on a Windows-based VPS or dedicated server, then the working knowledge of Action Center will certainly help you to review your server’s security and maintenance policy in order to keep the hackers at bay.

Leave a Reply