Windows 10 comes with great credibility and productive features which we need to specialize in tasks. It is also useful for business persons and bloggers as well. Windows 10 provides an excellent platform to deal with any kind of work, online or offline. With laptops comes handy as it is portable and compact, we generally do not shutdown laptops. What we usefully do is closing the laptop lid and putting it to sleep. Later, when we need to work again, it resumes the previous session where you left before. But shutting down Windows 10 is important for its performance and battery enhancement. In this tutorial, I’ll be showing you the different ways to Auto Shutdown Windows 10 PC or Laptop.
How to Auto Shutdown Windows 10 Device
Before getting started, you need to first know why you need to auto shutdown Windows 10. Most people out there don’t prefer shutting down their Windows machine for many reasons. It might be due to slow booting time or they might resume their works again soon or in the worst case, to avoid annoying automatic updates. But you need to shutdown your laptop or PC running on Windows 10 once in a white for better performance and here is why you need to set up auto shutdown in Windows 10 machines.

With Windows 10 auto shutdown trick, you are telling Windows to stop all works and auto shutdown after a particular time. This small little tweak comes handy when you are leaving your PC overnight for long background work or you are one of those who never cares to shutdown the PC or laptop.
1. Windows 10 Auto Shutdown using Run Dialog
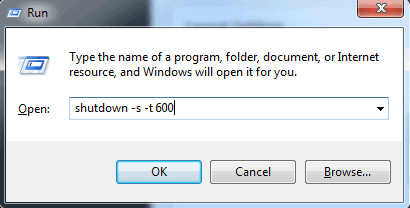
You can easily Auto Shutdown Windows 10 using Run dialog. Follow the steps below to run a simple command in Run box to shutdown Windows 10 automatically after 10 minutes.
- Press Win + R keys simultaneously on your keyword to open the Run dialog.
- Change the directory to
C Drive - Windows - system32using the CD command. - Type the command
shutdown -s -t 600 - Click OK to execute the command.
- Windows 10 will shutdown automatically after 600 seconds (10 minutes).
What does shutdown -s -t 600 mean?
- -s argument represents Shutdown
- -t argument represents Time
- 600 is the time to wait in seconds.
In the above example, we had set the Auto Shutdown in 10 minutes (600 seconds)
2. Auto Shutdown using CMD/PowerShell
Command Prompt (CMD) allow you to do anything with Windows and it is more powerful than you imagine. Many things you are unable to do with GUI can be done at Command Prompt. using simple yet powerful commands. “shutdown” is one of such commands which can auto shutdown Windows.
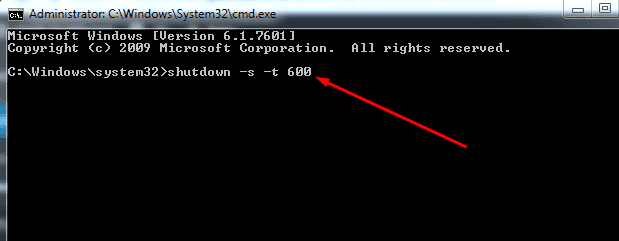
- Open CMD as Administrator.
- Navigate to system32 directory in C drive using
cdcommand. - Type the command
shutdown -s -t 600 - Hit Enter key on your keyword to run the command.
3. Auto Shutdown Windows 10 using Task Scheduler
You can use Windows inbuilt Task Scheduler to Auto Shutdown Windows 10 in just a few clicks. Task Scheduler helps you to execute scripts and functions at some specific interval of time or at any event. It works as a trigger which is executed according to your need. And we will use the same to Auto Shutdown Windows 10 by creating a task.
Follow the steps below to create a shutdown task using Task Scheduler:
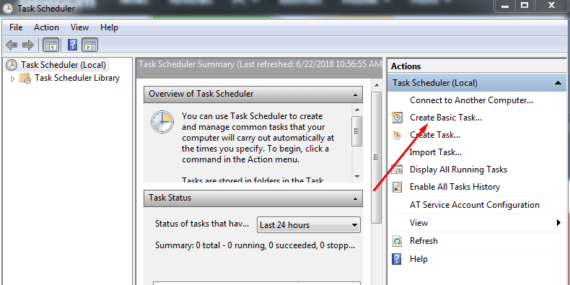
- Open Task Scheduler from the start menu.
- Click on “Create Basic Task” to create a new task and click Next.
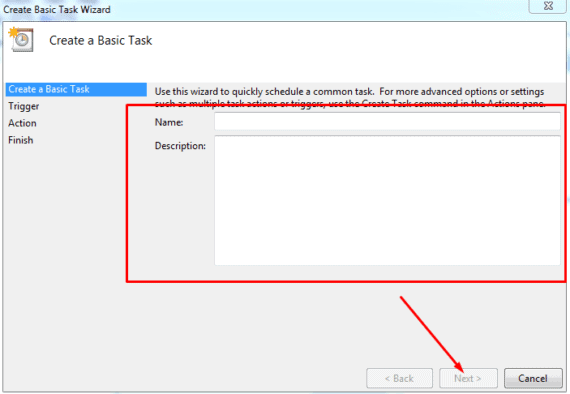
- Enter Name and Description for the task you are creating. This is just for your reference.
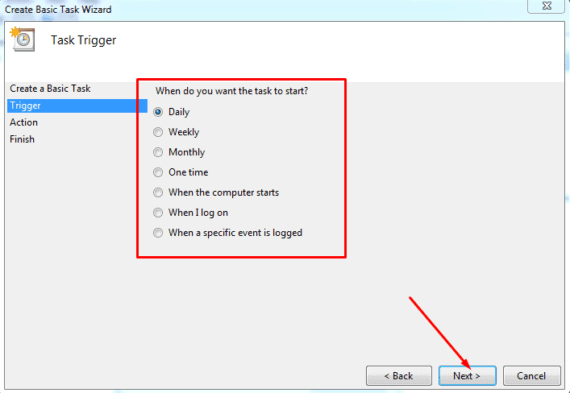
- Choose when to Trigger the task. In this case, I’m selecting “Daily“.
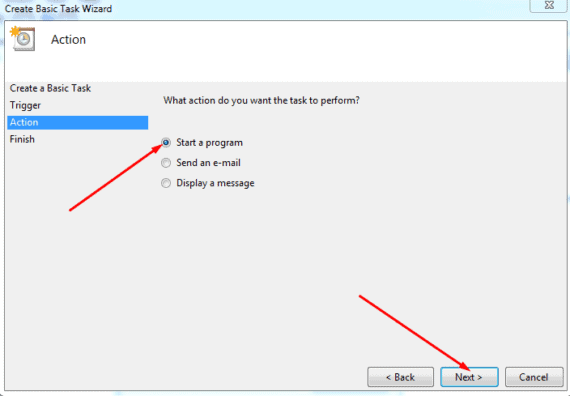
- At Action section, select “Start a program” and click Next.
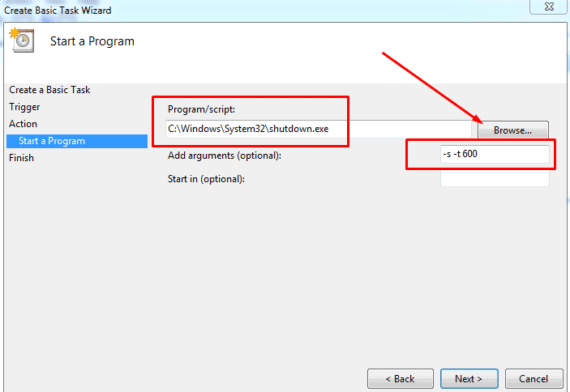
- Browse the shutdown.exe file from “C: Windows System32”.
- Type -s -t 6000 in Arguments box and click Next.
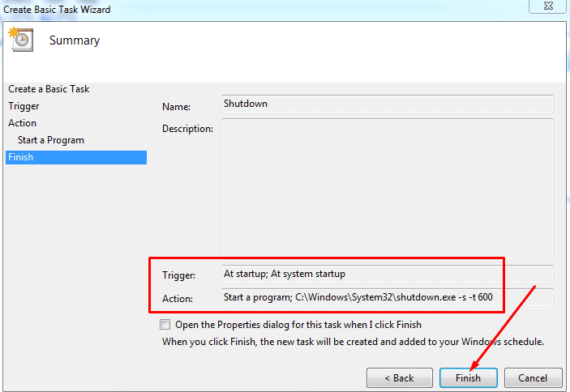
- Click Finish to create the task.
-
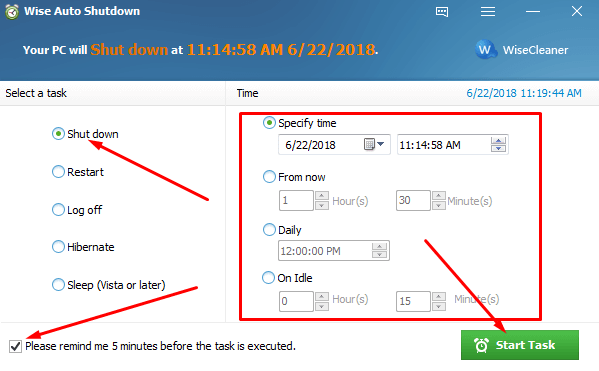
4. Auto Shutdown using Software
There are plenty of options available when it comes to select the best Auto Shutdown software. But, you need to choose the best of all available online. Wise Auto Shutdown is a software which is developed especially to Auto Shutdown Windows.
It is one of the best Auto Shutdown software as it is lightweight, intuitive user interface and very low CPU usage working in the background silently. It not only allows auto shutdown, but it also supports Auto Restart, Auto Sleep, Auto Hibernate, and Auto Log off.
- Download and install Wise Auto Shutdown.
- Double-click the desktop icon to open the software.
- Select Shutdown under Select a task.
- Set the time to auto shutdown your Windows PC or laptop.
5. Using Windows Shutdown Assistant
Windows Shutdown Assistant is another great software to automate tasks in Windows machines. It allows you Auto shut down the computer at the desired time automatically. In addition, it can shut down Windows at particular events like when the system is idle, excessive CPU usage or when the system is running on low battery.
- Open Windows Shutdown Assistant.
- Choose when to trigger the event under “Step 1: Trigger“.
- Select Shut down from the “Action” menu.
- Create the task by clicking on the Start button.
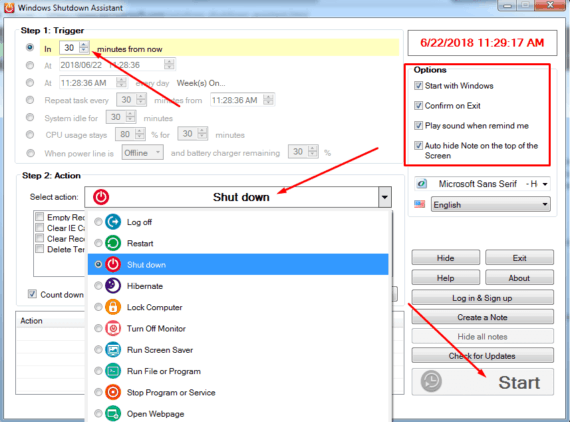
Windows Shutdown Assistant has various other automated tasks like Turn Off screen (Monitor), open a web page, run a program (just like Task Scheduler), Stop program/Service and much more.
Also Read: 15 Best Rainmeter Skins for Windows
Conclusion for Windows Auto Shutdown
There will be plenty of options to auto shutdown Windows 10 laptop or PC and here you have 5 simples methods. If you are a techie, consider running the command in CMD or RUN. If you are not comfortable with commands, make use of third-party software like Wise Auto Shutdown or Windows Shutdown Assistant to auto shutdown Windows 10. For better performance of your machine, you should always shutdown the device when not in use. In the worst case, you need put the device in Hibernate condition. Closing the laptop lid will put it on Sleep mode which is not good for battery in long run. Rebooting the Windows devices frequently will ultimately make the system perform better.
interesting and useful guide.