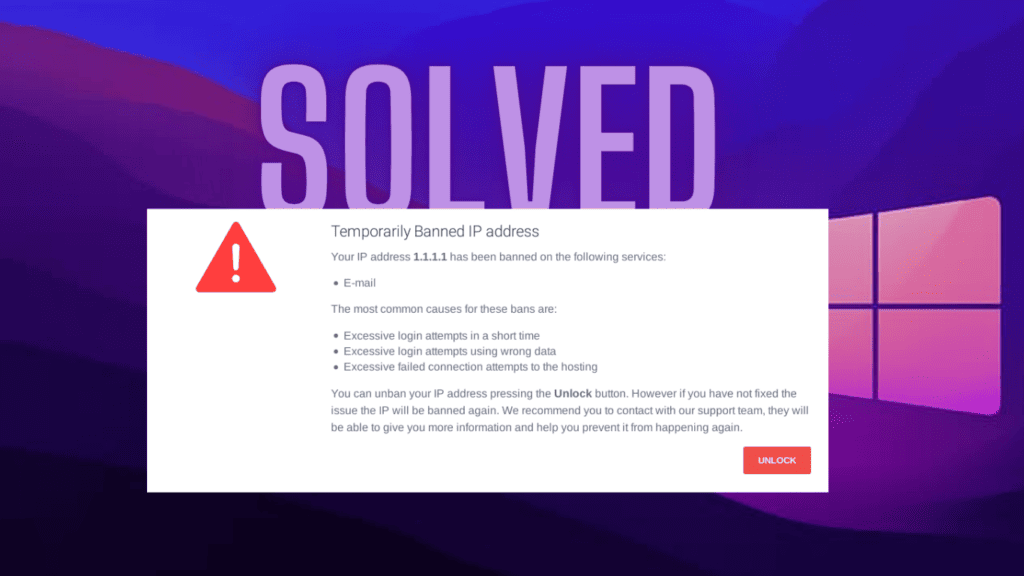
Your IP or Internet Protocol is a tag connected to your computer or network. It serves the purposes of network interface identification and location addressing. It is very uncommon to have this identification blocked; however, there is the rare occasion where you get a notification that reads – Your IP has been temporarily blocked.
You should note that this problem is not limited to a specific device, as Windows, Android, iOS, and Mac users may encounter it.
However, you do not have to go into panic when this happens, as there are a few practical solutions. This guide will show you what to do when your IP address is blocked. We also explain all the causes so that you may avoid a repeat occurrence.
Why Is My IP Address Blocked From One Website?
Repeated failed login attempts are one of the reasons why your IP address is blocked. If you are trying to access a website that requires login, as a security measure, it may lock you out and block your IP address if you input the wrong credentials multiple times.
Some websites will block your IP address if you try accessing it from an IP associated with spam or malware. Also, this is a security measure the site admin may adopt to safeguard against cyber attacks. This restriction will be more evident for IPs previously used to launch a denial-of-service attack.
IPs are sometimes geo-blocked, meaning visiting websites from some locations will be impossible. In most cases, geo-blocking an IP may be done to comply with local laws or regulations.
There are a few less common reasons, like technical errors or insecure connections. The latter is an intentional block by the website because you are trying to view secure material over an insecure network. Regardless of the reasons, try the solutions below.
What Do You Do if Your IP Has Been Temporarily Blocked?
1. Confirm your IP is not Blacklisted
If your IP has been temporarily blocked, it may be a sign that your IP is blacklisted. The common causes of blacklisted IPs are malware activity or denial-of-service attacks. However, even a repeated failed login attempt may blacklist your IP.
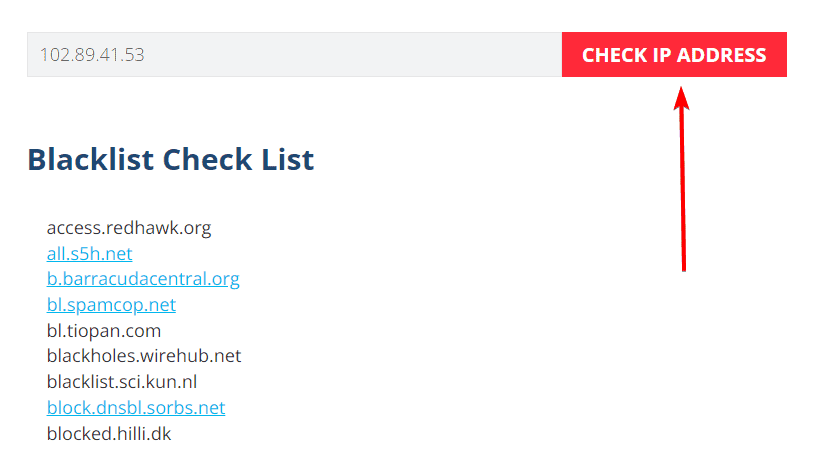
You may check your IP against a known blacklist pool. The easiest way to do so is using the My IP Address site. If, after the check, you are not blacklisted, you may wait it out or proceed to other solutions. Here is how to check your blacklist status.
- Visit the whatismyipaddress.com and it will automatically capture your IP address.
- Click the Check IP Address button.
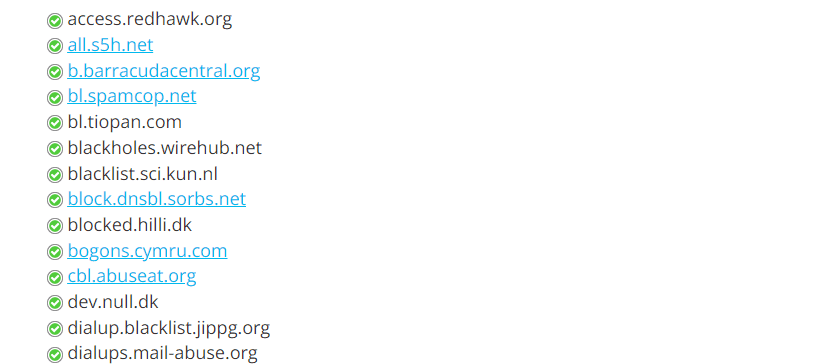
- Go through the list after the check completes; below are the expected results:
- Green Checkmark: IP Not Listed (Good)
- Red Exclamation mark: IP Listed (Bad)
- Blue Question Mark: Blacklist Timeout Error
- Ash Question Mark: Blacklist Offline
2. Wait Out the IP Address Blocking
A temporary block means it has some expiration period. In most cases, you will not need to lift a finger. If your IP has been banned, you may wait for the ban period to elapse.
The waiting period will be different for websites, but generally, it may sometimes go from anywhere between a few minutes to days. For specifics on a ban’s duration, try searching the website’s terms of use.
3. Use a VPN
When your IP has been temporarily blocked, using a VPN is one of the most potent solutions. A VPN will mask your IP address. This means it will be impossible to detect where the connection is coming from with certainty.
VPNs achieve this mask by routing your internet traffic through a server in another location. So, while it does not unblock the IP, it offers the website its server’s IP address, not your real IP address.
There are plenty of VPN services available in the market like Surfshark Virtual Private Network, VeePN, ExpressVPN, NordVPN, etc. You can choose any VPN of your choice depending on your requirements and budget.
4. Scan for Malware
To unblock an IP address, you should verify if you are banned from a single website or every website you visit. If you notice the block is from multiple websites, it is likely a case of malware on your computer, and you should employ a robust antivirus to scan your device. Your computer may have fallen victim to a hack and is sending out spam or DoS attacks.
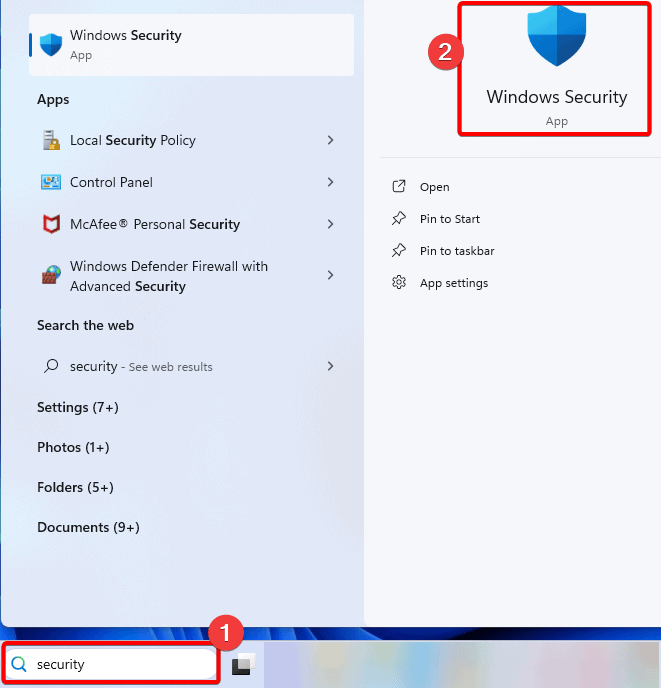
Multiple antivirus options exist, but some operating systems offer built-in tools like the Windows Security app on Windows devices. You may use the following steps to run a scan on Windows:
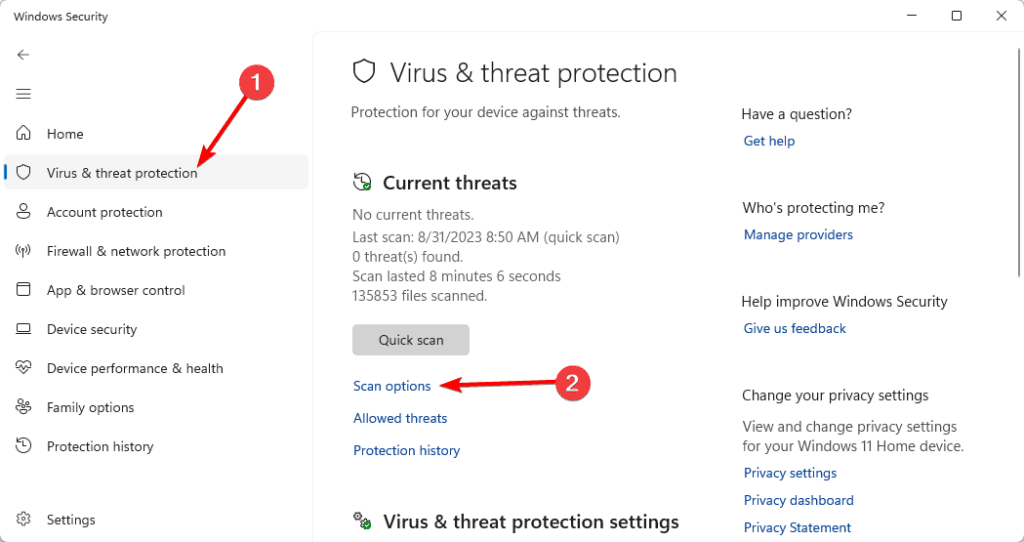
- Click the Taskbar’s magnifying lens, type security, and then select the Windows Security app.
- On the left pane, click Virus & threat protection, then on the right, select Scan options.
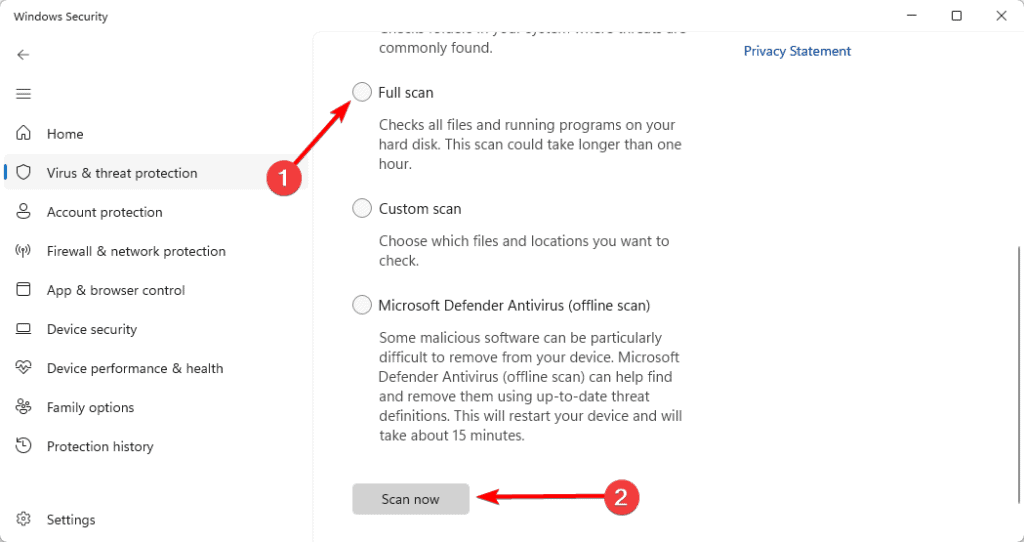
- Pick Full scan from the scan options and click the Scan now button.
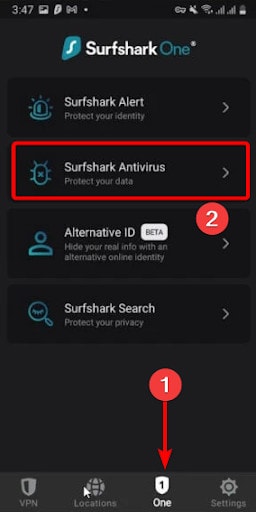
Alternatively, following the steps below, you may use an antivirus tool like SurfShark ONE on a mobile device.
- Launch the SurfShark ONE tool.
- Click the ONE tab and select Surfshark Antivirus.
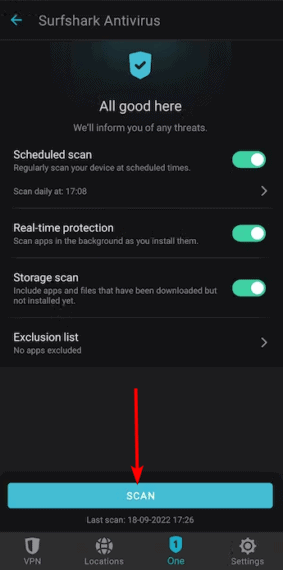
- Click the Scan button and wait for the scan to complete.
5. Change your IP Address
Since your IP has been temporarily blocked, changing it will be handy. Using a VPN, as discussed, may help you acquire a new IP address, but there are also a few other ways you may change your IP.
You may restart your modem. If you do not use a fixed IP, and they are dynamically allotted by your service provided, then at restart, your IP may be allotted to a different user while you get a new one.
Optionally, you may change your service provider. If you use your phone as a modem, you may try a wired connection instead.
6. Flush Your DNS Cache
When your IP has been temporarily blocked, you may need to flush the DNS cache. Flushing the cache will clear all the information stored about your Website’s IP address. Your computer will request a new IP address from the DNS server, which may help fix the error.
You may flush the DNS from the Command Panel or Terminal on Windows, Mac, and Linux. You may also flush the DNS cache on your browser.
Flush the DNS cache using the Command Prompt or Terminal
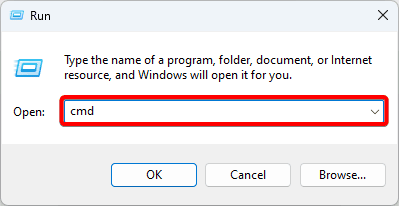
- Open your Command Prompt (Windows) or Terminal (Mac & Linux). On Windows, press Windows + R, type cmd, and hit Ctrl + Shift + Enter.
- Type the command associated with your OS and hit Enter or Return to flush the DNS cache:
- Windows:
ipconfig /flushdns - Mac:
sudo dscacheutil -flushcache - Linux:
sudo /etc/init.d/nscd restart
- Windows:
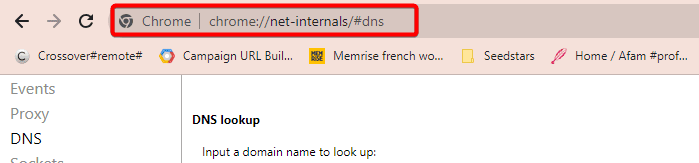
Flush the DNS cache on the Chrome Browser
- Launch the Chrome browser.
- Navigate to the page below using your address bar:
chrome://net-internals/#dns
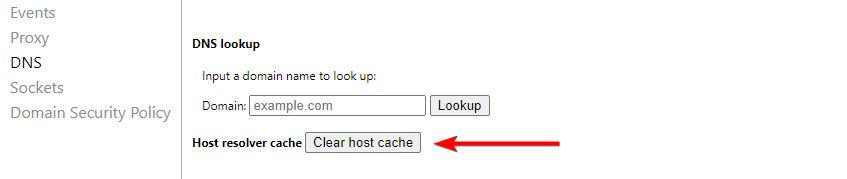
- Click Clear host cache.
7. Contact the Website Admin
Contacting the webmaster is a valid solution if no fix works. However, this solution will only work on smaller websites that actively engage with their users.
The website administrator may offer steps to rectify the situation, manually whitelist your IP address, or explain why your IP address was blocked.
8. Change your DNS Server
When your IP address is blacklisted or blocked, the site’s IP address may still be kept in your computer’s DNS cache. Changing the DNS server forces your computer must request a new IP address, and your computer will use a different DNS server to resolve the web resource’s IP address. On Windows, you may follow the steps below:
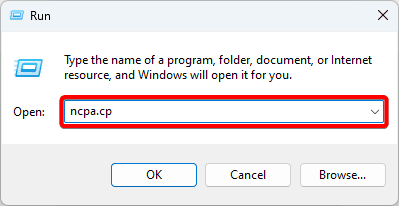
- Press the Windows key + R to open the Run dialog, type
ncpa.cpl, and hit Enter.
- Right-click your internet connection and select Properties from the context menu.
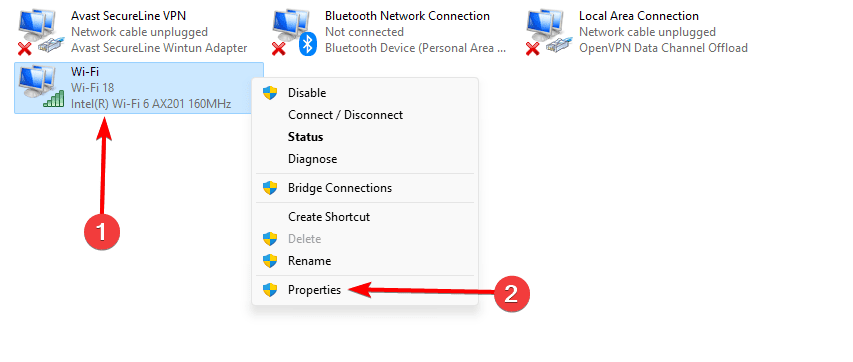
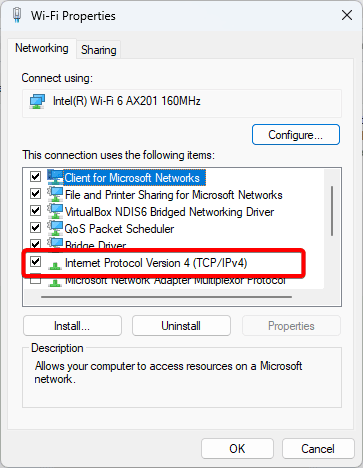
- Double-click Internet Protocol Version 4 (TCP/IP).
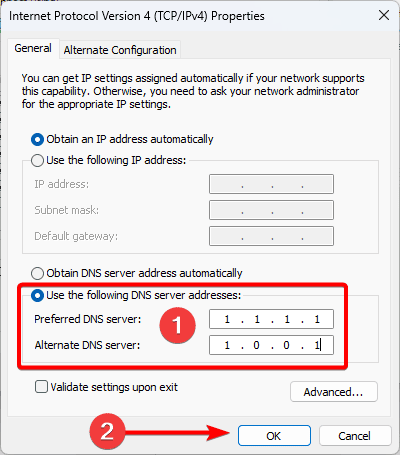
- Pick the Use the following DNS server addresses option and input 1.1.1.1 as the Preferred DNS server, and 1.0.0.1 as the Alternate DNS server, then click OK.
9. Contact Your ISP
After trying the above solutions, contact your Internet Service provider (ISP) if your IP is still blocked. Your internet service provider may have the answers to why you can’t access some sites and show you how to unblock an IP address.
Final Thoughts: Accessing Your Favorite Websites Again
If you have followed the solutions in this guide, you should have successfully been able to access your favorite websites again. Note that the solutions in this guide have not been written in any particular order, and we recommend you try whichever feels the most practical.
However, you should note that this temporal block will resolve automatically for most users. So, patience may be your most valuable fix.
We love hearing from you, so please leave us your comments and tell us what worked.